Introduction to Sticky Chicken Tenders Recipe
Ah, chicken tenders! Just the thought of them brings back memories of family dinners and cozy nights in. I remember the first time I made sticky chicken tenders; it was a rainy Saturday afternoon, and I was craving something comforting yet exciting. The aroma of marinated chicken sizzling in the pan filled my kitchen, wrapping me in a warm embrace. It was a culinary adventure that turned into a family favorite!
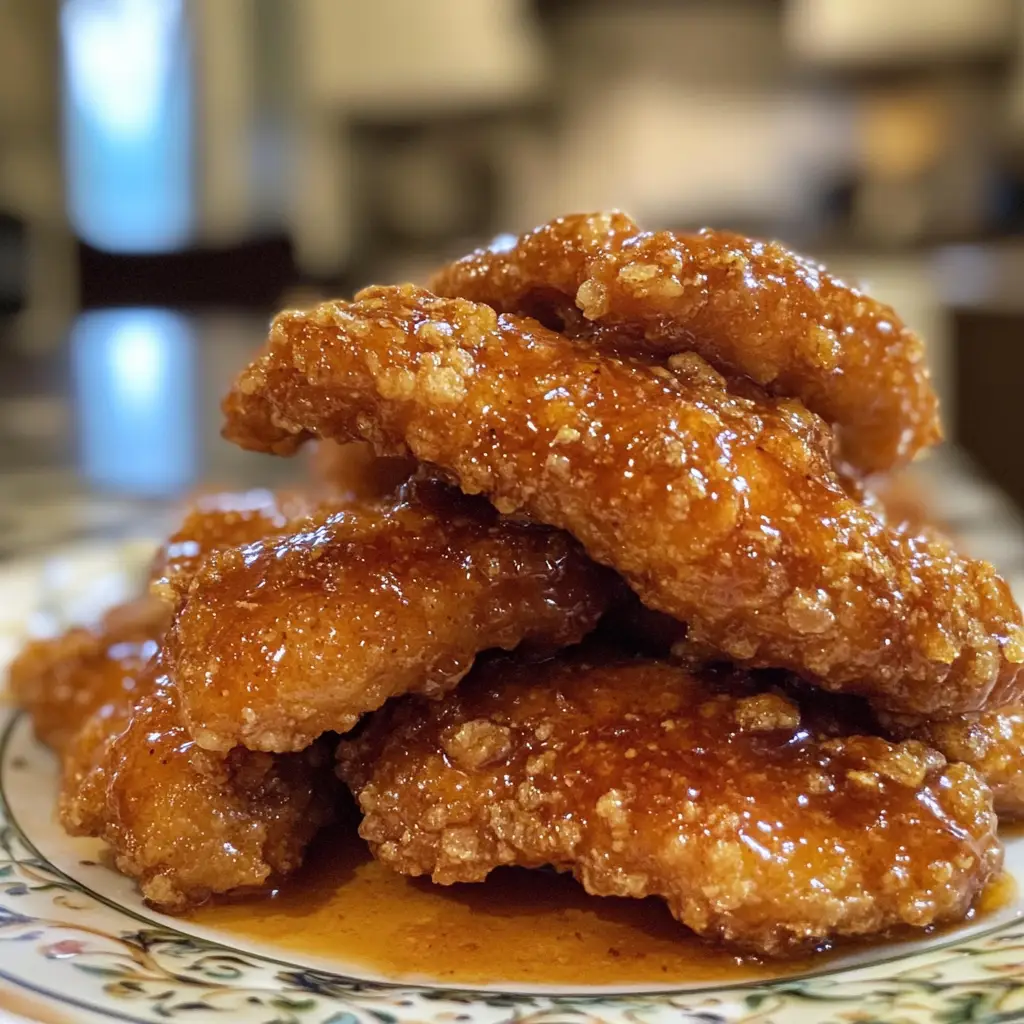
What makes my sticky chicken tenders recipe so special? It’s all about the perfect balance of flavors and textures. The chicken is tender and juicy, coated in a crispy layer that gives way to a sweet and tangy glaze. Each bite is a delightful explosion of taste that dances on your palate. Plus, they’re incredibly easy to whip up, making them perfect for busy weeknights or casual gatherings with friends.
As a passionate home cook, I love sharing recipes that not only satisfy hunger but also create lasting memories. This sticky chicken tenders recipe is one of those dishes that brings everyone together. Whether you’re serving them at a birthday party or enjoying them as a late-night snack, they’re sure to be a hit!
So, roll up your sleeves and get ready to dive into this delicious journey. I promise you, once you try these sticky chicken tenders, they’ll become a staple in your kitchen, just like they are in mine!
Ingredients for Sticky Chicken Tenders Recipe
Before we dive into the cooking process, let’s gather our ingredients! Having everything ready makes the cooking experience smoother and more enjoyable. I always find that when I have my ingredients prepped, it feels like I’m setting the stage for a delicious performance in the kitchen. Here’s what you’ll need for my sticky chicken tenders recipe.
Main Ingredients
- 1 pound of chicken tenders (fresh or thawed)
- 1 cup of buttermilk (for marinating)
- 1 cup of all-purpose flour
- 1 teaspoon of garlic powder
- 1 teaspoon of onion powder
- 1 teaspoon of paprika
- ½ teaspoon of salt
- ½ teaspoon of black pepper
- Vegetable oil (for frying)
When choosing chicken tenders, I always opt for fresh, high-quality meat. It makes a world of difference in flavor and texture. If you can, try to source organic or free-range chicken. It’s not just better for you; it also supports local farmers!
Optional Add-ons
- 1 tablespoon of hot sauce (for a spicy kick)
- 1 tablespoon of honey (for extra sweetness)
- Sesame seeds (for garnish)
- Chopped green onions (for garnish)
These optional add-ons can elevate your sticky chicken tenders to a whole new level! I love adding a splash of hot sauce to the marinade for a little heat. And if you’re feeling adventurous, drizzle some honey over the finished tenders for a sweet twist. The sesame seeds and green onions not only add flavor but also a pop of color that makes the dish visually appealing.
Now that we have our ingredients ready, let’s move on to the fun part—preparing these mouthwatering sticky chicken tenders!
How to Prepare Sticky Chicken Tenders Recipe
Now that we have our ingredients ready, it’s time to roll up our sleeves and get cooking! Preparing sticky chicken tenders is a delightful process that fills your kitchen with mouthwatering aromas. I can almost hear the sizzle of the chicken as I write this! Let’s dive into the steps to create these delicious tenders.
Step 1: Marinate the Chicken
First things first, we need to marinate our chicken tenders. This step is crucial for infusing flavor and ensuring the chicken stays juicy. In a bowl, combine the chicken tenders and buttermilk. Make sure each piece is well-coated. Cover the bowl and let it marinate in the fridge for at least 30 minutes, or even overnight if you have the time.
Tips for Marinating
- For extra flavor, add your favorite spices or herbs to the buttermilk.
- Don’t skip the marinating step! It’s what makes the chicken tender and flavorful.
- If you’re short on time, even a quick 15-minute soak can make a difference.
Step 2: Prepare the Coating
While the chicken is marinating, let’s prepare the coating. In a shallow dish, mix together the flour, garlic powder, onion powder, paprika, salt, and black pepper. This blend creates a flavorful crust that will make your chicken tenders irresistible!
Tips for Coating
- For a crunchier texture, you can add breadcrumbs to the flour mixture.
- Make sure to season the flour well; it’s where a lot of the flavor comes from!
- Set up a station with the marinated chicken and the flour mixture to make coating easier.
Step 3: Frying the Chicken Tenders
Now comes the fun part—frying! Heat about an inch of vegetable oil in a large skillet over medium-high heat. Once the oil is hot (you can test it by dropping a small piece of bread in; it should sizzle), it’s time to fry the chicken. Take each marinated tender, coat it in the flour mixture, and gently place it in the hot oil.
Tips for Frying
- Don’t overcrowd the pan; fry in batches if necessary to keep the temperature consistent.
- Fry each tender for about 4-5 minutes on each side, or until golden brown.
- Use a slotted spoon to remove the tenders and place them on a paper towel-lined plate to drain excess oil.
Step 4: Making the Sticky Sauce
While the chicken is frying, let’s whip up the sticky sauce! In a small saucepan, combine your choice of honey, soy sauce, and a splash of vinegar. Heat it over medium heat, stirring until it’s well combined and slightly thickened. This sauce is what gives the tenders their signature sticky goodness!
Tips for Sauce Consistency
- If you prefer a thicker sauce, let it simmer a bit longer until it reduces to your desired consistency.
- Feel free to add a pinch of red pepper flakes for a spicy kick!
- Taste the sauce as you go; adjust the sweetness or saltiness to your liking.
Step 5: Glazing the Chicken Tenders
Once your chicken tenders are fried and the sauce is ready, it’s time to glaze! In a large bowl, toss the hot chicken tenders with the sticky sauce until they are well coated. This step is where the magic happens, transforming ordinary chicken into a sticky, flavorful delight!
Tips for Glazing
- For an extra touch, sprinkle sesame seeds and chopped green onions on top after glazing.
- Serve immediately for the best texture; the longer they sit, the less crispy they become.
- Don’t be shy with the sauce; the more, the merrier!
And there you have it! Your sticky chicken tenders are ready to be devoured. I can already picture the smiles on my family’s faces as they take that first bite. Let’s move on to the next section, where we’ll discuss the equipment you’ll need for this delightful recipe!
Equipment Needed for Sticky Chicken Tenders Recipe
Before we dive into the cooking, let’s make sure we have all the right tools at our fingertips. Having the right equipment can make the cooking process smoother and more enjoyable. Here’s a quick list of what you’ll need for my sticky chicken tenders recipe:
- Large Skillet: A heavy-bottomed skillet is ideal for frying. If you don’t have one, a deep fryer works great too!
- Mixing Bowls: You’ll need a couple of bowls—one for marinating the chicken and another for mixing the coating.
- Measuring Cups and Spoons: Accurate measurements are key to achieving the perfect flavor balance.
- Slotted Spoon: This handy tool helps you lift the chicken tenders out of the hot oil without the excess grease.
- Paper Towels: Use these to drain the fried chicken tenders and keep them crispy.
- Small Saucepan: This is for making the sticky sauce. A non-stick pan works wonders here!
If you don’t have a large skillet, don’t fret! You can use a regular frying pan or even a wok if that’s what you have on hand. The key is to ensure the oil is deep enough to fry the tenders evenly. With the right equipment, you’ll be well on your way to creating those delicious sticky chicken tenders!
Variations of Sticky Chicken Tenders Recipe
As much as I adore my classic sticky chicken tenders, there’s something exciting about experimenting with variations! Each twist brings a new flavor profile that can surprise and delight your taste buds. Here are a few fun ideas to switch things up:
- Buffalo Sticky Chicken Tenders: Add a few tablespoons of your favorite buffalo sauce to the sticky sauce for a spicy kick. The heat combined with the sweetness creates a mouthwatering contrast!
- Asian-Inspired Tenders: Swap out the honey for hoisin sauce and add a splash of sesame oil to the marinade. Garnish with chopped cilantro for a fresh touch.
- BBQ Sticky Chicken Tenders: Mix your favorite barbecue sauce into the sticky sauce for a smoky flavor. This variation is perfect for summer cookouts!
- Herb-Infused Tenders: Add fresh herbs like rosemary or thyme to the buttermilk marinade. The herbs will infuse the chicken with a fragrant aroma that’s simply irresistible.
These variations not only keep things interesting but also allow you to cater to different tastes and preferences. I love how a simple change can transform the dish into something new and exciting. So, don’t hesitate to get creative and make these sticky chicken tenders your own!
Cooking Notes for Sticky Chicken Tenders Recipe
As I’ve learned through my culinary adventures, a few cooking notes can make all the difference in achieving the perfect sticky chicken tenders. Here are some tips that I always keep in mind when whipping up this delightful dish:
- Temperature Matters: Ensure your oil is hot enough before frying. If it’s too cool, the chicken will absorb excess oil and become greasy. A good rule of thumb is to maintain a temperature of around 350°F (175°C).
- Resting Time: After frying, let the chicken tenders rest for a few minutes before glazing. This allows the juices to redistribute, keeping them moist and tender.
- Batch Cooking: If you’re making a larger batch, consider keeping the cooked tenders warm in a low oven (around 200°F or 93°C) while you finish frying the rest. This way, they’ll all be hot and ready to serve at the same time!
- Storage Tips: Leftover sticky chicken tenders can be stored in an airtight container in the fridge for up to three days. Reheat them in the oven to maintain their crispiness.
- Experiment with Flavors: Don’t hesitate to adjust the seasoning in the coating or the sticky sauce to suit your taste. Cooking is all about personal expression, and I love adding my own twist!
These cooking notes have helped me refine my technique over the years, and I hope they do the same for you. With a little attention to detail, your sticky chicken tenders will turn out perfectly every time!
Serving Suggestions for Sticky Chicken Tenders Recipe
Now that your sticky chicken tenders are ready, it’s time to think about how to serve them! Presentation can elevate your dish from simple to spectacular, and I love getting creative with my serving ideas. Here are some of my favorite ways to enjoy these delicious tenders:
- Classic Dipping Sauces: Serve your sticky chicken tenders with a variety of dipping sauces like ranch, honey mustard, or barbecue sauce. It adds an interactive element to the meal, and everyone can customize their experience!
- On a Bed of Greens: For a lighter option, place the tenders on a bed of mixed greens or coleslaw. Drizzle with a tangy vinaigrette for a refreshing contrast to the sticky sweetness.
- In a Wrap: Wrap the tenders in a tortilla with fresh veggies, avocado, and a drizzle of sauce for a delicious handheld meal. It’s perfect for lunch or a casual dinner!
- With Rice or Noodles: Serve the sticky chicken tenders over a bed of steamed rice or noodles. The sticky sauce will soak into the grains, creating a flavorful dish that’s hard to resist.
- As Party Appetizers: Cut the tenders into bite-sized pieces and serve them on skewers or toothpicks. They make for fantastic finger food at parties or gatherings!
These serving suggestions not only enhance the dining experience but also allow you to showcase your sticky chicken tenders in fun and creative ways. I can’t wait for you to try them out and see which presentation becomes your favorite! Now, let’s move on to some tips for perfecting your sticky chicken tenders recipe.
Tips for Perfect Sticky Chicken Tenders Recipe
As a passionate home cook, I’ve learned that a few simple tips can elevate your sticky chicken tenders from good to absolutely unforgettable. Here are my top suggestions to ensure your tenders turn out perfectly every time:
- Use Fresh Ingredients: Fresh chicken and high-quality spices make a world of difference. I always choose organic chicken when possible, as it enhances the flavor and texture.
- Don’t Rush the Marinating: The longer you marinate, the more flavorful your chicken will be. If you can, let it sit overnight. Trust me, it’s worth the wait!
- Maintain Oil Temperature: Keep an eye on the oil temperature while frying. If it drops too low, the chicken will absorb oil and become greasy. A thermometer can be a handy tool here!
- Coat Generously: Make sure each chicken tender is well-coated in the flour mixture. A thick coating leads to a crunchier texture, which I absolutely love!
- Glaze While Hot: Toss the chicken in the sticky sauce immediately after frying. The heat helps the sauce cling better, creating that irresistible sticky finish.
By following these tips, you’ll be well on your way to creating sticky chicken tenders that are not only delicious but also memorable. I can’t wait for you to share these with your family and friends—they’re sure to be a hit!
Breakdown of Time for Sticky Chicken Tenders Recipe
Time is of the essence in the kitchen, and I always find it helpful to have a clear breakdown of how long each step will take. This way, I can plan my cooking session and ensure everything runs smoothly. Here’s a quick overview of the time you’ll need for my sticky chicken tenders recipe:
- Prep Time: 10 minutes (This includes gathering your ingredients and preparing the marinade and coating.)
- Marinating Time: 30 minutes to overnight (The longer, the better! But if you’re in a hurry, even a quick 30 minutes will do wonders.)
- Cooking Time: 20 minutes (This covers frying the chicken tenders and making the sticky sauce.)
- Total Time: 1 hour (This includes prep, marinating, and cooking time. If you marinate overnight, you can enjoy these tenders the next day with minimal effort!)
Having this time breakdown helps me stay organized and ensures that I can enjoy the cooking process without feeling rushed. Plus, it’s always nice to know exactly what to expect when I’m whipping up a delicious meal. Now that we have our timing sorted, let’s move on to the nutritional information for these tasty sticky chicken tenders!
Nutritional Information for Sticky Chicken Tenders Recipe
As a passionate home cook, I believe it’s important to know what we’re putting into our bodies, especially when it comes to delicious recipes like sticky chicken tenders. While these tenders are a treat, they can also fit into a balanced diet when enjoyed in moderation. Here’s a quick breakdown of the nutritional information for one serving (approximately 4 tenders) of my sticky chicken tenders recipe:
- Calories: 350
- Protein: 25g
- Fat: 15g
- Carbohydrates: 30g
- Sugar: 5g
- Sodium: 600mg
Keep in mind that these values can vary based on the specific ingredients you use and any optional add-ons you choose to include. For instance, if you opt for a lighter frying oil or skip the honey in the sauce, you can reduce the calorie count. I always encourage my fellow cooks to customize recipes to fit their dietary needs and preferences.
Enjoying sticky chicken tenders as part of a balanced meal can be a delightful experience. Pair them with a side of fresh veggies or a light salad to create a well-rounded dish that satisfies both your taste buds and your nutritional goals. Now, let’s move on to some frequently asked questions about this scrumptious recipe!
Frequently Asked Questions about Sticky Chicken Tenders Recipe
As I’ve shared my sticky chicken tenders recipe with friends and family, I’ve noticed a few common questions pop up. It’s always great to clarify any doubts and help fellow home cooks feel confident in the kitchen. Here are some frequently asked questions about this delicious dish:
Can I use chicken breasts instead of chicken tenders?
Absolutely! If you have chicken breasts on hand, you can cut them into strips to create your own chicken tenders. Just remember that cooking times may vary slightly, so keep an eye on them to ensure they’re cooked through.
How can I make these chicken tenders healthier?
There are several ways to lighten up this recipe! You can bake the chicken tenders instead of frying them. Simply coat them as directed, place them on a baking sheet, and bake at 400°F (200°C) for about 20-25 minutes, flipping halfway through. You can also use whole wheat flour or almond flour for a healthier coating.
What can I serve with sticky chicken tenders?
These tenders are incredibly versatile! You can serve them with a variety of sides like coleslaw, steamed vegetables, or a fresh salad. They also pair wonderfully with rice or noodles, making for a complete meal. Don’t forget about those dipping sauces for an extra flavor boost!
Can I make the sticky sauce ahead of time?
Yes, you can! The sticky sauce can be made in advance and stored in the refrigerator for up to a week. Just give it a good stir before using it to ensure everything is well combined. This makes meal prep a breeze!
How do I store leftovers?
If you have any leftover sticky chicken tenders, store them in an airtight container in the fridge for up to three days. To reheat, pop them in the oven at 350°F (175°C) for about 10-15 minutes to maintain their crispiness. You can also microwave them, but they may lose some of that delightful crunch.
These FAQs should help clear up any uncertainties you might have about making sticky chicken tenders. Cooking is all about experimenting and having fun, so don’t hesitate to ask questions and make this recipe your own. Now, let’s wrap things up with a conclusion on why this sticky chicken tenders recipe is a must-try!
Conclusion on Sticky Chicken Tenders Recipe
In conclusion, my sticky chicken tenders recipe is more than just a meal; it’s an experience that brings joy and comfort to the table. The combination of tender chicken, a crispy coating, and a sweet, sticky glaze creates a dish that’s hard to resist. Whether you’re cooking for family, friends, or just treating yourself, these tenders are sure to impress.
What I love most about this recipe is its versatility. You can easily customize it to suit your taste, whether you prefer a spicy kick or a sweet twist. Plus, the cooking process is straightforward, making it accessible for cooks of all skill levels. With just a few simple ingredients and steps, you can create a dish that feels special and indulgent.
So, gather your ingredients, roll up your sleeves, and embark on this delicious culinary adventure. I promise that once you try these sticky chicken tenders, they’ll become a beloved staple in your kitchen, just as they have in mine. Happy cooking!


