Introduction to Peruvian Grilled Chicken Recipe
As a passionate home cook, I often find myself on culinary adventures that take me to far-off places, all from the comfort of my kitchen. One of my favorite journeys is to the vibrant streets of Peru, where the aroma of grilled chicken fills the air, mingling with the sounds of laughter and music. The Peruvian Grilled Chicken Recipe, or “Pollo a la Brasa,” is a dish that captures the heart and soul of this beautiful country. It’s not just a meal; it’s an experience that brings people together.
What I love most about this recipe is its simplicity and the explosion of flavors that come from a few key ingredients. The marinade, a delightful blend of spices, garlic, and citrus, transforms ordinary chicken into something extraordinary. I remember the first time I tried this dish at a local Peruvian restaurant. The chicken was juicy, smoky, and bursting with flavor. I knew I had to recreate it at home!
In this article, I’ll share my version of the Peruvian Grilled Chicken Recipe, complete with tips and tricks that I’ve picked up along the way. Whether you’re planning a summer barbecue or a cozy family dinner, this recipe is sure to impress. So, roll up your sleeves, and let’s embark on this delicious journey together!
Ingredients for Peruvian Grilled Chicken Recipe
Before we dive into the cooking process, let’s gather our ingredients. I believe that great meals start with quality ingredients, so I always recommend sourcing the freshest items you can find. Here’s what you’ll need for the Peruvian Grilled Chicken Recipe:
Main Ingredients
- 4 chicken thighs (bone-in, skin-on for extra flavor)
- 4 chicken drumsticks
- 1/4 cup olive oil
- 1/4 cup fresh lime juice (about 2 limes)
- 4 cloves garlic, minced
- 1 tablespoon paprika (smoked paprika adds a nice touch)
- 1 tablespoon ground cumin
- 1 tablespoon dried oregano
- 1 teaspoon black pepper
- 1 teaspoon salt (or to taste)
- 1 teaspoon cayenne pepper (optional, for a spicy kick)
When selecting your chicken, I always opt for organic or free-range if possible. The flavor is richer, and it feels good to support sustainable farming practices. Fresh limes are a must; their zesty juice brightens the dish and balances the spices beautifully.
Optional Add-ons
- Fresh cilantro, chopped (for garnish)
- Peruvian yellow pepper sauce (Aji Amarillo) for an authentic touch
- Grilled vegetables (like bell peppers and zucchini) as a side
- Rice or potatoes for serving
These optional add-ons can elevate your meal even further. I love to sprinkle fresh cilantro on top just before serving; it adds a pop of color and freshness. If you’re feeling adventurous, try pairing the chicken with Aji Amarillo sauce. It’s a delightful way to bring a taste of Peru right to your table!
How to Prepare Peruvian Grilled Chicken Recipe
Now that we have our ingredients ready, it’s time to roll up our sleeves and get cooking! The process of making Peruvian Grilled Chicken is as exciting as the flavors it brings. I’ll guide you through each step, sharing my personal tips to ensure your chicken turns out juicy and flavorful. Let’s dive in!
Step 1: Marinating the Chicken
The first step in our culinary adventure is marinating the chicken. This is where the magic begins! The marinade is what infuses the chicken with all those delicious flavors. In a large bowl, combine the olive oil, lime juice, minced garlic, paprika, cumin, oregano, black pepper, salt, and cayenne pepper. Mix it all together until it’s well blended.
Next, add the chicken pieces to the marinade, making sure they are fully coated. I like to use my hands for this part; it’s messy but fun! Cover the bowl with plastic wrap and let it marinate in the refrigerator for at least 2 hours, or even overnight if you have the time. The longer, the better!
Tips for Marinating
- For maximum flavor, marinate the chicken overnight. It allows the spices to penetrate deeply.
- Don’t skip the lime juice! It not only adds flavor but also helps tenderize the chicken.
- If you’re short on time, even 30 minutes of marinating will still give you tasty results.
Step 2: Preparing the Grill
While the chicken is soaking up all those wonderful flavors, it’s time to prepare the grill. I prefer using a charcoal grill for that smoky flavor, but a gas grill works just as well. If you’re using charcoal, light it up and let it burn until the coals are covered with white ash. This usually takes about 20-30 minutes.
Once your grill is ready, brush the grates with oil to prevent sticking. This little step makes a big difference! You want your chicken to have those beautiful grill marks without tearing apart when you flip it.
Tips for Grill Preparation
- Make sure your grill is preheated to medium-high heat. This helps achieve that perfect sear.
- Keep a spray bottle of water nearby to manage any flare-ups from the grill.
- If you’re using a gas grill, turn on all burners to get an even heat distribution.
Step 3: Grilling the Chicken
Now comes the exciting part—grilling the chicken! Place the marinated chicken pieces on the grill, skin side down. I can already smell the deliciousness! Grill the chicken for about 6-8 minutes on each side, or until the internal temperature reaches 165°F (75°C). The skin should be crispy and golden brown.
As you grill, resist the urge to flip the chicken too often. Let it sit for a few minutes on each side to develop that lovely char. If you have any leftover marinade, you can brush it on the chicken while it cooks for an extra flavor boost.
Tips for Perfect Grilling
- Use tongs to flip the chicken instead of a fork. This keeps the juices inside!
- For added flavor, consider adding wood chips to the grill for a smoky aroma.
- Keep an eye on the chicken to avoid overcooking; it can dry out quickly.
Step 4: Resting the Chicken
Once your chicken is perfectly grilled, it’s time to let it rest. This step is crucial! Transfer the chicken to a plate and cover it loosely with aluminum foil. Let it rest for about 10 minutes. This allows the juices to redistribute, making the chicken even juicier when you cut into it.
Importance of Resting
- Resting helps keep the chicken moist and flavorful.
- It allows the temperature to even out, making it safer to eat.
- Use this time to prepare any sides or sauces you want to serve with your chicken!
And there you have it! Your Peruvian Grilled Chicken is ready to be served. I can’t wait for you to taste the fruits of your labor. It’s a dish that’s sure to impress family and friends alike!
Equipment Needed for Peruvian Grilled Chicken Recipe
Before we fire up the grill, let’s make sure we have all the right tools at our fingertips. Having the right equipment can make a world of difference in your cooking experience. Here’s what you’ll need for the Peruvian Grilled Chicken Recipe:
- Grill: A charcoal or gas grill works perfectly. If you don’t have a grill, you can use a grill pan on the stovetop or even bake the chicken in the oven at a high temperature.
- Mixing Bowl: A large bowl for marinating the chicken. I love using glass or stainless steel for easy cleanup.
- Meat Thermometer: This handy tool ensures your chicken is cooked to perfection. It takes the guesswork out of grilling!
- Tongs: A good pair of tongs is essential for flipping the chicken without piercing the skin.
- Brush: A basting brush for applying any leftover marinade while grilling. It adds an extra layer of flavor!
- Aluminum Foil: Use this to cover the chicken while it rests, keeping it warm and juicy.
If you’re missing any of these items, don’t fret! You can always improvise. For instance, a baking sheet can substitute for a grill pan, and a fork can work in place of tongs in a pinch. The key is to get creative and enjoy the process!
Variations of Peruvian Grilled Chicken Recipe
As I’ve explored the world of Peruvian cuisine, I’ve discovered that there are so many delightful variations of the classic grilled chicken recipe. Each twist brings its own unique flair, making it fun to experiment in the kitchen. Here are a few variations that I absolutely love:
- Herb-Infused Marinade: Instead of the traditional spices, try adding fresh herbs like rosemary or thyme to the marinade. The aroma that fills your kitchen will be heavenly!
- Spicy Peruvian Twist: For those who crave heat, add more cayenne pepper or even some chopped jalapeños to the marinade. It’s a fiery way to kick things up a notch!
- Beer Marinade: Swap out the lime juice for a light beer. The carbonation helps tenderize the chicken while adding a subtle flavor that’s simply irresistible.
- Grilled Chicken Skewers: Cut the chicken into bite-sized pieces and thread them onto skewers. This makes for a fun appetizer or party dish, perfect for sharing with friends!
These variations not only keep things exciting but also allow you to tailor the dish to your taste preferences. I love how cooking can be a canvas for creativity, and with each variation, you can create a new culinary masterpiece!
Cooking Notes for Peruvian Grilled Chicken Recipe
As I’ve cooked this Peruvian Grilled Chicken Recipe time and time again, I’ve gathered a few essential cooking notes that can help elevate your dish. These little nuggets of wisdom can make a big difference in your cooking experience!
- Chicken Quality: Always choose high-quality chicken. Organic or free-range options not only taste better but also contribute to a more ethical cooking practice.
- Marinating Time: If you can, let the chicken marinate overnight. This allows the flavors to deepen and the chicken to become incredibly tender.
- Grill Temperature: Keep an eye on your grill temperature. Too hot, and the outside will char before the inside cooks through. Too cool, and you’ll miss out on that beautiful sear.
- Leftover Marinade: If you have leftover marinade, you can use it as a basting sauce while grilling. Just make sure to cook it thoroughly to eliminate any raw chicken juices.
- Resting Time: Don’t rush the resting period! It’s crucial for juicy chicken. Use this time to prepare your sides or set the table.
These cooking notes are like little secrets I’ve learned along my culinary journey. They help ensure that every time I make this dish, it’s just as delicious as the last. Happy cooking!
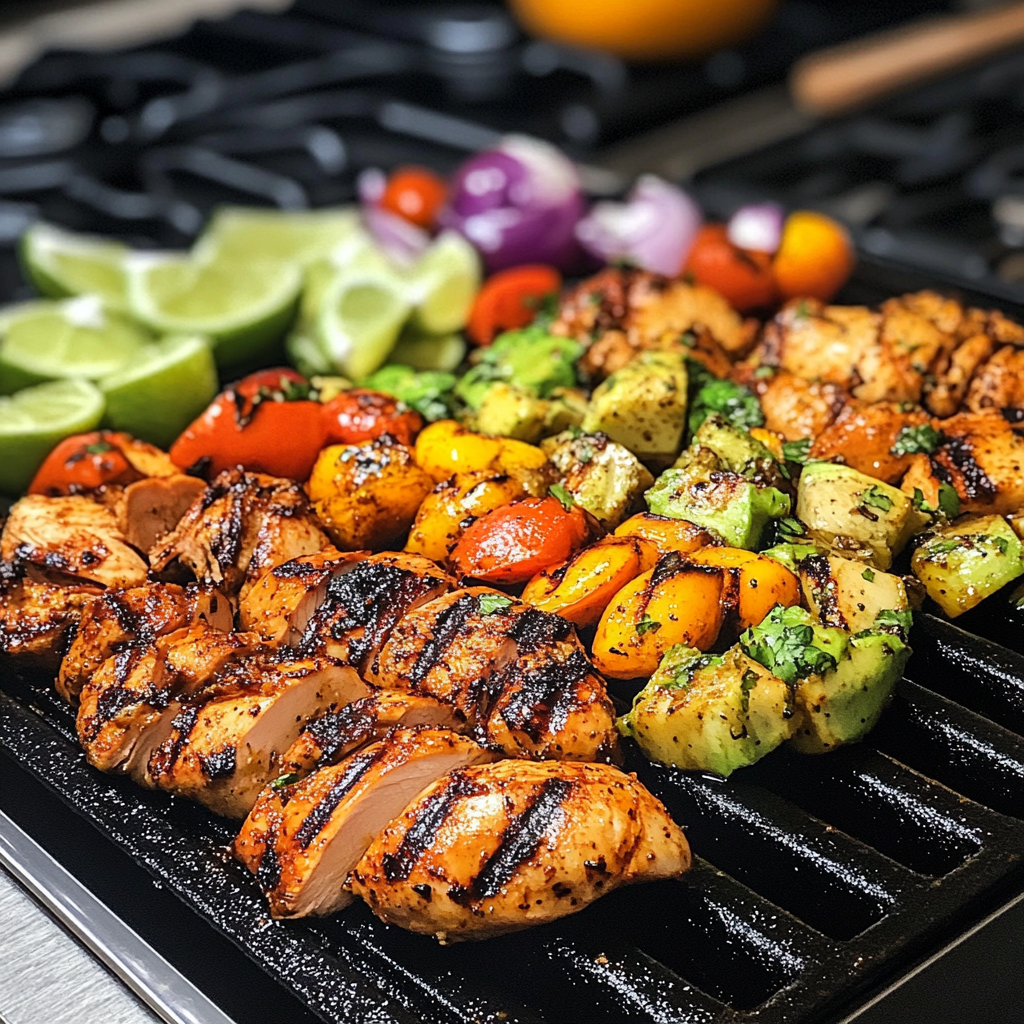
Serving Suggestions for Peruvian Grilled Chicken Recipe
Now that your Peruvian Grilled Chicken is ready, it’s time to think about how to serve it! Presentation can elevate your meal from delicious to extraordinary. I love to create a vibrant plate that reflects the colorful spirit of Peru. Here are some of my favorite serving suggestions:
- Accompany with Rice: Serve the chicken over a bed of fluffy white rice or seasoned cilantro-lime rice. The rice soaks up the juices beautifully, making every bite a delight.
- Grilled Vegetables: Add a side of grilled vegetables like bell peppers, zucchini, or corn on the cob. Their smoky flavor complements the chicken perfectly.
- Fresh Salad: A light salad with mixed greens, avocado, and a zesty lime vinaigrette adds a refreshing contrast to the rich flavors of the chicken.
- Peruvian Sides: Consider serving with traditional sides like Peruvian potato salad or aji de gallina for an authentic touch.
- Garnish with Herbs: Don’t forget to sprinkle fresh cilantro or parsley on top for a pop of color and freshness. It’s the finishing touch that makes the dish shine!
These serving suggestions not only enhance the meal but also create a feast for the eyes. I love to gather my family and friends around the table, sharing stories and laughter as we enjoy this delicious dish together. It’s all about creating memories, one bite at a time!
Tips for Making the Best Peruvian Grilled Chicken Recipe
As I’ve perfected my Peruvian Grilled Chicken Recipe over the years, I’ve gathered a treasure trove of tips that can help you achieve the best results. These little nuggets of wisdom can make a world of difference in your cooking journey. Here are my top tips to ensure your chicken turns out absolutely delicious:
- Use Fresh Ingredients: Fresh herbs, spices, and citrus make a significant impact on flavor. Whenever possible, opt for fresh over dried.
- Don’t Rush the Marinade: Allowing the chicken to marinate for longer enhances the flavor. If you can, aim for at least 4 hours or overnight.
- Check the Temperature: Invest in a meat thermometer. It’s the best way to ensure your chicken is cooked perfectly without drying it out.
- Experiment with Flavors: Feel free to tweak the marinade to suit your taste. Add your favorite spices or herbs to make it your own!
- Let It Rest: Always let the chicken rest after grilling. This step is crucial for juicy, tender meat.
These tips have helped me create a dish that not only tastes amazing but also brings joy to my family and friends. Cooking is all about sharing love and flavor, and I can’t wait for you to experience the magic of this Peruvian Grilled Chicken Recipe!
Breakdown of Time for Peruvian Grilled Chicken Recipe
As a home cook, I know that time management is key to a successful meal. When it comes to the Peruvian Grilled Chicken Recipe, understanding the time involved can help you plan your cooking adventure better. Here’s a quick breakdown of the time you’ll need:
- Prep Time: 15 minutes. This includes gathering your ingredients, marinating the chicken, and preparing the grill.
- Marinating Time: 2 hours (or longer, if you can!). This step is essential for infusing flavor into the chicken.
- Cooking Time: 20 minutes. This is the time spent grilling the chicken to perfection.
- Total Time: Approximately 2 hours and 35 minutes (including marinating time). If you choose to marinate overnight, you can easily prep the chicken the day before!
By breaking it down this way, you can see that while the marinating time may seem long, most of it is hands-off. You can use that time to prepare sides or simply relax. I love to set the table or whip up a refreshing salad while the chicken is soaking up all those delicious flavors. Happy cooking!
Nutritional Information for Peruvian Grilled Chicken Recipe
As a passionate home cook, I always find it important to know what goes into the meals I prepare. The Peruvian Grilled Chicken Recipe is not only delicious but also packed with nutrients. Here’s a quick look at the nutritional information for a serving of this flavorful dish:
- Calories: Approximately 350 calories
- Protein: 30 grams
- Fat: 20 grams (includes healthy fats from olive oil)
- Carbohydrates: 5 grams
- Sodium: 600 mg (can be adjusted based on salt used)
- Fiber: 1 gram
This nutritional breakdown highlights the protein-rich nature of the chicken, making it a great option for a satisfying meal. The healthy fats from olive oil contribute to heart health, while the spices and lime juice add flavor without extra calories. I love knowing that I can enjoy a tasty dish that also nourishes my body!
Of course, if you choose to add sides like rice or grilled vegetables, be sure to account for their nutritional values as well. Cooking is all about balance, and I believe that enjoying a delicious meal can also be a healthy choice!
Frequently Asked Questions about Peruvian Grilled Chicken Recipe
As I’ve shared my love for the Peruvian Grilled Chicken Recipe, I often get questions from fellow home cooks eager to try it out. It’s always exciting to see others dive into this flavorful dish! Here are some of the most common questions I receive, along with my answers to help you on your culinary journey.
Can I use boneless chicken for this recipe?
Absolutely! While I love the flavor that bone-in, skin-on chicken provides, boneless chicken thighs or breasts can work just as well. Just keep in mind that boneless pieces may cook faster, so be sure to check the internal temperature to avoid overcooking.
How can I make this recipe gluten-free?
This Peruvian Grilled Chicken Recipe is naturally gluten-free! Just ensure that any additional sauces or sides you serve with it are also gluten-free. Always check labels if you’re using pre-made ingredients.
What can I serve with Peruvian Grilled Chicken?
There are so many delicious options! I love serving it with fluffy rice, grilled vegetables, or a fresh salad. You can also try traditional Peruvian sides like aji de gallina or potato salad for an authentic touch. The possibilities are endless!
Can I marinate the chicken for too long?
While marinating is essential for flavor, I recommend not exceeding 24 hours. If you marinate for too long, the acid in the lime juice can start to break down the chicken too much, resulting in a mushy texture. Aim for anywhere between 2 hours to overnight for the best results.
What if I don’t have a grill?
No worries! If you don’t have a grill, you can use a grill pan on the stovetop or bake the chicken in the oven at a high temperature (around 425°F or 220°C). Just make sure to keep an eye on it to achieve that lovely golden color!
Can I freeze the marinated chicken?
Yes, you can! Freezing the marinated chicken is a great way to save time. Just place the marinated chicken in a freezer-safe bag or container and freeze it for up to 3 months. When you’re ready to cook, simply thaw it in the refrigerator overnight before grilling.
These FAQs cover some of the most common queries I encounter, but don’t hesitate to reach out if you have more questions! Cooking is all about learning and sharing, and I’m here to help you make the most of your Peruvian Grilled Chicken experience. Enjoy your culinary adventure!
Conclusion on Peruvian Grilled Chicken Recipe
As I reflect on my culinary journey with the Peruvian Grilled Chicken Recipe, I can’t help but feel a sense of joy and accomplishment. This dish is more than just a meal; it’s a celebration of flavors, culture, and togetherness. The combination of spices, citrus, and the smoky aroma from the grill creates a symphony of taste that dances on your palate.
What I love most about this recipe is its versatility. Whether you’re hosting a summer barbecue or enjoying a cozy family dinner, it’s sure to impress. Plus, the ease of preparation allows you to focus on what truly matters—sharing delicious food with loved ones. With each bite, you’ll be transported to the vibrant streets of Peru, where every meal is an opportunity to connect and create memories.
So, gather your ingredients, fire up the grill, and embark on this flavorful adventure. I can’t wait for you to experience the magic of this Peruvian Grilled Chicken Recipe. Happy cooking, and may your kitchen always be filled with love and laughter!


