Introduction to PB&J Cheesecake Swirl Bars
Ah, the classic PB&J sandwich! It’s a nostalgic treat that takes me back to my childhood, where lunchboxes were filled with the sweet and salty goodness of peanut butter and jelly. I can still remember the joy of biting into that soft bread, the flavors dancing on my tongue. But what if I told you that we could take that beloved sandwich and transform it into something even more delightful? Enter the PB&J Cheesecake Swirl Bars!
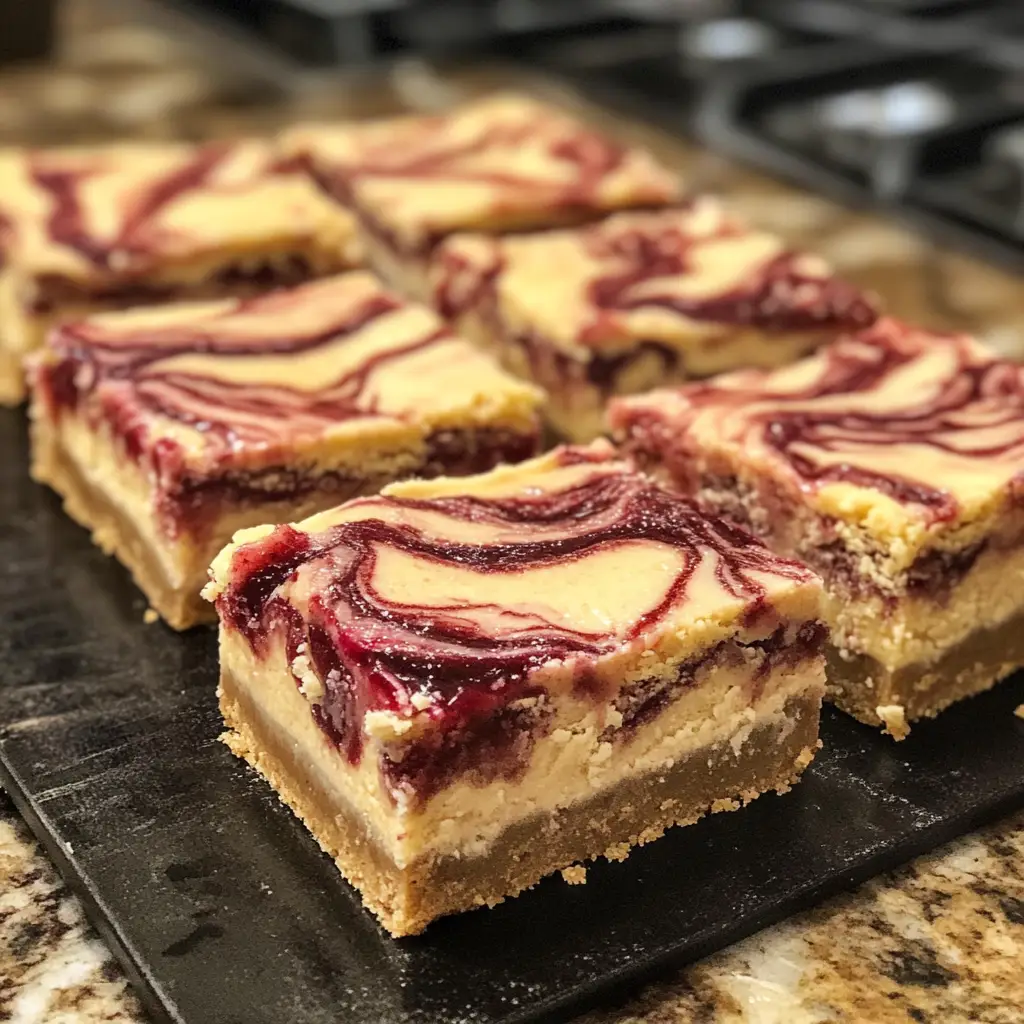
These bars are a delicious fusion of creamy cheesecake, rich peanut butter, and fruity jelly, all swirled together in a dreamy dessert. I first stumbled upon this recipe during a baking marathon with friends. We were experimenting with different flavors, and the idea of combining cheesecake with the classic PB&J just clicked! The moment I took my first bite, I was hooked. The creamy texture of the cheesecake paired with the nutty peanut butter and sweet jelly is simply divine.
What I love most about these bars is how easy they are to make. They’re perfect for gatherings, potlucks, or just a cozy night in. Plus, they’re a hit with both kids and adults alike! I often find myself making a double batch because they disappear faster than I can slice them. Trust me, once you try these PB&J Cheesecake Swirl Bars, you’ll want to share them with everyone you know.
So, grab your apron and let’s dive into this delightful recipe that brings together the best of both worlds. I promise you, these bars will not only satisfy your sweet tooth but also bring a smile to your face, just like those childhood lunches did!
Ingredients for PB&J Cheesecake Swirl Bars
Before we get our hands dirty in the kitchen, let’s gather all the ingredients we need for these scrumptious PB&J Cheesecake Swirl Bars. I always believe that the quality of ingredients can make or break a recipe, so I recommend using the best you can find. Here’s what you’ll need:
Main Ingredients
- 1 ½ cups graham cracker crumbs
- ½ cup unsalted butter, melted
- 2 cups cream cheese, softened
- 1 cup granulated sugar
- 2 large eggs
- 1 teaspoon vanilla extract
- ½ cup creamy peanut butter
- ½ cup jelly or jam (your favorite flavor, but grape or strawberry works wonders!)
When I make these bars, I always opt for high-quality cream cheese. It really enhances the creaminess of the cheesecake filling. And don’t skimp on the peanut butter! A good, creamy peanut butter will give you that rich flavor that pairs perfectly with the sweet jelly.
Optional Add-ons
- 1/4 cup powdered sugar (for extra sweetness in the cheesecake filling)
- Chopped peanuts (for a crunchy topping)
- Chocolate chips (for a decadent twist)
- Fresh fruit (like sliced strawberries or bananas, for serving)
Sometimes, I like to sprinkle a few chopped peanuts on top before baking for that extra crunch. And if you’re feeling adventurous, adding chocolate chips to the cheesecake filling can take these bars to a whole new level of deliciousness! The possibilities are endless, and that’s what makes cooking so much fun.
How to Prepare PB&J Cheesecake Swirl Bars
Now that we have all our ingredients ready, it’s time to roll up our sleeves and get to the fun part—preparing these delightful PB&J Cheesecake Swirl Bars! I love how each step brings us closer to that creamy, dreamy dessert. Let’s dive in!
Step 1: Prepare the Crust
First things first, we need to create a solid foundation for our bars. The crust is made from graham cracker crumbs and melted butter, which gives it that deliciously buttery flavor.
- Preheat your oven to 325°F (160°C).
- In a mixing bowl, combine the graham cracker crumbs and melted butter. Stir until the crumbs are evenly coated.
- Press the mixture firmly into the bottom of a greased 9×9-inch baking pan.
Tips for Step 1
Make sure to press the crust down firmly. I like to use the bottom of a measuring cup to get an even layer. This helps the crust hold together nicely when we slice the bars later!
Step 2: Make the Cheesecake Filling
Next up is the creamy cheesecake filling. This part is where the magic happens!
- In a large bowl, beat the softened cream cheese until smooth.
- Add in the granulated sugar and mix until well combined.
- Next, add the eggs one at a time, mixing well after each addition.
- Finally, stir in the vanilla extract and creamy peanut butter until everything is smooth and creamy.
Tips for Step 2
Make sure your cream cheese is at room temperature. This helps it blend smoothly without lumps. I often set it out an hour before I start baking. Trust me, it makes a world of difference!
Step 3: Swirl in the PB&J Mixture
Now comes the fun part—swirling in that delicious peanut butter and jelly mixture!
- In a small bowl, mix the jelly or jam with a spoon to loosen it up.
- Pour the cheesecake filling over the crust in the baking pan.
- Drop spoonfuls of the jelly mixture on top of the cheesecake filling.
- Using a knife or a skewer, gently swirl the jelly into the cheesecake filling to create a marbled effect.
Tips for Step 3
Don’t over-swirl! You want to see those beautiful swirls of jelly. If you mix it too much, it’ll turn into a solid color, and we want that lovely contrast!
Step 4: Bake the Bars
It’s time to bake our creation! The aroma that fills the kitchen is simply heavenly.
- Bake in the preheated oven for about 30-35 minutes, or until the edges are set and the center is slightly jiggly.
- Keep an eye on it; every oven is different!
Tips for Step 4
To prevent cracking, I like to place a pan of water on the bottom rack of the oven while baking. The steam helps keep the cheesecake moist. It’s a little trick I learned that works wonders!
Step 5: Cool and Slice
Once baked, it’s important to let the bars cool properly before slicing.
- Remove the pan from the oven and let it cool at room temperature for about 30 minutes.
- Then, refrigerate for at least 2 hours to set completely.
- Once chilled, use a sharp knife to slice into squares.
Tips for Step 5
For clean slices, dip your knife in hot water and wipe it dry before cutting. This helps create those perfect, beautiful edges that make your bars look as good as they taste!
And there you have it! Each step brings us closer to enjoying these delightful PB&J Cheesecake Swirl Bars. I can already taste the creamy cheesecake and sweet jelly in my mind. Let’s keep the momentum going and gather our equipment next!
Equipment Needed for PB&J Cheesecake Swirl Bars
Before we dive into the kitchen, let’s make sure we have all the right tools at our fingertips. Having the right equipment can make the process smoother and more enjoyable. Here’s what you’ll need to whip up these delightful PB&J Cheesecake Swirl Bars:
- 9×9-inch baking pan: This is perfect for baking the bars. If you don’t have one, an 8×8-inch pan will work too; just keep an eye on the baking time.
- Mixing bowls: A couple of medium-sized bowls will help you mix the crust and the cheesecake filling separately.
- Electric mixer: While a whisk can do the job, an electric mixer makes it easier to achieve that smooth, creamy cheesecake filling.
- Rubber spatula: This is great for scraping down the sides of the bowl and ensuring every bit of goodness is mixed in.
- Measuring cups and spoons: Accurate measurements are key to baking success, so don’t forget these!
- Knife or skewer: You’ll need this for swirling the jelly into the cheesecake filling. A toothpick can also work in a pinch!
- Cooling rack: If you have one, it’s perfect for letting the bars cool evenly after baking.
And there you have it! With these tools in hand, you’re all set to create your PB&J Cheesecake Swirl Bars. If you’re missing any of these items, don’t worry! You can often find alternatives around the kitchen. For example, a sturdy plate can substitute for a cooling rack, and a whisk can work in place of an electric mixer if you’re feeling up for a little workout!
Variations of PB&J Cheesecake Swirl Bars
While the classic PB&J Cheesecake Swirl Bars are absolutely delightful on their own, I love to experiment with different flavors and ingredients to keep things exciting! Here are a few variations that I’ve tried and absolutely adored:
- Nutty Chocolate Swirl: Swap out the peanut butter for almond butter and use chocolate syrup instead of jelly. The combination of chocolate and almond is simply heavenly!
- Berry Bliss: Instead of traditional jelly, use a mixed berry jam. The tartness of the berries adds a refreshing twist that pairs beautifully with the creamy cheesecake.
- Banana Cream: Add mashed ripe bananas to the cheesecake filling for a banana-flavored twist. Top with a drizzle of caramel sauce for an extra indulgent treat!
- Spiced Pumpkin: For a seasonal touch, mix in some pumpkin puree and pumpkin spice into the cheesecake filling. It’s like a fall festival in every bite!
These variations not only add a fun twist to the original recipe but also allow you to cater to different tastes and preferences. I often find that trying new flavors keeps my baking adventures fresh and exciting. So, don’t hesitate to get creative and make these bars your own!
Cooking Notes for PB&J Cheesecake Swirl Bars
As I’ve learned through my baking journey, a few cooking notes can make all the difference when preparing PB&J Cheesecake Swirl Bars. Here are some tips that I always keep in mind to ensure my bars turn out perfectly every time:
- Room Temperature Ingredients: Make sure your cream cheese and eggs are at room temperature before mixing. This helps create a smooth filling without lumps. I usually take them out of the fridge about an hour before I start.
- Don’t Overmix: When combining the cheesecake filling, mix just until everything is combined. Overmixing can introduce too much air, leading to cracks in your bars as they bake.
- Chill Time is Key: Allowing the bars to cool completely in the fridge is crucial. This helps them set properly and makes slicing easier. I often make them a day ahead to let the flavors meld together!
- Storage: These bars can be stored in an airtight container in the fridge for up to a week. They also freeze well, so you can enjoy them later. Just make sure to wrap them tightly!
- Serving Temperature: I love serving these bars chilled, but they can also be enjoyed at room temperature. Just let them sit out for a few minutes before serving for the best texture.
By keeping these cooking notes in mind, I’ve found that my PB&J Cheesecake Swirl Bars turn out consistently delicious. Happy baking, and may your kitchen be filled with sweet aromas and joyful moments!
Serving Suggestions for PB&J Cheesecake Swirl Bars
Now that we’ve created these scrumptious PB&J Cheesecake Swirl Bars, it’s time to think about how to serve them up! Presentation can elevate any dessert, and I love to get a little creative when it comes to serving. Here are some of my favorite serving suggestions that will make your bars even more delightful:
- Garnish with Fresh Fruit: A few slices of fresh strawberries or bananas on the side add a pop of color and freshness. They complement the flavors beautifully!
- Drizzle with Chocolate or Caramel: A light drizzle of chocolate or caramel sauce over the top can take these bars to the next level. It adds a touch of elegance and extra sweetness.
- Serve with Whipped Cream: A dollop of freshly whipped cream on top makes for a creamy contrast that pairs perfectly with the cheesecake.
- Pair with Ice Cream: For a truly indulgent treat, serve these bars with a scoop of vanilla or chocolate ice cream. The combination of warm and cold is simply heavenly!
- Dust with Powdered Sugar: A light dusting of powdered sugar right before serving gives a lovely finishing touch and makes the bars look extra special.
These serving suggestions not only enhance the visual appeal but also add layers of flavor that make each bite even more enjoyable. I often find that a little creativity in presentation can turn a simple dessert into a showstopper. So, gather your friends and family, and get ready to impress them with your delicious PB&J Cheesecake Swirl Bars!
Tips for Making PB&J Cheesecake Swirl Bars
As a passionate home cook, I’ve learned a few handy tips that can make your experience of making PB&J Cheesecake Swirl Bars even more enjoyable and successful. Here are my top suggestions to ensure your bars turn out perfectly every time:
- Prep Ahead: If you’re short on time, consider prepping the crust and cheesecake filling a day in advance. Just store them separately in the fridge until you’re ready to bake!
- Use Quality Ingredients: The flavor of your bars will shine through if you use high-quality peanut butter and jelly. I always opt for natural peanut butter without added sugars or oils for the best taste.
- Experiment with Swirls: Don’t be afraid to get creative with your jelly swirls! Try different patterns or even mix two flavors together for a unique twist.
- Check for Doneness: Ovens can vary, so keep an eye on your bars as they bake. They should be set around the edges but still slightly jiggly in the center when done.
- Let Them Chill: Patience is key! Allowing the bars to chill completely in the fridge not only helps them set but also enhances the flavors. I often find they taste even better the next day!
With these tips in your back pocket, you’ll be well on your way to creating delicious PB&J Cheesecake Swirl Bars that will impress everyone. Happy baking, and enjoy the sweet journey!
Breakdown of Time for PB&J Cheesecake Swirl Bars
As a home cook, I know that time management is key in the kitchen. When I’m whipping up my PB&J Cheesecake Swirl Bars, I like to keep track of how long each step takes. This way, I can plan my baking adventure without feeling rushed. Here’s a quick breakdown of the time you’ll need:
- Prep Time: Approximately 20-25 minutes. This includes gathering your ingredients, preparing the crust, and mixing the cheesecake filling.
- Cooking Time: About 30-35 minutes. This is the time spent baking the bars to perfection in the oven.
- Chill Time: At least 2 hours. This step is crucial for allowing the bars to set properly and makes slicing easier.
- Total Time: Roughly 2 hours and 55 minutes. This includes all prep, cooking, and chilling time.
By keeping this timeline in mind, you can easily plan your baking session. I often find that the wait is worth it, especially when I finally get to enjoy those creamy, dreamy bars. So, set aside a little time, and let’s get baking!
Nutritional Information for PB&J Cheesecake Swirl Bars
As a passionate home cook, I always find it helpful to know the nutritional content of the treats I whip up. It allows me to enjoy my creations while being mindful of what I’m indulging in. Here’s a general breakdown of the nutritional information for one serving of PB&J Cheesecake Swirl Bars, assuming you cut the batch into 12 squares:
- Calories: Approximately 250
- Protein: 5g
- Carbohydrates: 30g
- Fat: 12g
- Saturated Fat: 5g
- Cholesterol: 50mg
- Sodium: 180mg
- Fiber: 1g
- Sugar: 15g
Keep in mind that these values can vary based on the specific brands of ingredients you use and any optional add-ons you decide to include. If you’re looking to lighten things up a bit, consider using reduced-fat cream cheese or a sugar substitute. I often find that small tweaks can make a big difference without sacrificing flavor!
Whether you’re enjoying these bars as a special treat or sharing them with loved ones, knowing the nutritional information can help you savor every bite with a little more awareness. Happy baking and enjoy your delicious PB&J Cheesecake Swirl Bars!
Frequently Asked Questions about PB&J Cheesecake Swirl Bars
As I’ve shared my love for PB&J Cheesecake Swirl Bars, I often get questions from fellow home cooks eager to try this delightful recipe. I love connecting with others through our shared passion for baking, so I’ve compiled some of the most frequently asked questions to help you on your journey. Let’s dive in!
Can I use a different type of nut butter?
Absolutely! While peanut butter is the star of this recipe, you can easily swap it for almond butter, cashew butter, or even sunflower seed butter if you’re looking for a nut-free option. Each nut butter brings its own unique flavor, so feel free to experiment!
What if I don’t have graham cracker crumbs?
No worries! If graham cracker crumbs aren’t available, you can use crushed cookies like Oreos or digestive biscuits. Just make sure to adjust the amount of sugar in the crust if your cookie choice is already sweetened.
Can I make these bars gluten-free?
Yes! To make gluten-free PB&J Cheesecake Swirl Bars, simply use gluten-free graham cracker crumbs or any gluten-free cookie alternative for the crust. The rest of the ingredients are naturally gluten-free, so you’re good to go!
How long do these bars last in the fridge?
These bars can be stored in an airtight container in the fridge for up to a week. I often find that they taste even better after a day or two as the flavors meld together. Just make sure to keep them well-covered to maintain their freshness!
Can I freeze PB&J Cheesecake Swirl Bars?
Yes, you can! These bars freeze beautifully. Just wrap them tightly in plastic wrap and then place them in an airtight container. They can be frozen for up to three months. When you’re ready to enjoy, simply thaw them in the fridge overnight.
What’s the best way to slice the bars?
For clean slices, I recommend using a sharp knife dipped in hot water. Wipe it dry before cutting each slice. This little trick helps create those beautiful edges that make your bars look as good as they taste!
With these answers, I hope you feel more confident in your baking adventure with PB&J Cheesecake Swirl Bars. Remember, baking is all about having fun and experimenting, so don’t hesitate to reach out if you have more questions or need tips. Happy baking!
Conclusion on PB&J Cheesecake Swirl Bars
As I wrap up this delightful journey into the world of PB&J Cheesecake Swirl Bars, I can’t help but feel a sense of joy. These bars are more than just a dessert; they’re a celebration of flavors that remind us of simpler times. The creamy cheesecake, rich peanut butter, and sweet jelly come together in a harmonious blend that’s sure to please anyone who takes a bite.
What I love most about this recipe is its versatility. Whether you’re hosting a gathering, treating your family, or simply indulging yourself, these bars are perfect for any occasion. Plus, they’re easy to make, allowing even novice bakers to shine in the kitchen. With a few simple ingredients and steps, you can create a dessert that looks and tastes like it came from a bakery!
So, the next time you’re in the mood for something sweet, I encourage you to whip up a batch of these PB&J Cheesecake Swirl Bars. They’re not just a treat; they’re a way to create memories, share laughter, and enjoy the little moments in life. Happy baking, and may your kitchen always be filled with love and delicious aromas!


