Introduction to No-Bake PB&J Cheesecake Jars Recipe
As a passionate home cook, I often find myself reminiscing about the simple joys of childhood. One of my fondest memories is enjoying a classic peanut butter and jelly sandwich, a delightful combination that never fails to bring a smile to my face. The creamy peanut butter, the sweet jelly, and the soft bread created a perfect harmony of flavors. It’s a nostalgic treat that many of us hold dear.
Now, imagine transforming that beloved sandwich into a dessert that’s not only delicious but also incredibly easy to make. Enter the No-Bake PB&J Cheesecake Jars! This recipe is a delightful twist on the classic, combining the rich, creamy texture of cheesecake with the familiar flavors of peanut butter and jelly. And the best part? You don’t even need to turn on the oven!
When I first stumbled upon this recipe, I was instantly intrigued. The idea of layering creamy cheesecake filling with a luscious fruit jam and a crunchy crust in a jar seemed like a fun and creative way to enjoy a dessert. Plus, it’s perfect for gatherings, picnics, or even a cozy night in. Each jar is like a little treasure, waiting to be discovered and savored.
In this article, I’ll guide you through the process of making these delightful jars, sharing tips and tricks that I’ve learned along the way. Whether you’re a seasoned baker or a novice in the kitchen, I promise you’ll find joy in creating this sweet treat. So, let’s dive into the world of No-Bake PB&J Cheesecake Jars and bring a little nostalgia to your dessert table!
Ingredients for No-Bake PB&J Cheesecake Jars Recipe
Before we embark on this delicious journey, let’s gather our ingredients! I believe that using quality ingredients can make a world of difference in the final taste of our No-Bake PB&J Cheesecake Jars. So, let’s take a closer look at what we’ll need to create this delightful treat.
Main Ingredients
- 1 cup of graham cracker crumbs
- 1/4 cup of unsalted butter, melted
- 8 oz cream cheese, softened
- 1/2 cup of creamy peanut butter
- 1/2 cup of powdered sugar
- 1 teaspoon of vanilla extract
- 1 cup of whipped cream (store-bought or homemade)
- 1/2 cup of your favorite fruit jam (strawberry, grape, or raspberry work wonderfully)
When selecting your ingredients, I recommend using high-quality peanut butter. The kind that’s made with just peanuts and salt is my personal favorite. It adds a rich, nutty flavor that elevates the cheesecake filling. For the cream cheese, make sure it’s at room temperature; this will help create a smooth and creamy texture.
Optional Add-ons
- Chopped nuts (like peanuts or almonds) for added crunch
- Chocolate chips for a sweet twist
- Fresh fruit slices (like strawberries or bananas) for garnish
- Drizzle of chocolate or caramel sauce for extra indulgence
Feel free to get creative with these optional add-ons! I love adding a sprinkle of chopped nuts on top for that extra crunch. It’s like a little surprise in every bite! And if you’re feeling adventurous, a drizzle of chocolate sauce can take this dessert to a whole new level of decadence.
Now that we have our ingredients ready, let’s move on to the fun part—preparing our No-Bake PB&J Cheesecake Jars!
How to Prepare No-Bake PB&J Cheesecake Jars Recipe
Now that we have our ingredients ready, it’s time to roll up our sleeves and dive into the fun part—preparing our No-Bake PB&J Cheesecake Jars! I can already feel the excitement bubbling up as I think about the creamy layers and fruity goodness. Let’s get started!
Step 1: Prepare the Crust
First things first, we need to create that delicious graham cracker crust. It’s the foundation of our jars, and trust me, it’s worth the effort!
- In a mixing bowl, combine 1 cup of graham cracker crumbs with 1/4 cup of melted unsalted butter. Mix until the crumbs are well-coated and resemble wet sand.
- Next, take your mixture and press it firmly into the bottom of your jars. I like to use the back of a spoon or even my fingers to make sure it’s packed tightly.
Tips for Step 1
For an extra flavor boost, you can add a pinch of cinnamon to the graham cracker mixture. It adds a warm, cozy touch that pairs beautifully with the peanut butter and jelly. Also, if you want a thicker crust, feel free to double the crust ingredients!
Step 2: Make the Cheesecake Filling
Now, let’s whip up that creamy cheesecake filling that will make your taste buds dance!
- In a large mixing bowl, beat 8 oz of softened cream cheese until it’s smooth and creamy. I usually use an electric mixer for this, but a whisk works too if you’re feeling strong!
- Add in 1/2 cup of creamy peanut butter, 1/2 cup of powdered sugar, and 1 teaspoon of vanilla extract. Mix until everything is well combined.
- Finally, gently fold in 1 cup of whipped cream until it’s light and fluffy. This step is crucial for that airy texture!
Tips for Step 2
Make sure your cream cheese is at room temperature; this helps avoid lumps in your filling. If you want a richer flavor, try using a peanut butter that has a hint of honey or maple. It adds a delightful sweetness!
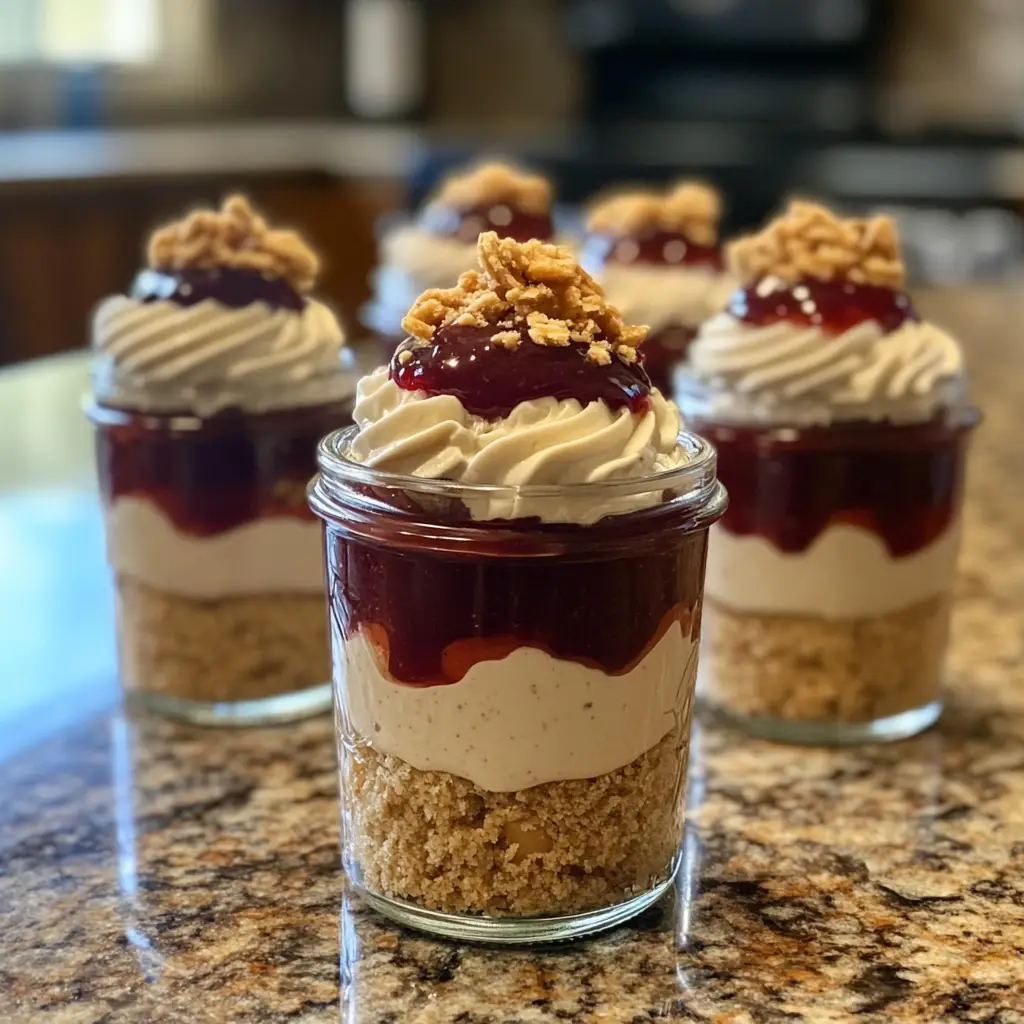
Step 3: Layer the Ingredients in Jars
Now comes the fun part—layering! This is where you can get creative and make your jars look as beautiful as they taste.
- Start by adding a layer of the crust at the bottom of each jar.
- Next, spoon in a generous layer of the cheesecake filling, smoothing it out with the back of a spoon.
- Then, add a layer of your favorite fruit jam on top. I love using strawberry jam for that classic PB&J flavor!
- Repeat the layers until you reach the top of the jar, finishing with a dollop of jam.
Tips for Step 3
Don’t be afraid to play with the layers! You can alternate between different jams or even add a layer of chopped nuts for a delightful crunch. It’s all about making it your own!
Step 4: Chill the Cheesecake Jars
Once your jars are beautifully layered, it’s time to let them chill. This step is essential for the flavors to meld together.
- Cover the jars with lids or plastic wrap and place them in the refrigerator for at least 4 hours, or overnight if you can wait!
Tips for Step 4
The longer you let them chill, the better the flavors will be. If you’re in a hurry, even a couple of hours will do, but trust me, patience is key for the best taste!
And there you have it! Your No-Bake PB&J Cheesecake Jars are now ready to be enjoyed. I can already picture the smiles on everyone’s faces as they dig into these delightful treats. Let’s move on to the next section and gather the equipment we’ll need for this sweet adventure!
Equipment Needed for No-Bake PB&J Cheesecake Jars Recipe
Before we dive into the delicious world of No-Bake PB&J Cheesecake Jars, let’s make sure we have all the right tools at our fingertips. Having the right equipment can make the process smoother and more enjoyable. Here’s what you’ll need:
- Mixing Bowls: A couple of medium-sized mixing bowls will do the trick. I love using glass bowls because they’re easy to clean and you can see the beautiful colors of your ingredients.
- Electric Mixer or Whisk: An electric mixer is my go-to for making the cheesecake filling super smooth. But if you’re feeling strong, a good old-fashioned whisk works just fine!
- Measuring Cups and Spoons: Accurate measurements are key to a successful recipe. Make sure you have a set of measuring cups and spoons handy.
- Spoon or Spatula: You’ll need a spoon or spatula for mixing and layering the ingredients. A silicone spatula is great for scraping down the sides of the bowl.
- Jars or Cups: The star of the show! You can use mason jars, small cups, or even dessert glasses. Just make sure they’re clear so everyone can admire the beautiful layers.
- Plastic Wrap or Lids: To cover your jars while they chill in the fridge, you’ll need some plastic wrap or lids to keep everything fresh.
If you don’t have a specific tool, don’t worry! You can always improvise. For example, if you don’t have a mixer, a sturdy whisk will work just as well. The most important thing is to have fun and enjoy the process of creating these delightful jars!
Variations of No-Bake PB&J Cheesecake Jars Recipe
One of the things I love most about cooking is the freedom to experiment and make a recipe your own. The No-Bake PB&J Cheesecake Jars are no exception! Here are a few fun variations that I’ve tried and absolutely adored:
- Chocolate Lovers Delight: Swap out the peanut butter for chocolate hazelnut spread. Layer it with chocolate ganache instead of jam for a rich, indulgent treat.
- Nutty Banana Bliss: Replace the fruit jam with banana slices and add a sprinkle of crushed walnuts or pecans for a delightful crunch. It’s like a banana split in a jar!
- Berry Medley: Use a mix of different fruit jams, like blueberry, raspberry, and strawberry. The combination of flavors creates a burst of fruity goodness in every bite.
- Vegan Version: For a plant-based twist, use vegan cream cheese and nut butter. You can also substitute coconut whipped cream for a light and fluffy texture.
These variations not only add a unique twist to the classic recipe but also allow you to cater to different tastes and dietary preferences. I encourage you to get creative and try out your own combinations! Who knows, you might just stumble upon a new favorite flavor that becomes a staple in your dessert repertoire.
Cooking Notes for No-Bake PB&J Cheesecake Jars Recipe
As I’ve journeyed through the delightful process of making No-Bake PB&J Cheesecake Jars, I’ve picked up a few cooking notes that can help ensure your dessert turns out perfectly every time. Here are some tips that I find invaluable:
- Room Temperature Ingredients: Always make sure your cream cheese and peanut butter are at room temperature. This simple step helps create a smooth and creamy filling without any lumps.
- Chill Time: While I recommend chilling the jars for at least 4 hours, letting them sit overnight allows the flavors to meld beautifully. Trust me, the wait is worth it!
- Layering Technique: When layering, try to keep the layers even. This not only makes for a beautiful presentation but also ensures that each spoonful has a balanced taste of crust, cheesecake, and jam.
- Storage Tips: If you have leftovers (which is rare in my house!), store them in the fridge for up to 3 days. Just make sure to cover them well to keep them fresh.
- Serving Temperature: For the best experience, serve the jars chilled. The cool, creamy texture is simply irresistible on a warm day!
These cooking notes are like little nuggets of wisdom that I’ve gathered over time. They help me create the most delicious No-Bake PB&J Cheesecake Jars, and I hope they do the same for you! Now, let’s move on to how we can serve these delightful treats.
Serving Suggestions for No-Bake PB&J Cheesecake Jars Recipe
Now that our No-Bake PB&J Cheesecake Jars are ready to go, it’s time to think about how to serve them! Presentation can elevate any dessert, and these jars are no exception. Here are some of my favorite serving suggestions that add a little flair to this delightful treat:
- Garnish with Fresh Fruit: Top each jar with a slice of fresh fruit, like strawberries or blueberries. Not only does it look beautiful, but it also adds a burst of freshness that complements the creamy cheesecake.
- Drizzle with Sauce: A drizzle of chocolate or caramel sauce over the top can take your jars to the next level. It adds a touch of indulgence that’s hard to resist!
- Serve with a Side: Pair the jars with a small scoop of vanilla ice cream or a dollop of whipped cream on the side. It’s a delightful contrast to the creamy cheesecake and adds an extra layer of sweetness.
- Use Fun Spoons: Consider serving the jars with colorful or themed spoons. It’s a small detail, but it can make the dessert feel even more special, especially for kids or at a party.
- Personalized Touch: If you’re serving these jars at a gathering, consider labeling each jar with a little tag. You can write the flavor or even a fun note. It adds a personal touch that guests will appreciate!
These serving suggestions not only enhance the visual appeal of your No-Bake PB&J Cheesecake Jars but also create a delightful experience for everyone enjoying them. I can’t wait for you to try these ideas and see how they elevate your dessert game! Now, let’s move on to some tips for perfecting this recipe.
Tips for Perfecting No-Bake PB&J Cheesecake Jars Recipe
As I’ve whipped up countless batches of No-Bake PB&J Cheesecake Jars, I’ve gathered a treasure trove of tips that can help you achieve dessert perfection. Here are my top suggestions to ensure your jars turn out as delightful as possible:
- Use Quality Ingredients: The better the ingredients, the better the taste! Opt for natural peanut butter and fresh fruit jams. They make a world of difference in flavor.
- Don’t Rush the Chilling: I know it’s tempting to dig in right away, but allowing the jars to chill for the full time enhances the flavors. Patience truly pays off!
- Experiment with Textures: Consider adding a layer of crushed cookies or nuts between the cheesecake and jam layers. It adds a delightful crunch that contrasts beautifully with the creaminess.
- Adjust Sweetness to Taste: If you prefer a less sweet dessert, feel free to reduce the powdered sugar in the cheesecake filling. You can always add more jam for sweetness if needed!
- Make Ahead for Convenience: These jars are perfect for meal prep! You can make them a day or two in advance, making them a great option for busy days or gatherings.
With these tips in your back pocket, you’ll be well on your way to creating the most scrumptious No-Bake PB&J Cheesecake Jars. I can’t wait for you to experience the joy of sharing these delightful treats with family and friends! Now, let’s break down the time it takes to whip up this delicious dessert.
Breakdown of Time for No-Bake PB&J Cheesecake Jars Recipe
Now that we’ve covered all the delicious details, let’s talk about the time it takes to create these delightful No-Bake PB&J Cheesecake Jars. I find that knowing the time commitment helps me plan better, especially when I’m excited to share these treats with friends and family. Here’s a quick breakdown:
- Prep Time: 20 minutes
- Chilling Time: 4 hours (or overnight for best results)
- Total Time: 4 hours and 20 minutes (or overnight)
As you can see, the prep time is quite manageable, and the chilling time is where the magic happens! I often make these jars in the evening, letting them chill overnight so they’re ready to impress the next day. It’s a simple way to have a delicious dessert waiting for you without any last-minute fuss. Now, let’s move on to the nutritional information for our delightful jars!
Nutritional Information for No-Bake PB&J Cheesecake Jars Recipe
As a passionate home cook, I always find it helpful to know the nutritional information of the dishes I prepare. It allows me to enjoy my creations while being mindful of what I’m eating. Here’s a general breakdown of the nutritional information for one serving of the No-Bake PB&J Cheesecake Jars:
- Calories: Approximately 300 calories
- Protein: 6g
- Carbohydrates: 30g
- Fat: 18g
- Sugar: 12g
- Fiber: 1g
Keep in mind that these values can vary based on the specific ingredients you use, especially the type of peanut butter and jam. If you’re looking to lighten things up, consider using reduced-fat cream cheese or a sugar-free jam. I love how versatile this recipe is, allowing you to adjust it to fit your dietary needs while still enjoying that nostalgic flavor of PB&J!
Now that we’ve covered the nutritional aspect, let’s move on to some frequently asked questions about our delightful No-Bake PB&J Cheesecake Jars!
Frequently Asked Questions about No-Bake PB&J Cheesecake Jars Recipe
As I’ve shared my love for No-Bake PB&J Cheesecake Jars, I’ve often received questions from fellow home cooks eager to try this delightful recipe. Here are some of the most common queries, along with my answers to help you on your culinary journey:
- Can I use a different type of nut butter? Absolutely! While peanut butter is the star of this recipe, you can easily swap it for almond butter, cashew butter, or even sunflower seed butter for a nut-free option. Each will bring its own unique flavor!
- How long do these jars last in the fridge? If stored properly, your No-Bake PB&J Cheesecake Jars can last up to 3 days in the refrigerator. Just make sure to cover them well to keep them fresh and delicious.
- Can I freeze these jars? Yes, you can freeze them! Just be aware that the texture may change slightly once thawed. I recommend enjoying them fresh for the best experience, but freezing is a great option for meal prep!
- What can I use instead of graham cracker crumbs? If you’re looking for a gluten-free option, crushed gluten-free cookies or even crushed oats can work well. You can also use digestive biscuits for a different flavor profile.
- Can I make these jars vegan? Definitely! Use vegan cream cheese and a plant-based whipped cream alternative. Just make sure your jam is also vegan-friendly, and you’re all set!
These FAQs cover some of the most common concerns and curiosities about the No-Bake PB&J Cheesecake Jars. I hope they inspire you to dive into this delightful recipe with confidence! Now, let’s wrap things up with a conclusion that highlights the charm of this sweet treat.
Conclusion on No-Bake PB&J Cheesecake Jars Recipe
As I reflect on the journey of creating these No-Bake PB&J Cheesecake Jars, I can’t help but feel a sense of joy and nostalgia. This recipe beautifully marries the classic flavors of a beloved childhood sandwich with the creamy indulgence of cheesecake, all while being incredibly easy to prepare. The best part? No oven required!
These jars are not just a dessert; they’re a delightful experience that brings smiles to faces young and old. Whether you’re hosting a gathering, enjoying a cozy night in, or simply treating yourself, these jars are sure to impress. With endless variations and personal touches, you can make them uniquely yours, catering to different tastes and dietary preferences.
So, gather your ingredients, roll up your sleeves, and dive into the world of No-Bake PB&J Cheesecake Jars. I promise you’ll find joy in every layer, and who knows, you might just create a new family favorite that will be cherished for years to come. Happy cooking!


