Introduction to No-Bake Dulce de Leche Cheesecake Squares Recipe
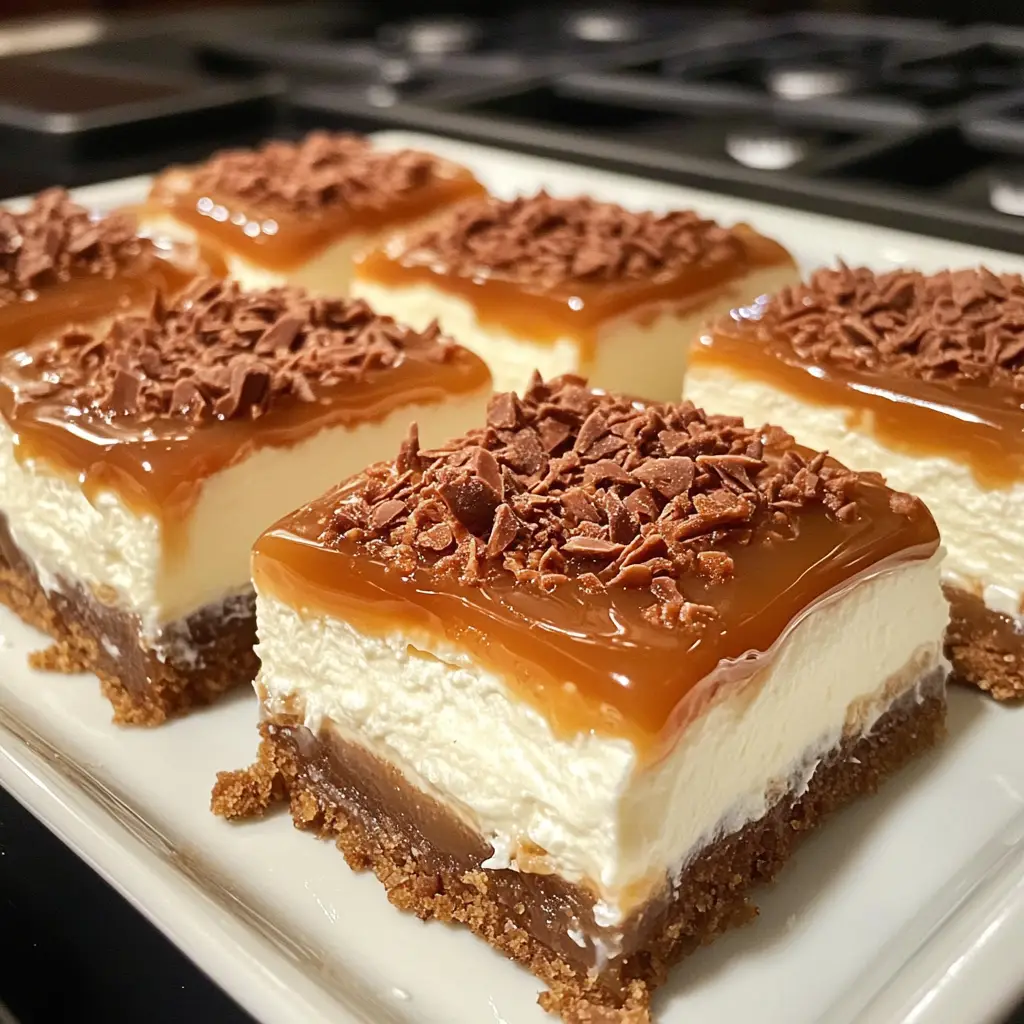
As a passionate home cook, I find immense joy in creating desserts that not only satisfy my sweet tooth but also bring smiles to the faces of my loved ones. One of my all-time favorite treats is the No-Bake Dulce de Leche Cheesecake Squares. This delightful dessert is a perfect blend of creamy cheesecake and rich dulce de leche, all without the need for an oven. It’s like a hug in dessert form!
Let me take you back to the first time I made these squares. It was a warm summer evening, and I wanted to whip up something special for a family gathering. I stumbled upon the idea of a no-bake cheesecake, and the thought of dulce de leche instantly made my heart race with excitement. The combination of flavors danced in my mind, and I knew I had to give it a try.
As I gathered my ingredients, I felt like a kid in a candy store. The sweet aroma of caramelized milk filled my kitchen, and I could hardly wait to taste the final product. When I finally took that first bite, it was pure bliss! The creamy texture, the sweet and slightly salty notes of the dulce de leche, and the buttery crust created a symphony of flavors that I couldn’t resist. I knew I had stumbled upon something magical.
This recipe is not just about the ingredients; it’s about the memories created while making it. Whether you’re celebrating a special occasion or simply indulging in a sweet treat after dinner, these No-Bake Dulce de Leche Cheesecake Squares are sure to impress. Plus, they’re incredibly easy to make, which means you can spend less time in the kitchen and more time enjoying the company of your friends and family.
So, grab your mixing bowls and let’s dive into this delicious adventure together! I promise you, once you try these cheesecake squares, they’ll become a staple in your dessert repertoire.
Ingredients for No-Bake Dulce de Leche Cheesecake Squares Recipe
Before we embark on this sweet journey, let’s gather our ingredients. I always believe that quality matters, especially when it comes to desserts. Using fresh and high-quality ingredients can elevate your No-Bake Dulce de Leche Cheesecake Squares to a whole new level. Here’s what you’ll need:
Main Ingredients
- 1 ½ cups of graham cracker crumbs
- ½ cup of unsalted butter, melted
- 2 cups of cream cheese, softened
- 1 cup of dulce de leche (store-bought or homemade)
- 1 cup of heavy whipping cream
- ½ cup of powdered sugar
- 1 teaspoon of vanilla extract
When I make this recipe, I always opt for high-quality cream cheese. It makes a world of difference in texture and flavor. If you can find it, try to use a brand that’s made with real cream. And for the dulce de leche, I often go for homemade, as it adds a personal touch. However, store-bought works just as well if you’re short on time!
Optional Add-ons
- Chopped nuts (like pecans or walnuts) for added crunch
- Chocolate shavings or cocoa powder for a chocolatey twist
- Fresh fruit, such as berries or banana slices, for a refreshing contrast
- A sprinkle of sea salt to enhance the caramel flavor
These optional add-ons can take your cheesecake squares to the next level. I love adding a sprinkle of sea salt on top; it creates a delightful balance with the sweetness of the dulce de leche. And if you’re feeling adventurous, a layer of fresh berries can add a pop of color and flavor that’s simply irresistible!
Now that we have our ingredients ready, let’s move on to the fun part—preparing our No-Bake Dulce de Leche Cheesecake Squares!
How to Prepare No-Bake Dulce de Leche Cheesecake Squares Recipe
Now that we have our ingredients all lined up like eager little soldiers, it’s time to roll up our sleeves and get to work! Making these No-Bake Dulce de Leche Cheesecake Squares is a delightful process that fills your kitchen with sweet aromas and your heart with joy. Let’s dive into the steps!
Step 1: Prepare the Crust
First things first, we need to create a solid foundation for our cheesecake squares. The crust is like the cozy blanket that wraps around the creamy filling, so let’s make it count!
- In a mixing bowl, combine the graham cracker crumbs and melted butter. Stir until the crumbs are evenly coated.
- Press the mixture firmly into the bottom of a lined 9×9-inch baking dish. Make sure it’s packed tightly for a sturdy crust.
Tips for Achieving the Perfect Crust
To get that perfect crust, I like to use the bottom of a measuring cup to press down the crumbs. It helps create an even layer. If you want a little extra flavor, consider adding a pinch of cinnamon to the crumbs. It adds a warm, inviting touch!
Step 2: Make the Cheesecake Filling
With the crust ready, it’s time to whip up the creamy filling that will make your taste buds sing!
- In a large mixing bowl, beat the softened cream cheese until it’s smooth and creamy.
- Add the dulce de leche, powdered sugar, and vanilla extract. Mix until everything is well combined.
- In another bowl, whip the heavy cream until stiff peaks form. Gently fold the whipped cream into the cream cheese mixture.
Tips for Creamy Cheesecake Filling
When folding in the whipped cream, be gentle! You want to keep that airy texture. I often use a spatula and fold in a figure-eight motion. It’s like a dance, and trust me, your cheesecake will thank you for it!
Step 3: Assemble the Cheesecake Squares
Now comes the fun part—layering everything together! This is where the magic happens.
- Pour the cheesecake filling over the prepared crust, spreading it evenly with a spatula.
- If you’re using any optional add-ons, like chopped nuts or chocolate shavings, sprinkle them on top now.
Tips for Layering
To create a beautiful finish, I like to use the back of a spoon to smooth out the top. It gives it a nice, polished look. Plus, if you’re feeling fancy, you can drizzle a little extra dulce de leche on top for that wow factor!
Step 4: Chill and Set
We’re almost there! Now, we need to let our cheesecake squares chill and set, which is the hardest part because the waiting can feel like an eternity!
- Cover the baking dish with plastic wrap and place it in the refrigerator for at least 4 hours, or overnight if you can wait that long.
Tips for Proper Chilling
For the best results, I recommend letting them chill overnight. This allows the flavors to meld beautifully. If you’re in a hurry, at least give them a solid 4 hours. Trust me, the wait is worth it!
And there you have it! With these simple steps, you’re well on your way to creating a dessert that will leave everyone asking for seconds. Let’s move on to the next exciting part—gathering the equipment we’ll need!
Equipment Needed for No-Bake Dulce de Leche Cheesecake Squares Recipe
Before we dive into the kitchen, let’s make sure we have all the right tools at our fingertips. Having the right equipment can make the process smoother and more enjoyable. Here’s what you’ll need to whip up these delightful No-Bake Dulce de Leche Cheesecake Squares:
- Mixing Bowls: A couple of medium to large mixing bowls will do the trick. I love using glass bowls because they’re easy to clean and you can see the ingredients mixing!
- Measuring Cups and Spoons: Accurate measurements are key in baking. Grab your trusty measuring cups and spoons to ensure everything is just right.
- Spatula: A silicone spatula is perfect for folding in the whipped cream and spreading the cheesecake filling evenly. It’s like a magic wand for your dessert!
- 9×9-inch Baking Dish: This is where the magic happens! If you don’t have one, a similar-sized dish will work just fine. Just make sure it’s deep enough to hold all that creamy goodness.
- Plastic Wrap: You’ll need this to cover the dish while the cheesecake chills. If you’re out of plastic wrap, a clean kitchen towel can work in a pinch.
- Hand Mixer or Stand Mixer: A hand mixer is great for whipping the cream and mixing the filling. If you have a stand mixer, it can save you some elbow grease!
With these tools in hand, you’re all set to create a dessert that will have everyone raving. Let’s keep the momentum going and explore the delicious variations we can make with our No-Bake Dulce de Leche Cheesecake Squares!
Variations of No-Bake Dulce de Leche Cheesecake Squares Recipe
As a home cook, I love experimenting with recipes to create new flavors and textures. The No-Bake Dulce de Leche Cheesecake Squares are incredibly versatile, allowing you to put your own spin on them. Here are a few delightful variations that I’ve tried and absolutely adored:
- Chocolate Dulce de Leche Cheesecake: For all the chocolate lovers out there, simply add melted chocolate to the cheesecake filling. It creates a rich, decadent flavor that pairs beautifully with the dulce de leche.
- Fruit-Infused Cheesecake: Incorporate pureed fruits like strawberries or mango into the filling for a refreshing twist. The fruity notes add a lovely brightness to the creamy cheesecake.
- Nutty Delight: Mix in crushed nuts, such as almonds or hazelnuts, into the filling or sprinkle them on top. This adds a delightful crunch and enhances the overall texture.
- Spiced Pumpkin Cheesecake: For a seasonal treat, add pumpkin puree and a blend of warm spices like cinnamon and nutmeg to the filling. It’s like autumn in every bite!
These variations not only keep things exciting but also allow you to cater to different tastes and preferences. I encourage you to get creative and make these cheesecake squares your own. After all, cooking is all about having fun and sharing joy through food!
Cooking Notes for No-Bake Dulce de Leche Cheesecake Squares Recipe
As I’ve journeyed through the delightful world of making No-Bake Dulce de Leche Cheesecake Squares, I’ve gathered a few cooking notes that can help you achieve the best results. These little nuggets of wisdom can make a big difference in your dessert-making adventure!
- Room Temperature Ingredients: Make sure your cream cheese and heavy cream are at room temperature before you start. This helps them blend together smoothly, creating that luscious texture we all crave.
- Chill Time is Key: Don’t rush the chilling process! Allowing the cheesecake to set properly in the fridge ensures that it holds its shape when you cut into it. Patience is a virtue, especially in the kitchen!
- Use Quality Dulce de Leche: Whether you choose store-bought or homemade, the quality of your dulce de leche can elevate the flavor of your cheesecake. Look for a brand that has a rich, caramel-like taste.
- Cutting the Squares: When it’s time to cut your cheesecake squares, use a sharp knife dipped in warm water. This helps create clean cuts and prevents the filling from sticking to the knife.
- Storage Tips: If you have leftovers (which is rare in my house!), store them in an airtight container in the fridge. They can last for up to 3 days, but I doubt they’ll last that long!
With these cooking notes in your back pocket, you’re well-equipped to create a stunning dessert that will impress everyone. Now, let’s move on to how to serve these delightful squares!
Serving Suggestions for No-Bake Dulce de Leche Cheesecake Squares Recipe
Now that our No-Bake Dulce de Leche Cheesecake Squares are ready to shine, let’s talk about how to serve them for maximum impact! Presentation can elevate any dessert, and these squares are no exception. Here are some of my favorite serving suggestions that will make your cheesecake squares the star of the show:
- Garnish with Fresh Berries: A handful of fresh berries, like strawberries or blueberries, adds a pop of color and a refreshing contrast to the rich cheesecake. It’s like a burst of summer on your plate!
- Drizzle with Extra Dulce de Leche: For those who can’t get enough of that sweet caramel flavor, a drizzle of extra dulce de leche on top is a must. It not only looks beautiful but also enhances the flavor.
- Serve with Whipped Cream: A dollop of freshly whipped cream on the side adds a light and airy touch. It’s the perfect companion to the creamy cheesecake squares.
- Plate with a Dusting of Cocoa Powder: For a touch of elegance, dust the plate with cocoa powder or powdered sugar before placing the cheesecake squares. It creates a lovely contrast and makes for a stunning presentation.
- Pair with Coffee or Tea: These cheesecake squares are delightful with a cup of coffee or tea. The warm beverage complements the sweetness of the dessert beautifully.
With these serving suggestions, you’ll not only impress your guests but also create a memorable dessert experience. I can’t wait for you to share these delicious squares with your friends and family. They’re sure to be a hit!
Tips for Making No-Bake Dulce de Leche Cheesecake Squares Recipe
As I’ve whipped up these No-Bake Dulce de Leche Cheesecake Squares time and time again, I’ve gathered a treasure trove of tips that can help you achieve dessert perfection. Here are some of my favorite nuggets of wisdom to ensure your cheesecake squares turn out just right:
- Prep Ahead: If you’re planning for a special occasion, consider making the cheesecake squares a day in advance. This allows the flavors to deepen and the texture to set beautifully.
- Experiment with Flavors: Don’t be afraid to play around with flavors! Adding a splash of almond extract or a hint of citrus zest can elevate the taste and make it uniquely yours.
- Keep It Cool: If your kitchen is warm, consider chilling your mixing bowls and beaters before whipping the cream. This helps achieve those perfect stiff peaks more easily.
- Use a Sharp Knife: When it’s time to cut your cheesecake squares, a sharp knife dipped in hot water will give you clean, beautiful slices. Wipe the knife between cuts for the best results!
- Don’t Skip the Sea Salt: A sprinkle of sea salt on top of the finished squares can enhance the sweetness of the dulce de leche and create a delightful contrast. It’s a small touch that makes a big difference!
With these tips in your back pocket, you’re ready to create No-Bake Dulce de Leche Cheesecake Squares that will wow your family and friends. Happy baking, and enjoy every delicious bite!
Breakdown of Time for No-Bake Dulce de Leche Cheesecake Squares Recipe
As a home cook, I know that time management is key in the kitchen. When it comes to making these No-Bake Dulce de Leche Cheesecake Squares, it’s all about planning ahead. Here’s a quick breakdown of the time you’ll need to whip up this delightful dessert:
- Prep Time: 20 minutes
- Chilling Time: 4 hours (or overnight for best results)
- Total Time: 4 hours and 20 minutes (or overnight if you choose to chill it longer)
While the prep time is relatively short, the chilling time is where the magic happens. It allows the flavors to meld and the cheesecake to set perfectly. I often find myself eagerly checking the fridge, counting down the minutes until I can finally indulge in these creamy squares. Trust me, the wait is worth it!
Nutritional Information for No-Bake Dulce de Leche Cheesecake Squares Recipe
As a passionate home cook, I always find it helpful to know the nutritional information of the dishes I create. It allows me to enjoy my desserts while being mindful of what I’m consuming. Here’s a general breakdown of the nutritional information for one serving of No-Bake Dulce de Leche Cheesecake Squares, assuming the recipe yields 16 squares:
- Calories: Approximately 250
- Fat: 18g
- Saturated Fat: 10g
- Cholesterol: 60mg
- Sodium: 150mg
- Carbohydrates: 22g
- Fiber: 1g
- Sugar: 12g
- Protein: 3g
Keep in mind that these values can vary based on the specific brands of ingredients you use and any optional add-ons you choose to include. If you’re looking to lighten things up a bit, consider using reduced-fat cream cheese or a sugar substitute. Regardless of the nutritional content, I believe that enjoying a sweet treat like these cheesecake squares is all about balance. So, savor each bite and share the joy with your loved ones!
Frequently Asked Questions about No-Bake Dulce de Leche Cheesecake Squares Recipe
As I’ve shared my love for No-Bake Dulce de Leche Cheesecake Squares, I’ve often received questions from fellow home cooks eager to try this delightful dessert. I love connecting with others through cooking, so I’ve compiled some of the most frequently asked questions to help you on your cheesecake journey!
Can I use a different type of crust?
Absolutely! While I adore the classic graham cracker crust, you can experiment with other options. A chocolate cookie crust or even an almond flour crust can add a unique twist. Just make sure to adjust the butter amount accordingly to keep it well-bound.
How long do these cheesecake squares last in the fridge?
These cheesecake squares can last up to 3 days in the fridge when stored in an airtight container. However, I doubt they’ll last that long in my house! They’re just too delicious to resist!
Can I freeze the cheesecake squares?
Yes, you can freeze them! Just make sure to wrap them tightly in plastic wrap and then place them in an airtight container. They can be frozen for up to a month. When you’re ready to enjoy, let them thaw in the fridge overnight for the best texture.
What can I substitute for dulce de leche?
If you can’t find dulce de leche, you can use caramel sauce as a substitute. While it won’t have the same depth of flavor, it will still provide that sweet, creamy goodness. You can also make your own dulce de leche at home by simmering sweetened condensed milk!
Can I make this recipe gluten-free?
Definitely! To make gluten-free No-Bake Dulce de Leche Cheesecake Squares, simply use gluten-free graham crackers or a gluten-free cookie alternative for the crust. The rest of the ingredients are naturally gluten-free, so you’re good to go!
How can I make the cheesecake filling lighter?
If you’re looking to lighten up the filling, consider using reduced-fat cream cheese and substituting some of the heavy cream with Greek yogurt. This will still give you a creamy texture while cutting down on calories.
These questions reflect the curiosity and creativity that come with cooking, and I love that! If you have any more questions or need further clarification, feel free to reach out. Cooking is all about sharing knowledge and experiences, and I’m here to help you create the best No-Bake Dulce de Leche Cheesecake Squares possible!
Conclusion on No-Bake Dulce de Leche Cheesecake Squares Recipe
As I wrap up this delightful journey through the world of No-Bake Dulce de Leche Cheesecake Squares, I can’t help but feel a sense of joy and satisfaction. This recipe is not just about creating a delicious dessert; it’s about the memories made in the kitchen and the smiles shared around the table. The creamy texture, the rich flavor of dulce de leche, and the buttery crust come together to create a treat that is simply irresistible.
What I love most about these cheesecake squares is their versatility. Whether you’re hosting a gathering, celebrating a special occasion, or simply treating yourself after a long day, they fit perfectly into any scenario. Plus, the no-bake aspect means you can whip them up without the fuss of turning on the oven, making them a go-to recipe for any home cook.
So, gather your ingredients, roll up your sleeves, and dive into this sweet adventure. I promise you, once you take that first bite, you’ll understand why these No-Bake Dulce de Leche Cheesecake Squares have a special place in my heart. Happy cooking, and may your kitchen always be filled with love and laughter!


