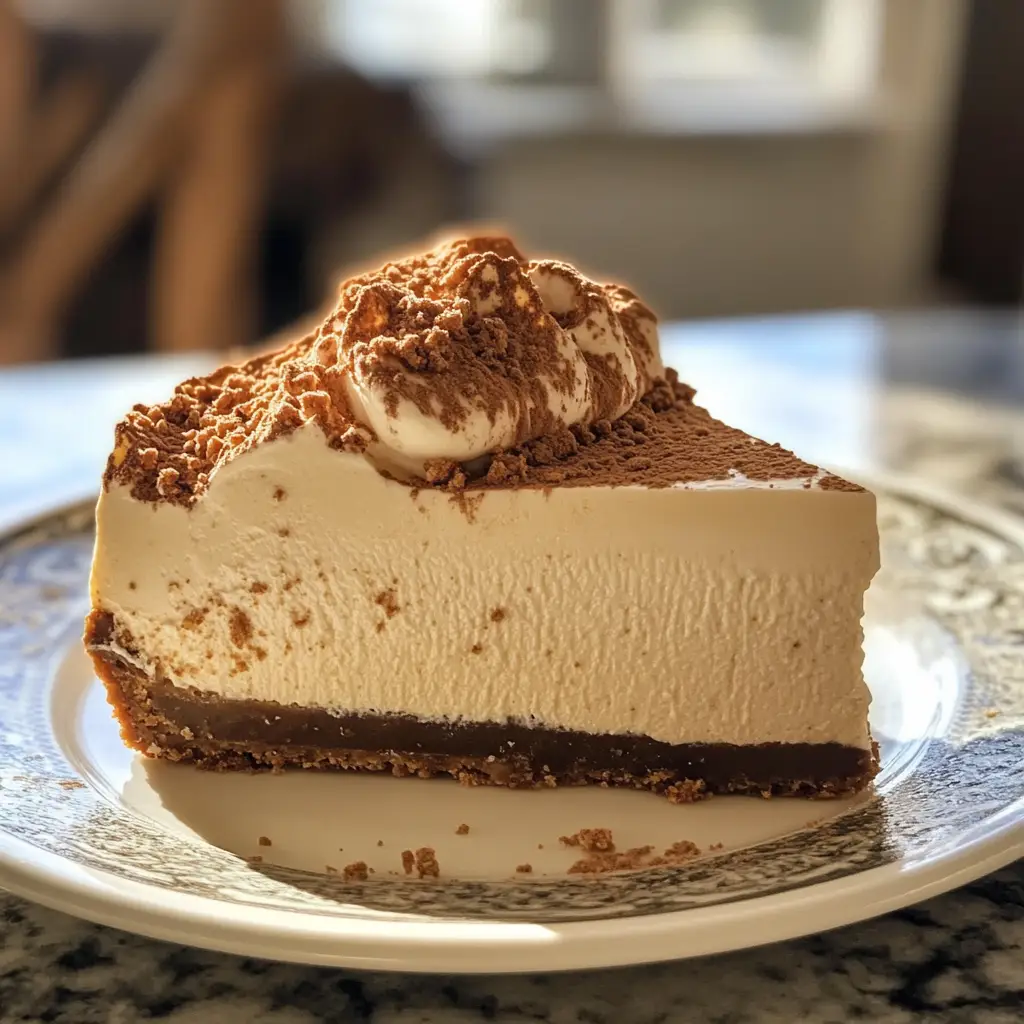
Introduction to No-Bake Biscoff Cheesecake Recipe
As a passionate home cook, I often find myself on a delightful journey through flavors and textures. One of my favorite stops along this culinary path is the world of cheesecakes. They are like a blank canvas, waiting for the right brush strokes of flavor to bring them to life. Today, I want to share with you a recipe that has become a staple in my kitchen: the No-Bake Biscoff Cheesecake.
Imagine a dessert that combines the creamy richness of cheesecake with the warm, spiced notes of Biscoff cookies. It’s like a hug in dessert form! I first stumbled upon this recipe during a cozy afternoon spent browsing through my favorite food blogs. The idea of a no-bake cheesecake intrigued me, especially since I often find myself in a rush but still craving something sweet and indulgent.
What I love most about this No-Bake Biscoff Cheesecake is how simple it is to make. You don’t need to turn on the oven, which is a huge plus during those hot summer months. Plus, the combination of the buttery cookie crust and the velvety filling creates a symphony of flavors that dance on your palate. It’s a dessert that never fails to impress my family and friends, and I can’t wait for you to try it!
In this article, I’ll guide you through each step of the process, sharing tips and tricks that I’ve learned along the way. Whether you’re a seasoned baker or a novice in the kitchen, this recipe is approachable and fun. So, grab your mixing bowl and let’s dive into the delicious world of No-Bake Biscoff Cheesecake!
Ingredients for No-Bake Biscoff Cheesecake Recipe
Before we embark on our cheesecake adventure, let’s gather all the ingredients we’ll need. I believe that using quality ingredients makes a world of difference in the final product. So, let’s make sure we have everything ready to create this delightful No-Bake Biscoff Cheesecake!
Main Ingredients
- For the crust:
- 200g Biscoff cookies (about 24 cookies)
- 100g unsalted butter, melted
- For the cheesecake filling:
- 400g cream cheese, softened
- 100g powdered sugar
- 200ml heavy whipping cream
- 1 teaspoon vanilla extract
- 200g Biscoff spread (for that extra flavor punch!)
When choosing your Biscoff cookies, I recommend going for the original ones. They have that perfect balance of sweetness and spice that makes this cheesecake truly special. As for the cream cheese, make sure it’s at room temperature. This helps achieve that smooth, creamy texture we all love!
Optional Add-ons
- Chopped Biscoff cookies for garnish
- Chocolate shavings or drizzles for a touch of decadence
- Fresh fruit, like strawberries or raspberries, for a pop of color and freshness
These optional add-ons can elevate your cheesecake to new heights. I often sprinkle some chopped Biscoff cookies on top for that extra crunch. It’s like a little surprise with every bite! Feel free to get creative and make this dessert your own.
How to Prepare No-Bake Biscoff Cheesecake Recipe
Now that we have all our ingredients ready, it’s time to roll up our sleeves and dive into the fun part: preparing the No-Bake Biscoff Cheesecake! I promise, this process is as enjoyable as it is rewarding. Let’s break it down step by step.
Step 1: Prepare the Crust
First things first, we need to create that delicious crust that will hold our cheesecake together. Start by crushing the Biscoff cookies into fine crumbs. You can do this by placing them in a zip-top bag and using a rolling pin, or you can use a food processor if you have one handy. I love the sound of the cookies crumbling; it’s like music to my ears!
Once you have your cookie crumbs, mix them with the melted butter in a bowl until everything is well combined. The mixture should resemble wet sand. Now, press this mixture firmly into the bottom of a springform pan. Make sure it’s even and compact; this will give you a sturdy base for your cheesecake.
Tips for Step 1
- For an extra crunchy crust, you can bake it at 180°C (350°F) for about 10 minutes. Just let it cool before adding the filling!
- Don’t be shy when pressing the crumbs down; a firm hand will ensure your crust holds together beautifully.
Step 2: Make the Cheesecake Filling
Now, let’s whip up that creamy filling! In a large mixing bowl, beat the softened cream cheese with an electric mixer until it’s smooth and fluffy. This step is crucial because it sets the stage for a velvety texture. I always take a moment to enjoy the creamy goodness before moving on!
Next, add the powdered sugar, vanilla extract, and Biscoff spread. Mix until everything is well combined. The aroma will be heavenly! In a separate bowl, whip the heavy cream until stiff peaks form. Gently fold the whipped cream into the cream cheese mixture. This step adds lightness to the filling, making it airy and delightful.
Tips for Step 2
- Make sure your cream cheese is at room temperature to avoid lumps in your filling.
- When folding in the whipped cream, be gentle! You want to keep that airy texture.
Step 3: Assemble the Cheesecake
With the crust and filling ready, it’s time to bring everything together! Pour the cheesecake filling over the prepared crust, spreading it evenly with a spatula. I love to take my time with this step, making sure every corner is filled with that luscious mixture. It’s like painting a masterpiece!
If you’re feeling fancy, you can swirl some extra Biscoff spread on top for a beautiful design. Just use a knife to create swirls; it adds a lovely touch to the presentation.
Tips for Step 3
- Use a spatula to smooth the top for a clean finish.
- Don’t worry if it’s not perfect; a little rustic charm adds character!
Step 4: Chill the Cheesecake
Now comes the hardest part: waiting! Cover the cheesecake with plastic wrap and place it in the refrigerator. Let it chill for at least 4 hours, or overnight if you can resist the temptation. This step allows the flavors to meld together and the cheesecake to set properly. I often find myself peeking into the fridge, dreaming of that first slice!
Tips for Step 4
- If you’re short on time, a 4-hour chill will work, but overnight is best for flavor.
- To prevent condensation, make sure the cheesecake is well covered.
Equipment Needed for No-Bake Biscoff Cheesecake Recipe
Before we dive into the kitchen, let’s gather the essential tools that will help us create this delightful No-Bake Biscoff Cheesecake. Having the right equipment makes the process smoother and more enjoyable. Here’s what you’ll need:
- Springform Pan: This is a must-have for cheesecakes! It allows for easy removal of the cheesecake once it’s set. If you don’t have one, a regular round cake pan will work, but be careful when serving.
- Mixing Bowls: You’ll need a couple of mixing bowls—one for the crust and another for the filling. I like to use glass bowls because they’re easy to clean and you can see the ingredients mixing!
- Electric Mixer: A hand mixer or stand mixer will make whipping the cream cheese and heavy cream a breeze. If you don’t have one, a whisk will do, but it’ll take a bit more elbow grease!
- Spatula: A rubber spatula is perfect for folding in the whipped cream and smoothing the cheesecake filling. It’s like your best friend in the kitchen!
- Measuring Cups and Spoons: Accurate measurements are key to a successful cheesecake. Make sure you have these handy!
- Food Processor or Rolling Pin: You’ll need one of these to crush the Biscoff cookies for the crust. If you don’t have a food processor, a rolling pin and a zip-top bag work just as well!
With these tools at your side, you’re all set to embark on your cheesecake-making adventure. Remember, cooking is all about having fun, so don’t stress if you have to improvise a little. Let’s get ready to create something delicious!
Variations of No-Bake Biscoff Cheesecake Recipe
As I’ve experimented with my No-Bake Biscoff Cheesecake, I’ve discovered that there are so many delightful variations to explore! Each twist adds a unique flavor profile, making this dessert even more exciting. Here are a few variations that I absolutely love:
- Chocolate Biscoff Cheesecake: For all the chocolate lovers out there, try adding melted chocolate to the cheesecake filling. You can mix in about 100g of melted dark chocolate for a rich, decadent twist. It pairs beautifully with the Biscoff flavor!
- Peanut Butter Biscoff Cheesecake: If you’re a fan of peanut butter, swirl in some creamy peanut butter into the filling. It adds a nutty richness that complements the spiced notes of the Biscoff cookies perfectly.
- Fruit-Infused Biscoff Cheesecake: For a refreshing touch, consider folding in some pureed fruit, like strawberries or mangoes, into the filling. This adds a burst of flavor and a lovely color to your cheesecake.
- Spiced Pumpkin Biscoff Cheesecake: Perfect for fall, you can incorporate pumpkin puree and a dash of pumpkin spice into the filling. It’s like a cozy autumn hug in dessert form!
These variations not only keep things interesting but also allow you to tailor the cheesecake to your taste preferences. I love to switch things up depending on the season or occasion. So, don’t hesitate to get creative and make this No-Bake Biscoff Cheesecake your own!
Cooking Notes for No-Bake Biscoff Cheesecake Recipe
As I’ve whipped up this No-Bake Biscoff Cheesecake countless times, I’ve gathered a few cooking notes that can help you achieve the best results. These little nuggets of wisdom can make a big difference in your cheesecake-making journey!
- Room Temperature Ingredients: Always ensure your cream cheese and heavy cream are at room temperature before you start. This helps them blend smoothly, creating that luscious texture we all crave.
- Chilling Time: Patience is key! While it’s tempting to dig in right away, allowing the cheesecake to chill overnight enhances the flavors and gives it a firmer texture. Trust me, it’s worth the wait!
- Serving Temperature: For the best experience, serve the cheesecake slightly chilled. This way, the flavors are more pronounced, and the texture is perfectly creamy.
- Storage: If you have leftovers (which is rare in my house!), store the cheesecake in an airtight container in the fridge. It can last for up to 3 days, but I doubt it will stick around that long!
- Garnishing: Don’t forget to have fun with garnishes! A sprinkle of crushed Biscoff cookies or a drizzle of chocolate can elevate the presentation and make it even more tempting.
These cooking notes are like little secrets I’ve learned along the way. They help ensure that every time I make this No-Bake Biscoff Cheesecake, it turns out just as delicious as the last. Happy baking!
Serving Suggestions for No-Bake Biscoff Cheesecake Recipe
Now that our No-Bake Biscoff Cheesecake is ready to dazzle, let’s talk about how to serve it up! Presentation can elevate any dessert, and this cheesecake is no exception. Here are some of my favorite serving suggestions that will make your cheesecake shine:
- Chilled Slices: Serve the cheesecake cold, straight from the fridge. I love to cut it into generous slices, allowing everyone to savor the creamy goodness.
- Garnish with Style: Top each slice with a dollop of whipped cream and a sprinkle of crushed Biscoff cookies. It adds a delightful crunch and a pop of flavor that complements the cheesecake beautifully.
- Drizzle of Caramel: For an extra touch of indulgence, drizzle some caramel sauce over the top. The sweet, sticky goodness pairs perfectly with the spiced notes of the Biscoff.
- Fresh Fruit: Add a few fresh berries, like strawberries or raspberries, on the side. Their tartness balances the sweetness of the cheesecake and adds a lovely color contrast.
- Mini Cheesecake Cups: For a fun twist, consider serving the cheesecake in individual cups. Layer the crust and filling in small glasses for a charming presentation that’s perfect for parties!
These serving suggestions not only enhance the visual appeal but also add layers of flavor and texture to your No-Bake Biscoff Cheesecake. I always enjoy experimenting with different toppings and presentations, making each serving a little adventure. So, get creative and have fun with it!
Tips for Perfecting No-Bake Biscoff Cheesecake Recipe
As I’ve crafted my No-Bake Biscoff Cheesecake over the years, I’ve picked up a few tips that can help you achieve cheesecake perfection. These little gems of wisdom can make all the difference in your baking journey!
- Use Quality Ingredients: The better the ingredients, the better the cheesecake! Opt for high-quality cream cheese and fresh Biscoff cookies. It truly elevates the flavor.
- Don’t Rush the Chilling: I know it’s hard to wait, but allowing the cheesecake to chill overnight is key. It helps the flavors meld beautifully and gives the cheesecake a firmer texture.
- Be Gentle When Folding: When incorporating the whipped cream into the cream cheese mixture, use a gentle folding motion. This keeps the filling light and airy, which is what we want!
- Experiment with Flavors: Don’t hesitate to add your own twist! Whether it’s a hint of espresso or a splash of orange zest, these small additions can create a unique flavor profile.
- Check for Doneness: Before serving, gently shake the cheesecake. If it wobbles slightly in the center, it’s ready! If it’s too jiggly, give it more time in the fridge.
These tips have helped me create a No-Bake Biscoff Cheesecake that’s always a hit. Remember, cooking is about enjoying the process, so have fun and let your creativity shine!
Breakdown of Time for No-Bake Biscoff Cheesecake Recipe
As a home cook, I know that time management is key in the kitchen. When it comes to making my No-Bake Biscoff Cheesecake, I like to have a clear idea of how long each step will take. This way, I can plan my day and ensure everything runs smoothly. Here’s a quick breakdown of the time involved:
- Prep Time: Approximately 30 minutes. This includes gathering your ingredients, preparing the crust, and making the cheesecake filling. It’s a fun and engaging process that flies by!
- Chilling Time: At least 4 hours, but I recommend overnight for the best flavor and texture. This is the hardest part, as the anticipation builds, but trust me, it’s worth the wait!
- Total Time: About 4 hours and 30 minutes (or overnight if you choose to chill it longer). This total time includes both the prep and chilling phases, giving you a delicious cheesecake ready to impress!
By keeping track of these times, I can easily fit this delightful dessert into my schedule. Whether I’m preparing for a family gathering or just treating myself, knowing the timeline helps me enjoy the process even more. Happy baking!
Nutritional Information for No-Bake Biscoff Cheesecake Recipe
As a passionate home cook, I believe it’s important to be mindful of what we’re putting into our bodies, even when indulging in a delicious dessert like my No-Bake Biscoff Cheesecake. While this cheesecake is a treat, it’s good to know the nutritional breakdown so you can enjoy it guilt-free. Here’s a general overview of the nutritional information per slice (assuming the cheesecake is cut into 12 slices):
- Calories: Approximately 320 kcal
- Protein: 4g
- Carbohydrates: 30g
- Fat: 22g
- Saturated Fat: 12g
- Sugar: 15g
- Fiber: 1g
Keep in mind that these values can vary based on the specific brands of ingredients you use and any optional add-ons you choose to include. If you’re looking to lighten things up a bit, consider using reduced-fat cream cheese or a sugar substitute. However, I always say that moderation is key, and enjoying a slice of this creamy delight every now and then is perfectly fine!
So, whether you’re treating yourself or sharing with loved ones, you can savor each bite of this No-Bake Biscoff Cheesecake, knowing it’s a delicious indulgence worth every calorie!
Frequently Asked Questions about No-Bake Biscoff Cheesecake Recipe
As I’ve shared my No-Bake Biscoff Cheesecake with friends and family, I’ve encountered a few common questions that pop up time and again. I love answering these queries because it helps everyone feel more confident in their cheesecake-making journey. Here are some of the most frequently asked questions about this delightful dessert:
Can I use a different type of cookie for the crust?
Absolutely! While Biscoff cookies give this cheesecake its signature flavor, you can experiment with other cookies like Oreos, graham crackers, or even digestive biscuits. Just make sure to adjust the amount of butter if the cookies are different in texture or sweetness.
How long can I store the No-Bake Biscoff Cheesecake?
If you have any leftovers (which is rare in my house!), you can store the cheesecake in an airtight container in the fridge for up to 3 days. Just be sure to keep it covered to maintain its freshness!
Can I freeze the No-Bake Biscoff Cheesecake?
Yes, you can freeze this cheesecake! Just make sure to wrap it tightly in plastic wrap and then in aluminum foil to prevent freezer burn. It can be frozen for up to 2 months. When you’re ready to enjoy it, let it thaw in the fridge overnight before serving.
What can I use instead of cream cheese?
If you’re looking for a dairy-free option, you can use vegan cream cheese or a mixture of silken tofu blended until smooth. This will give you a similar creamy texture while keeping it plant-based. Just keep in mind that the flavor may vary slightly.
Can I make mini versions of this cheesecake?
Definitely! Making mini cheesecakes is a fun idea. You can use muffin tins or small jars to create individual servings. Just adjust the chilling time, as they may set faster than a full-sized cheesecake.
These FAQs are just a glimpse into the wonderful world of No-Bake Biscoff Cheesecake. I hope they help you feel more prepared and excited to create this delicious dessert in your own kitchen. Remember, every cheesecake is a chance to express your creativity, so don’t hesitate to ask more questions or share your experiences!
Conclusion on No-Bake Biscoff Cheesecake Recipe
As I wrap up this delightful journey through the world of No-Bake Biscoff Cheesecake, I can’t help but feel a sense of joy. This recipe is not just about creating a dessert; it’s about crafting a moment of happiness to share with loved ones. The creamy filling, the buttery crust, and the warm spices of Biscoff cookies come together to create a symphony of flavors that is simply irresistible.
What I love most about this cheesecake is its simplicity. With no baking required, it’s perfect for those busy days when you still want to impress your family and friends. Plus, the variations allow you to get creative and make it your own, whether you’re adding chocolate, fruit, or even a hint of spice. Each bite is a reminder that cooking can be both fun and rewarding.
So, whether you’re celebrating a special occasion or just treating yourself, I encourage you to give this No-Bake Biscoff Cheesecake a try. It’s a dessert that brings smiles and satisfaction, and I can’t wait for you to experience the joy it brings. Happy baking, and may your kitchen always be filled with love and deliciousness!


