Introduction to Homemade Tandoori Roti Recipe
As a passionate home cook, there’s something magical about the aroma of freshly baked bread wafting through my kitchen. The first time I made homemade tandoori roti, I felt like I had unlocked a secret door to a world of flavors. It was a chilly evening, and I decided to recreate a dish I had enjoyed at a local Indian restaurant. The moment I rolled out that dough and placed it on the hot skillet, I knew I was in for a treat.
Tandoori roti is not just any bread; it’s a delightful flatbread that pairs perfectly with curries, dals, and even grilled meats. The way it puffs up and develops those beautiful charred spots is nothing short of a culinary dance. I remember the first time I served it to my family. Their eyes lit up with joy as they tore off pieces, scooping up their favorite dishes. It was a moment of pure happiness, and I knew I had to share this experience with others.
In this recipe, I’ll guide you through the steps to create your own homemade tandoori roti. Whether you’re a seasoned cook or just starting your culinary journey, I promise you’ll find joy in the process. With simple ingredients and a little bit of love, you can bring the taste of India right into your home. So, roll up your sleeves, and let’s get started on this delicious adventure!
Ingredients for Homemade Tandoori Roti Recipe
Before we dive into the cooking process, let’s gather our ingredients. Having everything ready makes the experience smoother and more enjoyable. I always find that when I have my ingredients prepped, it feels like I’m setting the stage for a beautiful performance in the kitchen. Here’s what you’ll need for your homemade tandoori roti recipe.
Main Ingredients
- Whole wheat flour: 2 cups (I prefer using organic flour for a richer flavor and better texture.)
- Water: ¾ cup (Adjust as needed; the dough should be soft but not sticky.)
- Salt: 1 teaspoon (This enhances the flavor, so don’t skip it!)
- Oil: 1 tablespoon (I like to use olive oil, but any cooking oil will do.)
Optional Add-ons
- Yogurt: 2 tablespoons (Adding yogurt makes the roti softer and adds a slight tang.)
- Herbs: Chopped cilantro or mint (A sprinkle of fresh herbs can elevate the flavor.)
- Spices: A pinch of cumin or ajwain (carom seeds) for an aromatic twist.
When sourcing your ingredients, I recommend visiting local markets or organic stores. Fresh ingredients can make a world of difference in flavor. Plus, supporting local farmers is always a win-win! Now that we have our ingredients ready, let’s move on to the fun part—preparing our delicious tandoori roti!
How to Prepare Homemade Tandoori Roti Recipe
Now that we have our ingredients ready, it’s time to roll up our sleeves and dive into the preparation of our homemade tandoori roti. This part is where the magic happens! I love the feeling of working with dough; it’s like a mini workout and a creative outlet all in one. Let’s break it down step by step.
Step 1: Mixing the Dough
First things first, let’s mix our ingredients. In a large mixing bowl, combine the whole wheat flour and salt. I like to use my hands for this part; it feels more personal. Gradually add water and oil, mixing until the dough starts to come together. It should feel like a soft cloud, not too sticky but not dry either.
Tips for Mixing the Dough
- Start with less water and add more as needed. It’s easier to add than to take away!
- Use a fork or your fingers to mix initially, then switch to your hands for a better feel.
Step 2: Kneading the Dough
Once the dough is mixed, it’s time to knead! Transfer the dough to a floured surface and knead it for about 8-10 minutes. This is where the dough gets its strength and elasticity. I often think of it as giving the dough a little massage. It should become smooth and pliable.
Tips for Kneading the Dough
- Use the heel of your hand to push the dough away from you, then fold it back over itself.
- If the dough sticks to your hands, sprinkle a little flour to keep it manageable.
Step 3: Resting the Dough
After kneading, it’s crucial to let the dough rest. Cover it with a damp cloth and let it sit for at least 30 minutes. This resting period allows the gluten to relax, making it easier to roll out later. I often take this time to clean up my workspace or prepare my favorite curry!
Importance of Resting
- Resting helps the dough become softer and more pliable.
- It also enhances the flavor as the ingredients meld together.
Step 4: Shaping the Roti
Once the dough has rested, it’s time to shape our rotis. Divide the dough into equal portions, about the size of a golf ball. Roll each ball between your palms to make it smooth. Then, on a floured surface, flatten it slightly and start rolling it out into a circle. Aim for about 6-8 inches in diameter. I like to imagine I’m creating little edible canvases!
Techniques for Shaping
- Use even pressure while rolling to ensure uniform thickness.
- If the edges crack, just pinch them back together; it’s all part of the process!
Step 5: Cooking the Roti
Now comes the exciting part—cooking! Preheat your tandoor or skillet over medium-high heat. Once hot, place the rolled-out roti on the surface. If you’re using a skillet, cook for about 1-2 minutes on one side until you see bubbles forming. Flip it over and cook for another minute. If you’re using a tandoor, you can stick the roti to the walls for that authentic charred flavor.
Tips for Cooking on a Tandoor or Skillet
- For a tandoor, make sure it’s hot enough; you want that sizzle!
- For a skillet, you can cover it with a lid to help it puff up.
And there you have it! Your homemade tandoori roti is ready to be enjoyed. The smell alone will have everyone gathering around the kitchen, eager to dig in. I can’t wait for you to experience the joy of making this delightful bread!
Equipment Needed for Homemade Tandoori Roti Recipe
Before we embark on our culinary journey, let’s gather the essential tools that will help us create the perfect homemade tandoori roti. Having the right equipment makes the process smoother and more enjoyable. Here’s what you’ll need:
- Mixing Bowl: A large bowl is perfect for mixing your dough. I often use a glass or stainless steel bowl, as they’re easy to clean and durable.
- Rolling Pin: This is essential for rolling out your dough into those lovely circles. If you don’t have one, a clean wine bottle can work in a pinch!
- Floured Surface: A clean countertop or a large cutting board will do. Just make sure it’s floured to prevent sticking.
- Skillet or Tandoor: A heavy-bottomed skillet is great for cooking the roti on the stovetop. If you have a tandoor, that’s even better for that authentic flavor!
- Spatula: A flat spatula helps flip the roti easily. I love using a wooden spatula for this task.
- Damp Cloth: This is used to cover the dough while it rests, keeping it moist and pliable.
Don’t worry if you don’t have all the fancy tools. The beauty of cooking is that you can often improvise. Just remember, it’s all about the love and care you put into your food. Now that we have our equipment ready, let’s move on to the next exciting step of making our delicious tandoori roti!
Variations of Homemade Tandoori Roti Recipe
As I’ve explored the world of homemade tandoori roti, I’ve discovered that there are so many delightful variations to try! Each twist adds a unique flavor and character to this beloved bread. Here are a few of my favorites that I think you’ll enjoy:
- Garlic Tandoori Roti: Simply add minced garlic to the dough for a fragrant twist. The aroma of garlic wafting through the kitchen is simply irresistible!
- Stuffed Tandoori Roti: For a heartier option, stuff the roti with spiced potatoes, paneer, or even sautéed vegetables before rolling it out. It’s like a surprise waiting to be discovered!
- Herbed Tandoori Roti: Mix in finely chopped herbs like cilantro, mint, or even spinach into the dough. This not only adds color but also a fresh burst of flavor.
- Spiced Tandoori Roti: Incorporate spices like cumin, coriander, or even chili powder into the dough for an extra kick. It’s a great way to customize the heat level to your liking!
These variations are just the tip of the iceberg! I love experimenting with different ingredients, and I encourage you to do the same. Each time I try a new version, it feels like I’m embarking on a new culinary adventure. So, don’t hesitate to get creative and make this recipe your own!
Cooking Notes for Homemade Tandoori Roti Recipe
As I’ve spent time perfecting my homemade tandoori roti recipe, I’ve gathered a few cooking notes that can help elevate your experience. These little tips can make a big difference in the final result, ensuring your rotis turn out soft, flavorful, and perfectly cooked.
- Temperature Matters: Whether you’re using a tandoor or a skillet, make sure it’s hot enough before placing the roti on it. A sizzling sound when the dough hits the surface is a good sign!
- Puffing Up: If your roti doesn’t puff up while cooking, don’t worry! You can gently press down on the edges with a spatula to encourage it to rise. It’s like giving it a little encouragement!
- Keep Them Warm: Once cooked, stack your rotis in a clean kitchen towel to keep them warm and soft. This also helps retain moisture, making each bite delightful.
- Experiment with Cooking Times: Every stove and tandoor is different. Keep an eye on your rotis and adjust the cooking time as needed. It’s all about finding that perfect balance!
- Storage Tips: If you have leftovers, store them in an airtight container. You can reheat them on a skillet or in the microwave, but I recommend a quick toast on the skillet for that fresh taste.
These cooking notes are like little nuggets of wisdom I’ve picked up along the way. They help me create the best tandoori roti every time, and I hope they do the same for you. Happy cooking!
Serving Suggestions for Homemade Tandoori Roti Recipe
Now that your homemade tandoori roti is ready, it’s time to think about how to serve it! I always find that the right accompaniments can elevate the experience to a whole new level. Here are some of my favorite serving suggestions that will make your meal truly memorable:
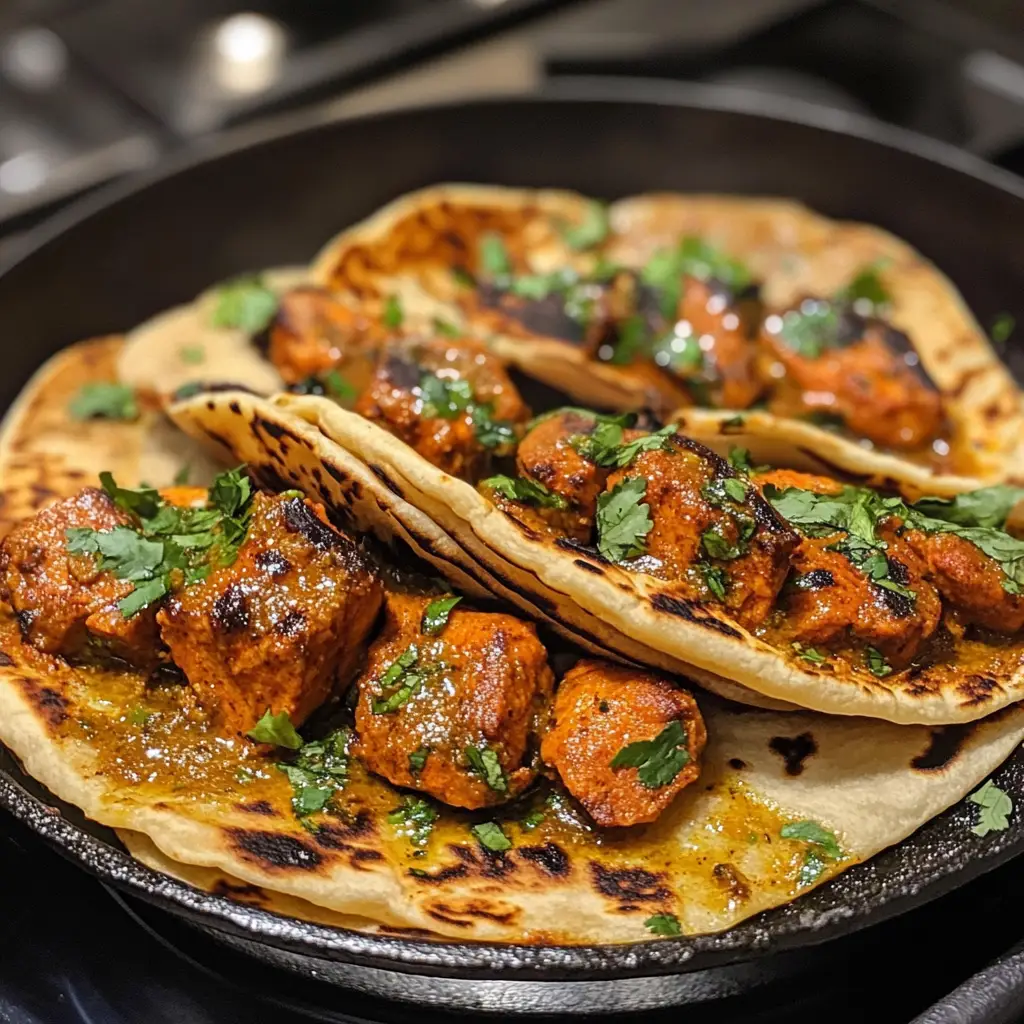
- With Curries: Tandoori roti pairs beautifully with rich, flavorful curries like butter chicken, palak paneer, or chana masala. The soft bread is perfect for scooping up every last bit of sauce!
- With Dals: A warm bowl of dal (lentils) is a comforting match for tandoori roti. The earthy flavors of the dal complement the bread perfectly, creating a wholesome meal.
- With Grilled Meats: If you’re in the mood for something heartier, serve your tandoori roti alongside grilled meats or kebabs. The charred flavors of the meat and the bread create a delightful harmony.
- With Yogurt or Raita: A side of cool yogurt or raita (yogurt mixed with herbs and spices) can balance the spices in your meal. It’s refreshing and adds a lovely creaminess!
- As a Wrap: Get creative! Use your tandoori roti as a wrap for grilled vegetables, paneer, or even a spicy chicken filling. It’s a fun way to enjoy the bread in a different form.
These serving suggestions are just a starting point. I love to mix and match based on what I have on hand or what I’m in the mood for. The beauty of homemade tandoori roti is its versatility, so don’t hesitate to get creative and make it your own! Enjoy every bite, and let the flavors transport you to a cozy Indian kitchen!
Tips for Perfect Homemade Tandoori Roti Recipe
As I’ve journeyed through the art of making homemade tandoori roti, I’ve gathered a treasure trove of tips that can help you achieve perfection every time. These little nuggets of wisdom have transformed my cooking experience, and I’m excited to share them with you!
- Use Fresh Ingredients: Fresh flour and quality water can make a world of difference. I always opt for organic whole wheat flour, as it adds a richer flavor and better texture to the roti.
- Don’t Rush the Resting: Allowing the dough to rest is crucial. I often let it sit for an hour if I have the time. This extra rest helps the gluten relax, making the dough easier to roll out.
- Perfect Your Rolling Technique: Aim for even thickness while rolling. I like to rotate the dough a quarter turn after each roll to keep it circular. It’s like a dance with the dough!
- Experiment with Heat Levels: Every stove is different. I recommend starting with medium-high heat and adjusting as needed. You want that perfect sizzle when the roti hits the pan!
- Keep a Damp Cloth Handy: Cover your cooked rotis with a damp cloth to keep them warm and soft. This simple step makes a big difference in texture.
These tips have been my guiding stars in the kitchen, helping me create the perfect tandoori roti time and again. I hope they inspire you to embrace the process and enjoy every moment of your cooking adventure!
Breakdown of Time for Homemade Tandoori Roti Recipe
As a passionate home cook, I know that time management is key in the kitchen. When I first started making homemade tandoori roti, I often found myself losing track of time. Now, I’ve got it down to a science! Here’s a quick breakdown of the time you’ll need for each step of this delightful recipe:
- Prep Time: 15 minutes – This includes gathering your ingredients, mixing the dough, and letting it rest. It’s a great time to enjoy a cup of tea while you wait!
- Cooking Time: 10-15 minutes – Depending on how many rotis you’re making, this time can vary. Each roti takes about 2-3 minutes to cook, so keep an eye on them as they puff up!
- Total Time: 25-30 minutes – In just half an hour, you can have fresh, warm tandoori roti ready to serve. It’s a quick and satisfying way to elevate any meal!
With this time breakdown, you can plan your cooking session more effectively. I often find that knowing how long each step takes helps me enjoy the process even more. So, roll up your sleeves and get ready to create some delicious tandoori roti!
Nutritional Information for Homemade Tandoori Roti Recipe
As a passionate home cook, I always find it important to know what goes into the dishes I prepare. Understanding the nutritional value of my homemade tandoori roti not only helps me make healthier choices but also allows me to share this information with family and friends. Here’s a quick overview of the nutritional content for one serving of tandoori roti, which is typically one piece:
- Calories: Approximately 120 calories
- Carbohydrates: 25 grams
- Protein: 4 grams
- Fat: 2 grams
- Fiber: 3 grams
- Sodium: 200 mg (depending on added salt)
These values can vary based on the specific ingredients and portion sizes you use. For instance, adding yogurt or herbs can slightly alter the nutritional profile. I love that tandoori roti is not only delicious but also a wholesome addition to any meal. It’s a great source of energy, especially when paired with protein-rich dishes like lentils or grilled meats. So, enjoy your homemade tandoori roti guilt-free, knowing it’s a nutritious choice!
Frequently Asked Questions about Homemade Tandoori Roti Recipe
As I’ve shared my journey of making homemade tandoori roti, I’ve often encountered questions from fellow cooking enthusiasts. It’s always exciting to see others eager to dive into this delicious adventure! Here are some of the most frequently asked questions, along with my personal insights to help you along the way.
Can I use all-purpose flour instead of whole wheat flour?
Absolutely! While I love the nutty flavor of whole wheat flour, you can use all-purpose flour if that’s what you have on hand. Just keep in mind that the texture and flavor will be slightly different. All-purpose flour will yield a softer roti, which can be delightful in its own right!
How do I store leftover tandoori roti?
If you have any leftovers (which is rare in my house!), store them in an airtight container or wrap them in foil. They can be kept at room temperature for a day or two. For longer storage, pop them in the freezer. Just reheat them on a skillet for that fresh taste!
What if my roti doesn’t puff up while cooking?
Don’t worry! If your roti doesn’t puff up, it might be due to the heat not being high enough. You can gently press down on the edges with a spatula to encourage it to rise. It’s like giving your roti a little pep talk!
Can I make the dough ahead of time?
Yes, you can! I often prepare the dough a few hours in advance. Just cover it with a damp cloth and let it rest. If you need to store it longer, refrigerate it. Just remember to bring it back to room temperature before rolling it out.
Is it possible to make tandoori roti without a tandoor?
Definitely! A heavy-bottomed skillet works wonderfully for cooking tandoori roti. You can achieve a similar charred effect by cooking it on high heat. If you have an oven, you can also bake them on a pizza stone for a different approach!
These FAQs are just a glimpse into the wonderful world of homemade tandoori roti. I hope they help clear up any doubts you may have and inspire you to get cooking. Remember, every kitchen adventure is a chance to learn and grow, so don’t hesitate to experiment and enjoy the process!
Conclusion on Homemade Tandoori Roti Recipe
As I reflect on my journey of making homemade tandoori roti, I can’t help but feel a sense of accomplishment and joy. This simple yet delightful bread has a way of bringing people together, creating moments of laughter and shared meals. The process of mixing, kneading, and cooking is not just about making food; it’s about crafting memories in the kitchen.
What I love most about tandoori roti is its versatility. Whether you enjoy it with a rich curry, a comforting dal, or even as a wrap for your favorite fillings, it adapts beautifully to any meal. Plus, knowing that I can create something so delicious and wholesome from just a few ingredients makes it all the more rewarding.
So, I encourage you to embark on this culinary adventure. With each batch of tandoori roti you make, you’ll not only hone your cooking skills but also create a warm atmosphere filled with love and flavor. Embrace the process, experiment with variations, and most importantly, enjoy every bite. Happy cooking!


