Introduction to Herbed Garlic Butter Bread
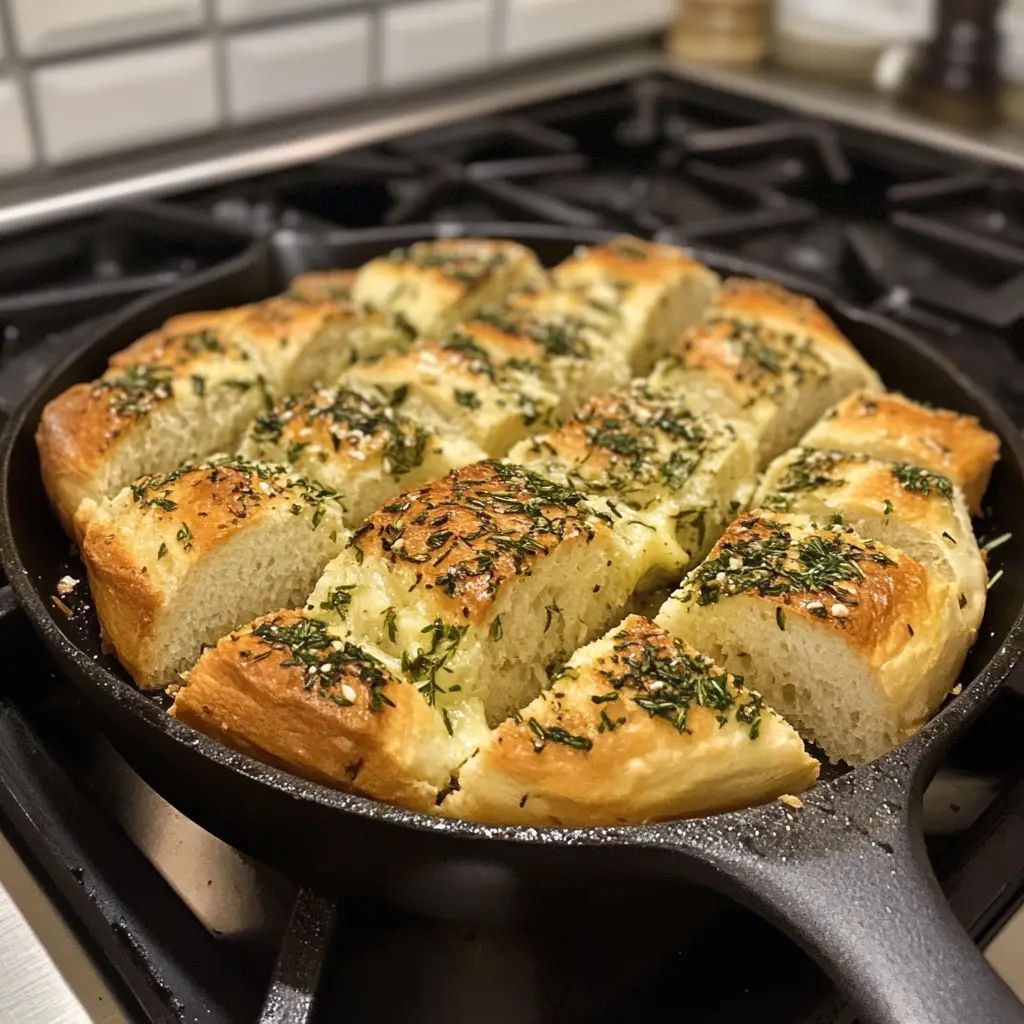
Ah, the aroma of freshly baked bread wafting through the kitchen! It’s like a warm hug on a chilly day. I remember the first time I made Herbed Garlic Butter Bread. It was a rainy afternoon, and I was craving something comforting. I decided to experiment with a simple bread recipe, adding my favorite herbs and a generous amount of garlic butter. The result? A golden, crusty loaf that was bursting with flavor!
This bread is not just a side dish; it’s a star on its own. Imagine tearing off a piece, the soft, fluffy interior revealing itself, while the rich, herby garlic butter seeps into every nook and cranny. It’s perfect for dipping into soups, slathering with cheese, or simply enjoying on its own. Every bite is a delightful experience that transports me back to that cozy kitchen, where the rain pattered against the window, and the world outside faded away.
What I love most about Herbed Garlic Butter Bread is its versatility. You can customize it with your favorite herbs, whether it’s fresh basil, rosemary, or even a sprinkle of chili flakes for a kick. Plus, it’s a fantastic way to impress guests at dinner parties or family gatherings. Trust me, when you serve this bread, everyone will be asking for the recipe!
So, roll up your sleeves and let’s dive into this culinary adventure together. I promise, once you try making this bread, it will become a staple in your kitchen. Let’s get started!
Ingredients for Herbed Garlic Butter Bread
Before we embark on this delicious journey, let’s gather our ingredients. Having everything ready makes the process smoother and more enjoyable. Here’s what you’ll need to create your own Herbed Garlic Butter Bread.
Main Ingredients
- 3 ½ cups all-purpose flour
- 1 packet (2 ¼ teaspoons) active dry yeast
- 1 ½ teaspoons salt
- 1 tablespoon sugar
- 1 ¼ cups warm water (about 110°F or 43°C)
- ¼ cup unsalted butter, melted
- 4 cloves garlic, minced
- 2 tablespoons fresh parsley, chopped (or 1 tablespoon dried parsley)
- 1 tablespoon fresh rosemary, chopped (or 1 teaspoon dried rosemary)
- ½ teaspoon black pepper
When choosing your ingredients, I always recommend going for high-quality flour and fresh herbs. They make a world of difference in flavor. If you can, visit a local farmer’s market for fresh herbs; the aroma is simply unbeatable!
Optional Add-ons
- 1 teaspoon chili flakes for a spicy kick
- ½ cup grated Parmesan cheese for a cheesy twist
- 1 tablespoon of dried Italian seasoning for extra flavor
- Sun-dried tomatoes or olives for a Mediterranean flair
Feel free to get creative! I often toss in whatever I have on hand. One time, I added some sun-dried tomatoes, and it took the bread to a whole new level. The beauty of Herbed Garlic Butter Bread is that it’s forgiving and adaptable, just like a good friend.
How to Prepare Herbed Garlic Butter Bread
Now that we have our ingredients ready, it’s time to roll up our sleeves and get our hands a little floury! Making Herbed Garlic Butter Bread is a delightful process that fills your kitchen with warmth and delicious aromas. Let’s break it down step by step.
Step 1: Preparing the Dough
First things first, we need to create the dough. In a large mixing bowl, combine the warm water, sugar, and yeast. Let it sit for about 5-10 minutes until it becomes frothy. This means your yeast is alive and ready to work its magic!
Next, add the flour, salt, and melted butter to the yeast mixture. Mix it all together until a shaggy dough forms. I love using my hands for this part; it feels so satisfying to knead the dough and watch it come together.
Tips for Step 1
- Make sure your water is warm, not hot. Too hot can kill the yeast!
- If the dough feels too sticky, sprinkle a little more flour as you knead.
- Don’t rush the resting time for the yeast; it’s crucial for a fluffy bread!
Step 2: Making the Herbed Garlic Butter
While the dough is rising, let’s whip up that herbed garlic butter! In a small bowl, combine the melted butter, minced garlic, parsley, rosemary, and black pepper. Mix it well until all the herbs are evenly distributed. The smell will be heavenly!
This butter is what makes our bread so special. You can even taste a little to see if you want to add more herbs or garlic. I often find myself sneaking a spoonful—it’s that good!
Tips for Step 2
- Use fresh garlic for the best flavor. It really elevates the bread!
- If you want a milder garlic taste, you can sauté the minced garlic in the butter for a minute before mixing.
- Feel free to experiment with different herbs based on your preference!
Step 3: Shaping the Bread
Once your dough has risen and doubled in size (about 1 hour), it’s time to shape it. Punch down the dough gently to release the air. Then, turn it out onto a floured surface. Roll it into a rectangle, about 1 inch thick. Now, spread that delicious herbed garlic butter all over the dough, leaving a little space around the edges.
Next, roll the dough tightly from one end to the other, like a cozy sleeping bag for your herbs! Pinch the seams to seal it well. You can also twist the dough for a fun look before placing it in a greased loaf pan.
Tips for Step 3
- Don’t worry if it’s not perfect; rustic is charming!
- For a fun twist, try braiding the dough instead of rolling it.
- Make sure to seal the edges well to keep the butter from leaking out while baking.
Step 4: Baking the Bread
Now comes the exciting part—baking! Preheat your oven to 375°F (190°C). Place your shaped dough in the loaf pan and cover it with a clean kitchen towel. Let it rise for another 30 minutes. This second rise is essential for that fluffy texture.
Once it’s puffed up, pop it in the oven and bake for about 25-30 minutes, or until the top is golden brown. The aroma will be irresistible, and you might find it hard to wait!
Tips for Step 4
- For a shiny crust, brush the top with a little melted butter before baking.
- Check for doneness by tapping the bottom of the loaf; it should sound hollow.
- Let the bread cool for a few minutes before slicing to keep it from getting gummy.
Equipment Needed for Herbed Garlic Butter Bread
Before we dive into the baking process, let’s gather the essential tools that will make our journey smoother. While you don’t need fancy gadgets, having the right equipment can make a world of difference. Here’s what I recommend:
- Mixing Bowl: A large bowl is perfect for mixing your dough. If you don’t have one, any deep container will do.
- Measuring Cups and Spoons: Accurate measurements are key to baking success. If you don’t have these, you can use a regular cup, but keep in mind that it might not be as precise.
- Wooden Spoon or Dough Scraper: A sturdy spoon helps mix the dough, while a dough scraper is great for handling sticky dough. If you don’t have one, your hands work just fine!
- Loaf Pan: This is where your bread will take shape. If you don’t have a loaf pan, you can use a baking sheet to create a free-form loaf.
- Kitchen Towel: A clean towel is essential for covering the dough while it rises. If you’re in a pinch, any cloth will work.
- Oven Mitts: Safety first! Protect your hands when taking the hot bread out of the oven.
With these tools in hand, you’re all set to create your own Herbed Garlic Butter Bread. Remember, it’s not about having the fanciest equipment; it’s about the love and care you put into your cooking. Let’s keep the adventure going!
Variations of Herbed Garlic Butter Bread
One of the things I adore about Herbed Garlic Butter Bread is its ability to adapt and transform. Just like a chameleon, it can take on different flavors and styles based on what you have on hand or what you’re in the mood for. Here are a few delightful variations that I’ve tried and loved:
- Cheesy Garlic Bread: Add a generous amount of shredded mozzarella or cheddar cheese to the herbed garlic butter before spreading it on the dough. The melty cheese creates a gooey, indulgent treat!
- Olive and Herb Bread: Toss in some chopped olives along with your herbs for a Mediterranean twist. The briny flavor of the olives pairs beautifully with the garlic butter.
- Sweet Herb Bread: For a unique take, try adding a tablespoon of honey to the herbed garlic butter. It creates a sweet and savory combination that’s perfect for breakfast or brunch.
- Spicy Garlic Bread: If you love a little heat, mix in some chili flakes or diced jalapeños into the herbed garlic butter. It adds a delightful kick that will wake up your taste buds!
These variations are just the tip of the iceberg! Feel free to experiment with different herbs, spices, or even nuts. The beauty of Herbed Garlic Butter Bread lies in its versatility, allowing you to create something new and exciting every time you bake. I can’t wait to hear about your own delicious twists!
Cooking Notes for Herbed Garlic Butter Bread
As I’ve journeyed through the world of baking Herbed Garlic Butter Bread, I’ve picked up a few handy notes that can make your experience even more enjoyable. Here are some insights that I wish I had known when I first started:
- Room Temperature Ingredients: For the best results, make sure your butter and any eggs (if you choose to add them) are at room temperature. This helps them blend more easily into the dough.
- Don’t Rush the Rising: Patience is key! Allowing the dough to rise properly is crucial for achieving that fluffy texture. If your kitchen is cool, consider placing the dough in a warm spot, like near a sunny window.
- Experiment with Herbs: While I love parsley and rosemary, don’t hesitate to try other herbs like thyme, dill, or even tarragon. Each herb brings its own unique flavor profile to the bread.
- Storage Tips: If you have leftovers (which is rare in my house!), store the bread in an airtight container at room temperature for up to 2 days. For longer storage, wrap it tightly in plastic wrap and freeze it. Just pop it in the oven to reheat!
- Serving Warm: This bread is best enjoyed warm. If you can, serve it fresh out of the oven or reheat slices in the oven for a few minutes before serving. The aroma will fill your kitchen and make everyone’s mouth water!
These little notes can make a big difference in your baking adventure. Remember, cooking is all about learning and having fun. So, don’t be afraid to make mistakes; they often lead to the best discoveries!
Serving Suggestions for Herbed Garlic Butter Bread
Now that we’ve baked our delicious Herbed Garlic Butter Bread, it’s time to think about how to serve it! This bread is incredibly versatile and can complement a variety of dishes. Here are some of my favorite serving suggestions that will make your meal even more delightful:
- With Soups: There’s nothing quite like dipping a warm slice of this bread into a hearty bowl of tomato soup or creamy potato leek soup. The flavors meld beautifully, creating a comforting experience.
- As a Side Dish: Serve it alongside your favorite pasta dishes, like spaghetti or fettuccine alfredo. The herbed garlic butter adds a lovely touch that enhances the overall meal.
- With Cheese: Create a simple cheese platter with a variety of cheeses, olives, and fruits. The bread pairs wonderfully with sharp cheddar, creamy brie, or tangy goat cheese.
- For Breakfast: Toast a slice and spread a little butter or cream cheese on top. You can even add a drizzle of honey for a sweet twist that’s perfect for breakfast or brunch.
- As a Snack: Enjoy it on its own as a tasty snack. I often find myself sneaking a piece right out of the oven, savoring the warm, buttery goodness!
These serving suggestions are just the beginning! Feel free to get creative and pair this bread with whatever you love. The beauty of Herbed Garlic Butter Bread is that it can elevate any meal, making it a true crowd-pleaser. I can’t wait for you to share your favorite ways to enjoy it!
Tips for Perfecting Herbed Garlic Butter Bread
As I’ve baked Herbed Garlic Butter Bread time and time again, I’ve gathered a treasure trove of tips that can help you achieve that perfect loaf every single time. Here are my top suggestions to elevate your bread-making game:
- Use Fresh Ingredients: Fresh herbs and quality butter make a world of difference. The vibrant flavors will shine through in your bread, making it irresistible!
- Don’t Skip the Kneading: Kneading the dough is essential for developing gluten, which gives the bread its structure. Aim for about 8-10 minutes of kneading until the dough is smooth and elastic.
- Check Your Oven Temperature: Ovens can vary, so it’s a good idea to use an oven thermometer. Baking at the right temperature ensures even cooking and a beautifully golden crust.
- Experiment with Toppings: Before baking, sprinkle some coarse sea salt or additional herbs on top of the dough for an extra flavor boost. It adds a delightful crunch and enhances the presentation!
- Let It Rest: After baking, allow the bread to cool for at least 10 minutes before slicing. This helps the texture set and makes for cleaner slices.
These tips are like little nuggets of wisdom that I wish I had when I first started baking. Each loaf is a chance to learn and grow, so don’t be afraid to try new things. Happy baking!
Breakdown of Time for Herbed Garlic Butter Bread
Now that we’ve covered the ingredients and the steps to create your own Herbed Garlic Butter Bread, let’s take a moment to break down the time involved in this delightful baking adventure. Knowing how long each part takes can help you plan your day and ensure everything runs smoothly.
- Prep Time: Approximately 20 minutes. This includes gathering your ingredients, mixing the dough, and preparing the herbed garlic butter.
- First Rise: About 1 hour. This is when the dough gets all fluffy and ready to be shaped.
- Shaping and Second Rise: Around 30 minutes. After shaping the dough, it needs a little more time to rise before baking.
- Cooking Time: 25-30 minutes. This is when your kitchen fills with that irresistible aroma as the bread bakes to golden perfection.
Total Time: Roughly 2 hours and 20 minutes. This includes all the prep, rising, and baking time. While it may seem like a bit of a commitment, trust me, the end result is worth every minute spent in the kitchen!
So, grab your apron and get ready to enjoy the process. Baking Herbed Garlic Butter Bread is not just about the final product; it’s about the joy of creating something delicious from scratch. I can’t wait for you to experience the magic!
Nutritional Information for Herbed Garlic Butter Bread
As a passionate home cook, I believe it’s important to know what goes into our food, especially when it’s something as delightful as Herbed Garlic Butter Bread. While this bread is a treat, it’s also packed with wholesome ingredients that can fit into a balanced diet. Here’s a quick breakdown of the nutritional information per slice (assuming the loaf is divided into 12 slices):
- Calories: Approximately 180 calories
- Protein: 4 grams
- Carbohydrates: 28 grams
- Fat: 6 grams
- Saturated Fat: 3 grams
- Fiber: 1 gram
- Sodium: 150 milligrams
Keep in mind that these values can vary based on the specific ingredients you use, especially if you add optional ingredients like cheese or olives. While Herbed Garlic Butter Bread is a delicious indulgence, it can also be enjoyed in moderation as part of a balanced meal. Pair it with a fresh salad or a hearty soup for a satisfying and nutritious dining experience!
Remember, cooking is about balance and enjoyment. So, savor each slice and share it with loved ones. After all, food is best when it’s shared!
Frequently Asked Questions about Herbed Garlic Butter Bread
As I’ve shared my love for Herbed Garlic Butter Bread, I’ve often received questions from fellow home cooks eager to try their hand at this delightful recipe. Here are some of the most common queries I’ve encountered, along with my answers to help you on your baking journey!
Can I use whole wheat flour instead of all-purpose flour?
Absolutely! Whole wheat flour can add a nutty flavor and extra fiber to your bread. However, it may result in a denser loaf. I recommend using a mix of all-purpose and whole wheat flour for the best texture. Start with a 50/50 ratio and adjust based on your preference.
How do I store leftover bread?
If you have any leftovers (which is rare in my house!), store the bread in an airtight container at room temperature for up to 2 days. For longer storage, wrap it tightly in plastic wrap and freeze it. When you’re ready to enjoy it again, just pop it in the oven for a few minutes to warm it up!
Can I make this bread ahead of time?
Yes! You can prepare the dough and let it rise, then shape it and refrigerate it overnight. Just remember to bring it back to room temperature before baking. This method can enhance the flavor, giving your bread a delightful depth!
What can I substitute for fresh herbs?
If you don’t have fresh herbs on hand, dried herbs work just fine! Use about one-third of the amount of dried herbs compared to fresh. For example, if the recipe calls for 1 tablespoon of fresh parsley, use 1 teaspoon of dried parsley instead. Just keep in mind that the flavor may be slightly less vibrant.
Can I add cheese to the bread?
Definitely! Adding cheese can elevate your Herbed Garlic Butter Bread to a whole new level. I love mixing in shredded cheese like mozzarella or cheddar into the herbed garlic butter before spreading it on the dough. It creates a gooey, cheesy delight that’s hard to resist!
What if my dough doesn’t rise?
If your dough doesn’t rise, it could be due to inactive yeast. Make sure your yeast is fresh and that the water temperature is just right—too hot can kill the yeast, while too cold can slow it down. If your dough doesn’t rise, don’t be discouraged! You can still bake it; it will just be denser.
These FAQs are just a glimpse into the wonderful world of Herbed Garlic Butter Bread. I hope they help you feel more confident as you embark on your baking adventure. Remember, every loaf is a chance to learn and create something delicious. Happy baking!
Conclusion on Herbed Garlic Butter Bread
As I wrap up this delightful journey into the world of Herbed Garlic Butter Bread, I can’t help but reflect on the magic that happens when simple ingredients come together. This bread is more than just a recipe; it’s an experience that fills your kitchen with warmth and your heart with joy. The combination of fresh herbs and rich garlic butter creates a flavor explosion that elevates any meal.
What I love most about this bread is its versatility. Whether you’re serving it alongside a comforting soup, enjoying it as a snack, or impressing guests at a dinner party, Herbed Garlic Butter Bread never fails to delight. Plus, the process of making it is a wonderful way to connect with your culinary creativity. Each loaf is a canvas for your imagination, allowing you to experiment with flavors and textures.
So, I encourage you to roll up your sleeves and give this recipe a try. Embrace the process, savor the aromas, and enjoy the delicious results. I promise that once you take that first warm, buttery bite, you’ll understand why this bread has a special place in my heart. Happy baking, and may your kitchen always be filled with the delightful scent of freshly baked bread!


