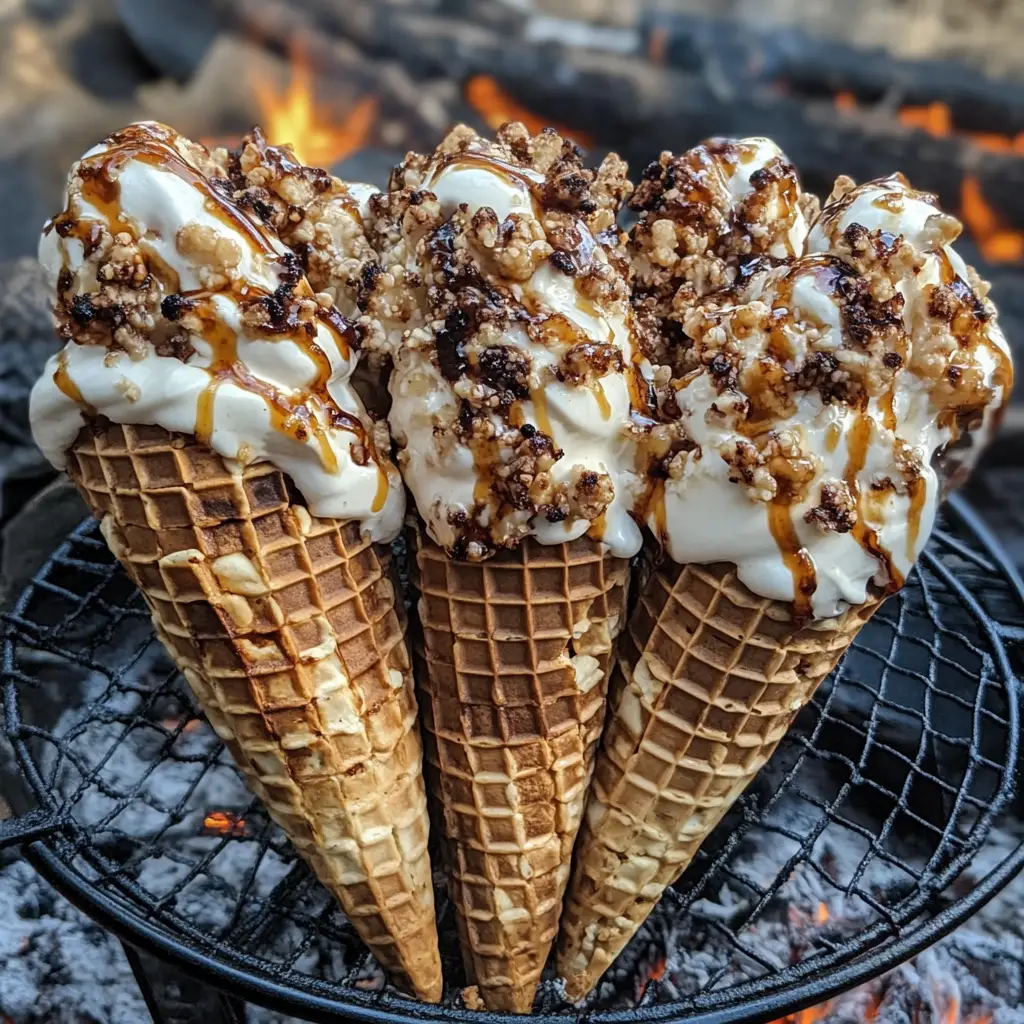
Introduction to Campfire Cones Recipe
As a passionate home cook, I find joy in creating delicious memories around the campfire. There’s something magical about gathering with friends and family, sharing stories, and indulging in sweet treats under the stars. One of my favorite campfire delights is the Campfire Cones Recipe. This delightful dessert is not just a treat; it’s an experience that brings everyone together.
Picture this: the sun sets, casting a warm glow over the campsite. The crackling fire dances, and the air is filled with laughter. I remember the first time I made campfire cones. It was a spontaneous decision during a weekend getaway. I had a few ingredients on hand, and with a little creativity, I transformed them into a fun and tasty dessert. The kids were thrilled, and even the adults couldn’t resist the gooey goodness!
What I love most about campfire cones is their versatility. You can customize them to suit your taste buds. Whether you prefer chocolate, fruit, or a mix of both, the possibilities are endless. Plus, they’re incredibly easy to make, which means more time enjoying the great outdoors and less time fussing in the kitchen.
In this article, I’ll guide you through the simple steps to create your own campfire cones. I’ll share my favorite ingredients, tips for perfecting the recipe, and even some fun variations to try. So, grab your ingredients, gather your loved ones, and let’s embark on this delicious culinary adventure together!
Ingredients for Campfire Cones Recipe
Before we dive into the fun of making campfire cones, let’s gather our ingredients. I always believe that the best dishes start with quality ingredients. For this recipe, you’ll need a few essentials, along with some optional add-ons to make your cones truly unique. Here’s what you’ll need:
Main Ingredients
- Waffle cones: 4-6 cones (the sturdier, the better!)
- Chocolate chips: 1 cup (I love using semi-sweet, but feel free to mix it up with dark or milk chocolate!)
- Mini marshmallows: 1 cup (these add that gooey, melty goodness that makes campfire treats so special)
- Fresh fruit: 1 cup (sliced strawberries, bananas, or even blueberries work wonders)
- Peanut butter or Nutella: ½ cup (optional, but oh-so-delicious for a creamy layer)
Optional Add-ons
- Granola: ½ cup (for a crunchy texture that pairs beautifully with the soft ingredients)
- Coconut flakes: ¼ cup (adds a tropical twist that I can’t resist)
- Chopped nuts: ¼ cup (almonds or walnuts add a nice crunch)
- Caramel or chocolate sauce: for drizzling (because who doesn’t love a little extra sweetness?)
When it comes to sourcing your ingredients, I recommend visiting local farmers’ markets for fresh fruit. Not only does it support local growers, but the flavor is often unbeatable! For the chocolate and other pantry staples, I always opt for high-quality brands. Trust me, it makes a difference in the final taste of your campfire cones.
Now that we have our ingredients ready, let’s move on to the fun part—preparing these delightful treats!
How to Prepare Campfire Cones Recipe
Now that we have our ingredients ready, it’s time to roll up our sleeves and dive into the preparation of these scrumptious campfire cones! I promise, the process is as enjoyable as the final treat. Let’s get started!
Step 1: Gather Your Ingredients and Equipment
First things first, let’s make sure we have everything we need. Gather your ingredients and the necessary equipment. You’ll need:
- Your ingredients from the previous section
- Aluminum foil (heavy-duty works best)
- A campfire or grill
- Long skewers or a grilling basket (optional, but helpful for cooking)
Tips for Choosing Ingredients
When selecting your ingredients, freshness is key! Choose ripe fruits that are bursting with flavor. For chocolate, I always go for high-quality brands. It truly elevates the taste of your campfire cones. And don’t forget to check the expiration dates on your marshmallows and peanut butter!
Step 2: Assemble the Campfire Cones
Now comes the fun part—assembling your cones! Take a waffle cone and start layering your ingredients. Here’s how I like to do it:
- Start with a layer of chocolate chips at the bottom.
- Add a handful of mini marshmallows.
- Next, toss in some fresh fruit slices.
- If you’re using peanut butter or Nutella, spread a layer on top.
- Repeat the layers until the cone is filled, leaving a little space at the top.
Tips for Layering Ingredients
Don’t be shy with your ingredients! The more, the merrier. Just make sure not to overfill the cone, or it might spill out while cooking. I like to mix and match flavors, so feel free to get creative with your combinations!
Step 3: Wrap the Cones in Foil
Once your cones are assembled, it’s time to wrap them up. Take a piece of aluminum foil and place the cone in the center. Fold the foil around the cone, making sure it’s tightly sealed.
Tips for Wrapping Properly
Make sure the foil is snug but not too tight. You want to create a pocket that allows the heat to circulate while keeping the deliciousness inside. I usually double-wrap mine for extra protection against the flames!
Step 4: Cook Over the Campfire
Now, it’s time to cook those delightful cones! Place your wrapped cones near the edge of the campfire or on a grill. Avoid direct flames to prevent burning.
Tips for Cooking Time and Heat Control
Cook the cones for about 5-10 minutes, turning them occasionally. Keep an eye on them to ensure they don’t burn. You’ll know they’re ready when the chocolate and marshmallows are gooey and melty. The aroma wafting through the air will be your best indicator!
And there you have it! The preparation of campfire cones is simple and fun. I can’t wait for you to experience the joy of making these delightful treats. Next up, let’s talk about the equipment you’ll need to make this process even smoother!
Equipment Needed for Campfire Cones Recipe
Before we dive into the deliciousness of campfire cones, let’s make sure we have the right tools at our disposal. While this recipe is quite forgiving, having the right equipment can make the process smoother and more enjoyable. Here’s what you’ll need:
- Aluminum foil: Heavy-duty foil is best for wrapping your cones. If you don’t have heavy-duty, regular foil will work, but you might need to double-wrap for extra protection.
- Long skewers or grilling basket: These are optional but can be very helpful. Skewers allow you to hold the cones over the fire without burning your hands, while a grilling basket can keep them secure.
- Campfire or grill: A good campfire is essential for that smoky flavor. If you’re at home, a grill will do just fine!
- Heat-resistant gloves: These are a great safety addition. They protect your hands when handling hot cones or foil.
If you don’t have skewers, don’t worry! You can simply place the wrapped cones directly on the grill or near the campfire. Just be cautious and use tongs to turn them. The goal is to keep it simple and fun, so use what you have on hand!
With your equipment ready, we’re one step closer to enjoying those scrumptious campfire cones. Let’s move on to the exciting variations you can try!
Variations of Campfire Cones Recipe
One of the best things about campfire cones is their versatility! You can easily switch up the ingredients to create a whole new flavor experience. I love experimenting with different combinations, and I’m excited to share a few of my favorite variations with you!
- Berry Bliss: Swap out the chocolate chips for a mix of fresh berries like raspberries, blueberries, and blackberries. Add a sprinkle of granola for crunch and a drizzle of honey for sweetness.
- Peanut Butter Cup: Layer in peanut butter chips instead of chocolate, and add sliced bananas. This combination is a real treat for peanut butter lovers!
- Caramel Delight: Use caramel sauce instead of chocolate. Add chopped apples and a sprinkle of cinnamon for a cozy fall-inspired treat.
- Minty Fresh: Mix in some crushed peppermint candies with chocolate chips and mini marshmallows for a refreshing twist. This is perfect for the holiday season!
Feel free to get creative! The beauty of campfire cones is that you can tailor them to your taste. Whether you’re in the mood for fruity, nutty, or chocolatey flavors, there’s a combination waiting for you to discover. So, gather your ingredients and let your imagination run wild!
Cooking Notes for Campfire Cones Recipe
As I’ve learned from my own culinary adventures, a few cooking notes can make all the difference when it comes to perfecting your campfire cones. Here are some tips that I’ve gathered over the years to ensure your cones turn out delicious every time:
- Watch the Heat: Campfires can vary in temperature. If your fire is too hot, it can burn the cones quickly. I recommend cooking them on the edge of the fire where the heat is gentler.
- Check for Melting: Keep an eye on your cones as they cook. The goal is to achieve that gooey, melty goodness without turning them into a charred mess. The smell of melting chocolate and marshmallows is a sure sign you’re on the right track!
- Experiment with Cooking Times: Depending on your fire’s intensity, cooking times may vary. I usually start checking my cones around the 5-minute mark. If they need more time, I’ll give them a few extra minutes while keeping a close watch.
- Let Them Cool: Once you remove the cones from the fire, let them sit for a minute before unwrapping. This allows the heat to settle and makes it easier to enjoy without burning your fingers!
These cooking notes are like little nuggets of wisdom I’ve picked up along the way. They help me create the perfect campfire cones every time, and I hope they do the same for you. Now, let’s move on to serving suggestions that will elevate your campfire experience even further!
Serving Suggestions for Campfire Cones Recipe
Once your campfire cones are perfectly cooked and ready to be devoured, it’s time to think about how to serve them! I love to make the experience even more special with a few simple touches. Here are some of my favorite serving suggestions that will have everyone coming back for seconds:
- Serve with Ice Cream: A scoop of vanilla or chocolate ice cream on the side takes your campfire cones to the next level. The cold creaminess pairs beautifully with the warm, gooey filling.
- Drizzle with Sauce: After unwrapping your cones, drizzle them with caramel or chocolate sauce for an extra layer of sweetness. It’s like a cherry on top, but even better!
- Garnish with Fresh Mint: A sprig of fresh mint adds a pop of color and a refreshing flavor. It’s a simple touch that elevates the presentation.
- Pair with Hot Beverages: Serve your cones alongside hot chocolate or spiced cider. The warmth of the drink complements the sweet treat perfectly, making it a cozy experience.
These serving suggestions not only enhance the flavor but also create a delightful atmosphere around the campfire. I always find that sharing food is about more than just taste; it’s about the memories we create together. So, gather your loved ones, serve up those campfire cones, and enjoy the sweet moments that follow!
Tips for Perfecting Your Campfire Cones Recipe
As I’ve enjoyed making campfire cones over the years, I’ve picked up a few tips that can truly elevate your experience. These little nuggets of wisdom can help you create the most delicious and memorable cones. Here’s what I’ve learned:
- Choose the Right Cone: Opt for sturdy waffle cones. They hold up better against the heat and keep your ingredients from spilling out. Trust me, a broken cone can lead to a messy situation!
- Layer Wisely: When assembling your cones, think about balance. I like to alternate between soft and crunchy ingredients. This creates a delightful texture that keeps every bite interesting.
- Don’t Rush the Cooking: Patience is key! Cooking your cones slowly over a gentle heat allows the chocolate and marshmallows to melt perfectly. If you rush it, you might end up with burnt edges and unmelted centers.
- Experiment with Flavors: Don’t be afraid to mix and match ingredients! Try adding spices like cinnamon or nutmeg for a warm twist. The more adventurous you are, the more fun you’ll have!
- Enjoy the Process: Lastly, remember that cooking is about joy and connection. Gather your friends and family, share stories, and savor the moments. The best campfire cones are made with love and laughter!
With these tips in your back pocket, you’re all set to create the perfect campfire cones. I can’t wait for you to experience the joy of making and sharing these delightful treats. Now, let’s move on to the breakdown of time for this delicious recipe!
Breakdown of Time for Campfire Cones Recipe
Now that we’ve covered all the delicious details, let’s talk about the time it takes to whip up these delightful campfire cones. I always find it helpful to know how long each step will take, especially when I’m planning a fun evening around the fire. Here’s a quick breakdown:
- Prep Time: 15 minutes
- Cooking Time: 5-10 minutes
- Total Time: 20-25 minutes
In just about 20 to 25 minutes, you can have these scrumptious treats ready to enjoy! The prep time includes gathering your ingredients, assembling the cones, and wrapping them in foil. The cooking time varies depending on your campfire’s heat, but I usually find that 5 to 10 minutes is just right for that gooey perfection.
So, gather your loved ones, set up your campfire, and get ready to indulge in a sweet treat that’s worth every minute spent preparing it. I promise, the smiles and laughter that follow will make it all worthwhile!
Nutritional Information for Campfire Cones Recipe
As a passionate home cook, I always find it important to be mindful of what goes into our delicious creations. While campfire cones are a delightful treat, they do come with some nutritional considerations. Here’s a general breakdown of the nutritional information for one campfire cone, based on the main ingredients:
- Calories: Approximately 250-300 calories
- Protein: 4-6 grams
- Carbohydrates: 40-45 grams
- Fat: 10-15 grams
- Sugar: 15-20 grams
Keep in mind that these values can vary based on the specific ingredients you choose. For instance, using dark chocolate or adding nuts can increase the protein and healthy fat content. If you’re looking to lighten things up, consider using less chocolate or opting for fresh fruit as the main filling.
Ultimately, campfire cones are meant to be enjoyed as a special treat. I believe that balance is key in any diet, and indulging in these sweet delights can be a wonderful way to create lasting memories with loved ones. So, savor every bite and enjoy the experience of making and sharing these delightful cones!
Frequently Asked Questions about Campfire Cones Recipe
As I’ve shared my love for campfire cones, I often get questions from fellow cooking enthusiasts eager to try this delightful treat. I love answering these questions because it shows just how much excitement there is around this fun dessert! Here are some of the most frequently asked questions I receive, along with my personal insights:
Can I make campfire cones ahead of time?
Absolutely! You can prepare the cones in advance and wrap them in foil. Just store them in a cool place until you’re ready to cook them over the fire. This is a great way to save time and keep the fun going when you’re out camping!
What if I don’t have a campfire? Can I use an oven?
Yes, you can! If you’re at home and don’t have a campfire, you can bake your wrapped cones in the oven at 350°F (175°C) for about 10-15 minutes. Just keep an eye on them to ensure they don’t burn. The oven will give you that warm, gooey goodness, too!
Can I use different types of cones?
Definitely! While waffle cones are my favorite for their sturdiness, you can also use sugar cones or even homemade cones if you’re feeling adventurous. Just make sure whatever cone you choose can hold up to the heat and ingredients.
What are some good fruit options for campfire cones?
Fresh fruit is a fantastic addition! I love using strawberries, bananas, and apples, but you can also try peaches, raspberries, or even pineapple. Just make sure to slice them small enough to fit into the cone easily!
How do I store leftover campfire cones?
If you happen to have any leftovers (which is rare in my experience!), you can store them in an airtight container in the fridge for a day or two. Just remember that the cones may lose some of their crunchiness, but they’ll still be delicious!
These questions reflect the curiosity and creativity that come with making campfire cones. I hope my answers inspire you to gather your ingredients and start your own campfire adventure. Remember, cooking is all about experimenting and having fun, so don’t hesitate to make this recipe your own!
Conclusion on Campfire Cones Recipe
As I reflect on my culinary journey with campfire cones, I can’t help but smile at the memories created around the fire. This delightful recipe is more than just a sweet treat; it’s a celebration of togetherness, creativity, and the joy of cooking outdoors. The beauty of campfire cones lies in their versatility, allowing you to mix and match flavors to suit your taste buds. Whether you’re camping under the stars or enjoying a backyard bonfire, these cones bring a sense of adventure to any gathering.
Not only are they easy to prepare, but they also invite everyone to participate in the fun of assembling their own unique creations. The gooey chocolate, melted marshmallows, and fresh fruit come together in a warm, crunchy cone that’s simply irresistible. Plus, the cooking process itself is a delightful experience, filled with laughter and the comforting crackle of the fire.
So, gather your loved ones, embrace the spirit of adventure, and dive into the world of campfire cones. I promise that each bite will be a sweet reminder of the joy of sharing food and creating lasting memories together. Happy cooking, and may your campfire cones be as delicious as the moments you share!


