Introduction to Butterfinger Balls Recipe
Ah, Butterfinger Balls! Just the name makes my mouth water. I remember the first time I stumbled upon this delightful treat. It was during a family gathering, and my aunt had brought a platter of these golden, chocolate-covered wonders. The moment I took a bite, I was transported to a world of crunchy peanut butter bliss, wrapped in a sweet chocolate hug. It was love at first taste!
As a passionate home cook, I find joy in recreating those nostalgic flavors in my own kitchen. The Butterfinger Balls recipe is not just a dessert; it’s a celebration of simple ingredients that come together to create something magical. With just a handful of items, you can whip up these delicious bites that are perfect for any occasion—be it a birthday party, a holiday gathering, or just a cozy night in with a movie.
What I love most about this recipe is its simplicity. You don’t need to be a master chef to impress your friends and family. In fact, I often involve my kids in the process. They love crushing the Butterfinger bars and rolling the mixture into balls. It’s a fun activity that brings us together, and the best part? We get to enjoy the sweet rewards of our labor afterward!
So, if you’re ready to embark on a culinary adventure that’s as easy as pie (or should I say, as easy as Butterfinger Balls?), grab your apron and let’s dive into this delightful recipe. Trust me, once you make these, they’ll become a staple in your dessert repertoire. Let’s get started!
Ingredients for Butterfinger Balls Recipe
Before we dive into the fun of making Butterfinger Balls, let’s gather our ingredients. This recipe is all about simplicity, and I love how just a few key items can create such a delightful treat. Here’s what you’ll need:
Main Ingredients
- 4 Butterfinger bars (fun-sized or regular, depending on your preference)
- 1 cup creamy peanut butter
- 2 cups powdered sugar
- 1 cup chocolate chips (milk chocolate or dark chocolate, your choice)
- 1 tablespoon coconut oil (optional, for a smoother chocolate coating)
When choosing your Butterfinger bars, I recommend going for the fun-sized ones if you want bite-sized treats. They’re easier to crush and mix! As for the peanut butter, I always opt for a creamy variety. It blends beautifully with the crushed bars, creating that luscious texture we all love. And don’t skimp on the powdered sugar; it’s what gives these balls their sweetness and helps bind everything together.
Optional Add-ons
- Chopped nuts (like peanuts or almonds, for added crunch)
- Sprinkles (to make them festive for parties)
- Sea salt (a sprinkle on top for a sweet and salty combo)
Feel free to get creative with your Butterfinger Balls! Sometimes, I toss in a handful of chopped nuts for an extra crunch. If I’m feeling festive, I’ll add colorful sprinkles on top before the chocolate sets. And let me tell you, a sprinkle of sea salt can elevate the flavor to a whole new level. It’s like a little surprise with every bite!
Now that we have our ingredients ready, let’s move on to the fun part—preparing these delicious treats!
How to Prepare Butterfinger Balls Recipe
Now that we have our ingredients all lined up, it’s time to roll up our sleeves and get to the fun part—preparing the Butterfinger Balls! This process is not only simple but also incredibly satisfying. I love watching the transformation from a few basic ingredients into these delightful treats. Let’s dive into the steps!
Step 1: Crush the Butterfinger Bars
The first step is to crush those Butterfinger bars into tiny pieces. You can do this by placing them in a zip-top bag and using a rolling pin or a meat mallet. It’s a great way to release any pent-up energy!
Tips for Crushing
- Make sure to crush them into small, even pieces. This helps them mix better with the peanut butter.
- If you prefer, you can use a food processor for a quicker method. Just pulse until they resemble coarse crumbs.
Step 2: Mix Ingredients
Once your Butterfinger bars are crushed, it’s time to mix them with the peanut butter and powdered sugar. In a large bowl, combine the crushed bars, peanut butter, and powdered sugar. I like to use a spatula to fold everything together until it’s well combined.
Tips for Mixing
- Don’t be afraid to get your hands in there! Sometimes, using your hands is the best way to ensure everything is mixed evenly.
- If the mixture feels too dry, add a little more peanut butter. If it’s too sticky, sprinkle in a bit more powdered sugar.
Step 3: Form the Balls
Now comes the fun part—shaping the mixture into balls! I like to use a small cookie scoop to get even portions. Roll each portion between your palms until they’re nice and round.
Tips for Shaping
- Keep your hands slightly damp to prevent the mixture from sticking to your palms.
- Try to make them uniform in size for even coating later on. About 1 inch in diameter works perfectly!
Step 4: Chill the Balls
After shaping, it’s important to chill the balls in the refrigerator for about 30 minutes. This helps them firm up, making them easier to coat in chocolate.
Tips for Chilling
- Place them on a parchment-lined baking sheet to avoid sticking.
- If you’re in a hurry, you can pop them in the freezer for about 15 minutes instead.
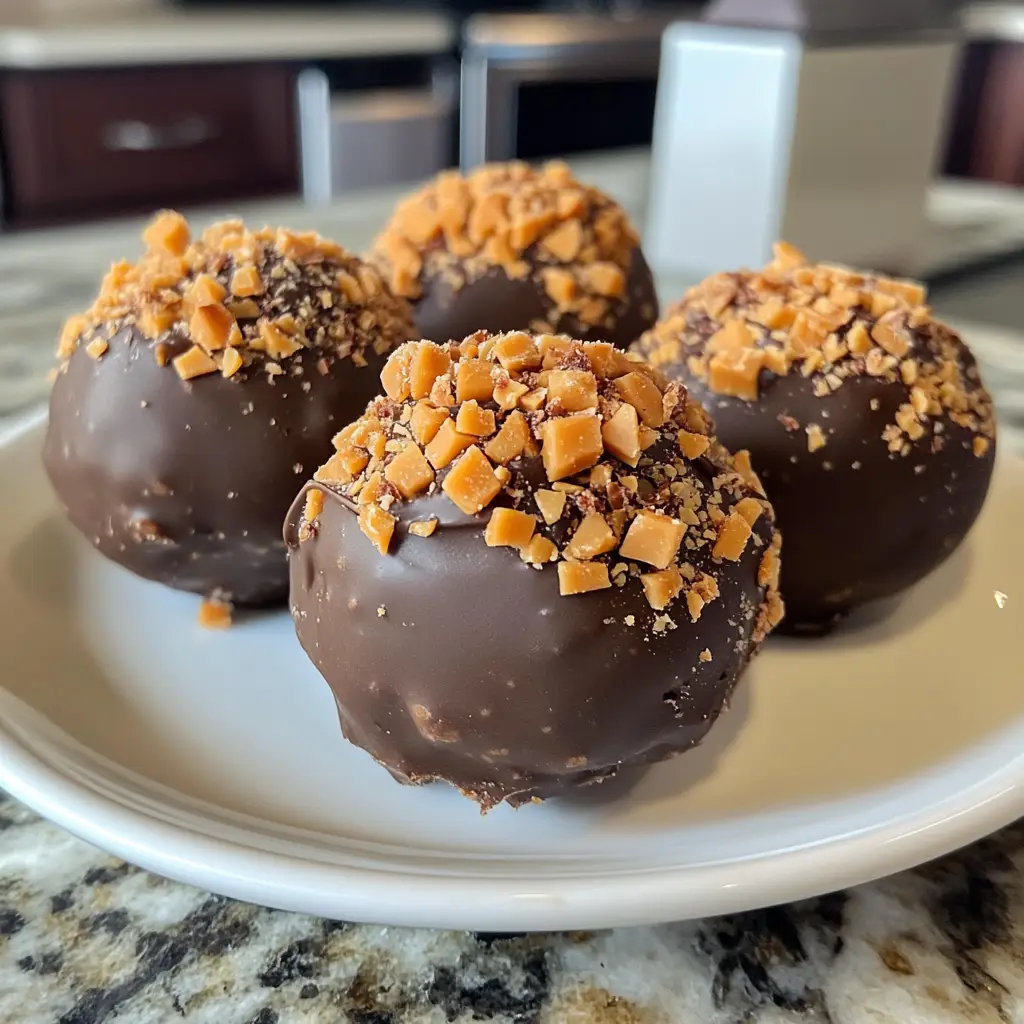
Step 5: Coat with Chocolate
Finally, it’s time to coat our chilled balls in chocolate! Melt the chocolate chips in a microwave-safe bowl, stirring every 30 seconds until smooth. Then, dip each ball into the melted chocolate, ensuring they’re fully coated.
Tips for Coating
- Use a fork to lift the balls out of the chocolate, allowing any excess to drip off.
- If you’re using coconut oil, mix it with the chocolate before melting. This gives a nice sheen and smoother texture.
Once coated, place the chocolate-covered balls back on the parchment paper and let them set. You can even sprinkle some chopped nuts or sea salt on top before the chocolate hardens for an extra touch!
And there you have it! The steps to create your very own Butterfinger Balls. I can already smell the sweet aroma wafting through my kitchen. Let’s move on to the next section and see what equipment we’ll need for this delightful recipe!
Equipment Needed for Butterfinger Balls Recipe
Before we dive into the kitchen, let’s make sure we have all the right tools at our fingertips. The beauty of the Butterfinger Balls recipe is that it doesn’t require fancy equipment. Just a few basic items will do the trick! Here’s what you’ll need:
- Mixing Bowl: A large bowl is essential for mixing all those delicious ingredients together. I often use a glass bowl because it’s easy to see the mixture and clean up afterward.
- Spatula: A sturdy spatula helps combine the ingredients thoroughly. If you have a silicone spatula, it’s perfect for scraping down the sides of the bowl.
- Cookie Scoop: This handy tool makes it easy to portion out the mixture into uniform balls. If you don’t have one, you can use your hands, but the scoop ensures even sizes.
- Parchment Paper: Line your baking sheet with parchment paper to prevent sticking. It makes cleanup a breeze, too!
- Microwave-Safe Bowl: You’ll need this for melting the chocolate. If you prefer, you can use a double boiler on the stove instead.
- Zip-Top Bag or Food Processor: For crushing the Butterfinger bars, a zip-top bag and a rolling pin work well. Alternatively, a food processor can save time and effort.
With these tools in hand, you’re all set to create your Butterfinger Balls! I love how simple it is to gather everything. Now, let’s move on to the variations of this delightful recipe!
Variations of Butterfinger Balls Recipe
While the classic Butterfinger Balls are absolutely delicious on their own, I love to experiment with different variations to keep things exciting! Here are a few fun twists you can try:
- Chocolate Drizzle: After coating the balls in chocolate, melt some white chocolate and drizzle it over the top. It adds a beautiful contrast and a touch of elegance!
- Peanut Butter Swirl: For peanut butter lovers, mix in a bit of crunchy peanut butter with the creamy variety. It gives a delightful texture and an extra peanutty flavor.
- Minty Fresh: Add a few drops of peppermint extract to the mixture for a refreshing minty twist. It’s perfect for the holiday season!
- Cookie Crumble: Crush up some chocolate cookies and mix them into the Butterfinger mixture. It adds a delightful crunch and a rich chocolate flavor.
- Fruit Fusion: Incorporate dried fruits like cranberries or cherries for a sweet and tangy surprise in every bite. It’s a great way to add a pop of color, too!
These variations not only keep the recipe fresh but also allow you to cater to different tastes and preferences. I often find that trying something new can lead to delightful surprises in the kitchen. So, don’t hesitate to get creative and make these Butterfinger Balls your own!
Cooking Notes for Butterfinger Balls Recipe
As I’ve whipped up these delightful Butterfinger Balls time and time again, I’ve gathered a few cooking notes that can help you achieve the best results. These little tips can make a big difference in your final product!
- Room Temperature Ingredients: Make sure your peanut butter is at room temperature. It mixes more easily with the crushed Butterfinger bars, creating a smoother texture.
- Chilling Time: Don’t rush the chilling process! Allowing the balls to chill properly helps them hold their shape when you coat them in chocolate.
- Chocolate Melting: When melting chocolate, be patient. Stirring every 30 seconds prevents it from burning and ensures a silky smooth finish.
- Storage: Store your Butterfinger Balls in an airtight container in the fridge. They’ll stay fresh for up to a week, but I doubt they’ll last that long!
- Make Ahead: You can prepare the mixture a day in advance and chill it overnight. Just shape and coat them the next day for a quick treat!
These cooking notes are like little nuggets of wisdom I’ve picked up along the way. They help me create the perfect Butterfinger Balls every time, and I hope they do the same for you! Now, let’s move on to how to serve these delicious treats!
Serving Suggestions for Butterfinger Balls Recipe
Now that we’ve created these delightful Butterfinger Balls, it’s time to think about how to serve them! Presentation can elevate any dish, and these treats are no exception. Here are some of my favorite serving suggestions that will make your Butterfinger Balls shine:
- On a Platter: Arrange the Butterfinger Balls on a decorative platter. You can even add some colorful sprinkles or chopped nuts around them for a festive touch. It’s like a party on a plate!
- In Mini Cupcake Liners: Place each ball in a mini cupcake liner. This not only makes them look adorable but also makes it easy for guests to grab one (or two!).
- With a Dipping Sauce: Serve them alongside a warm chocolate or caramel sauce for dipping. It adds an interactive element to your dessert and makes it even more indulgent!
- As Party Favors: Package a few Butterfinger Balls in clear bags tied with a ribbon. They make delightful party favors that your guests will love to take home.
- With Fresh Fruit: Pair the balls with fresh fruit like strawberries or banana slices. The fruity freshness balances the sweetness of the Butterfinger Balls beautifully.
These serving suggestions not only enhance the visual appeal but also create a delightful experience for everyone enjoying these treats. I love how a little creativity can turn a simple dessert into a showstopper! So, whether it’s a family gathering or a casual movie night, these Butterfinger Balls are sure to impress. Now, let’s move on to some tips for making them even better!
Tips for Making Butterfinger Balls Recipe
As I’ve crafted these Butterfinger Balls over the years, I’ve picked up a few handy tips that can make your experience even smoother and more enjoyable. Here are my top suggestions to ensure your treats turn out perfectly every time:
- Use Quality Ingredients: The better the ingredients, the better the flavor! Opt for high-quality chocolate and fresh Butterfinger bars for the best results.
- Don’t Overmix: When combining the ingredients, mix just until everything is incorporated. Overmixing can lead to a denser texture, and we want these balls to be light and delightful!
- Experiment with Coatings: While chocolate is the classic choice, consider using white chocolate or even colored candy melts for a fun twist. It adds a pop of color and flavor!
- Chill Between Steps: If you find the mixture getting too soft while shaping, pop it back in the fridge for a few minutes. This makes it easier to handle and shape into perfect balls.
- Get Creative with Toppings: After coating, sprinkle on crushed Butterfinger pieces, nuts, or even a drizzle of caramel for an extra layer of flavor and texture.
These tips have helped me elevate my Butterfinger Balls to new heights, and I hope they do the same for you! Remember, cooking is all about having fun and experimenting, so don’t hesitate to make this recipe your own. Now, let’s take a look at the time breakdown for making these delicious treats!
Breakdown of Time for Butterfinger Balls Recipe
Now that we’ve covered all the delicious details of making Butterfinger Balls, let’s talk about the time it takes to whip up these delightful treats. I always find it helpful to have a clear idea of the time commitment before diving into a recipe. Here’s how the timing breaks down:
- Prep Time: 15 minutes. This includes gathering your ingredients, crushing the Butterfinger bars, and mixing everything together. It’s a quick and fun process!
- Chilling Time: 30 minutes. This step is crucial for firming up the mixture, making it easier to shape and coat. Patience is key here!
- Coating Time: 15 minutes. Melting the chocolate and coating the balls takes just a little time, but it’s oh-so-worth it for that delicious finish.
Total Time: 1 hour. In just one hour, you can create a batch of these scrumptious Butterfinger Balls that will have everyone asking for seconds!
Knowing the time breakdown helps me plan my cooking sessions better, especially when I’m preparing for a gathering. Plus, it’s always nice to know that such a delightful treat can come together in under an hour. So, let’s keep the momentum going and check out the nutritional information for these tasty bites!
Nutritional Information for Butterfinger Balls Recipe
As a passionate home cook, I always find it helpful to know the nutritional information of the treats I make. It allows me to enjoy them mindfully while sharing them with family and friends. Here’s a quick breakdown of the nutritional content for one Butterfinger Ball, assuming you make about 20 balls from the recipe:
- Calories: Approximately 120 calories
- Fat: 6g (Saturated Fat: 3g)
- Carbohydrates: 15g (Sugars: 10g)
- Protein: 2g
- Sodium: 50mg
Keep in mind that these values can vary based on the specific brands of ingredients you use. If you decide to add optional ingredients like nuts or sprinkles, the nutritional content will change accordingly. I always encourage balance, so enjoy these Butterfinger Balls as a sweet treat in moderation!
Now that we’ve covered the nutritional side, let’s move on to some frequently asked questions about this delightful recipe!
Frequently Asked Questions about Butterfinger Balls Recipe
As I’ve shared my Butterfinger Balls recipe with friends and family, I’ve noticed a few common questions pop up. It’s always great to clarify any doubts, especially when it comes to creating these delicious treats. Here are some FAQs that might help you on your Butterfinger journey:
Can I use crunchy peanut butter instead of creamy?
Absolutely! Using crunchy peanut butter will add a delightful texture to your Butterfinger Balls. Just keep in mind that it may change the overall consistency slightly, but it will still taste amazing!
How long do Butterfinger Balls last?
When stored in an airtight container in the fridge, these treats can last up to a week. However, I doubt they’ll stick around that long—they’re just too delicious!
Can I freeze Butterfinger Balls?
Yes, you can freeze them! Just make sure to place them in a single layer on a baking sheet until frozen, then transfer them to an airtight container. They can last for up to three months in the freezer.
What can I use instead of chocolate chips for coating?
If you want to switch things up, you can use white chocolate, colored candy melts, or even yogurt-covered coating. Each option brings a unique flavor and look to your Butterfinger Balls!
Can I make these without Butterfinger bars?
While Butterfinger bars are the star of this recipe, you can experiment with other candy bars like Reese’s or Snickers for a different flavor profile. Just remember, it won’t be the classic Butterfinger experience!
These FAQs should help clear up any questions you might have as you embark on your Butterfinger Balls adventure. Now, let’s wrap things up with a sweet conclusion!
Conclusion on Butterfinger Balls Recipe
As we wrap up our delightful journey into the world of Butterfinger Balls, I can’t help but feel a sense of joy and satisfaction. This recipe is more than just a sweet treat; it’s a way to create memories in the kitchen with loved ones. Whether you’re making them for a special occasion or just to satisfy a sweet tooth, these little bites of heaven are sure to bring smiles all around.
What I love most about Butterfinger Balls is their versatility. You can customize them to fit any occasion, from festive holiday gatherings to casual movie nights. Plus, they’re incredibly easy to make, which means you can whip up a batch in no time. I often find myself making them on a whim, and they never fail to impress!
So, if you’re looking for a fun and delicious recipe to add to your dessert repertoire, look no further. Grab those Butterfinger bars, gather your ingredients, and let the magic happen. I promise you, once you take that first bite, you’ll be hooked. Happy cooking, and may your Butterfinger Balls be as delightful as the memories you create while making them!
Conclusion on Butterfinger Balls Recipe
As we come to the end of our delicious adventure with Butterfinger Balls, I can’t help but smile at the thought of all the joy these treats can bring. This recipe is not just about satisfying a sweet tooth; it’s about creating moments of happiness in the kitchen. Whether you’re whipping them up for a birthday party, a holiday gathering, or simply for a cozy night in, these delightful bites are sure to impress.
What makes Butterfinger Balls so appealing is their simplicity and versatility. With just a handful of ingredients, you can create a dessert that’s both fun to make and even more fun to eat. Plus, the opportunity to customize them with different toppings or variations means you can make them your own. I love how they can be a canvas for creativity, allowing you to experiment and add your personal touch.
So, if you’re looking for a recipe that’s easy, delicious, and perfect for sharing, look no further than Butterfinger Balls. I encourage you to gather your loved ones, roll up your sleeves, and dive into this sweet adventure. Trust me, once you take that first bite, you’ll understand why these little treats have a special place in my heart. Happy cooking, and may your kitchen be filled with laughter and sweetness!


