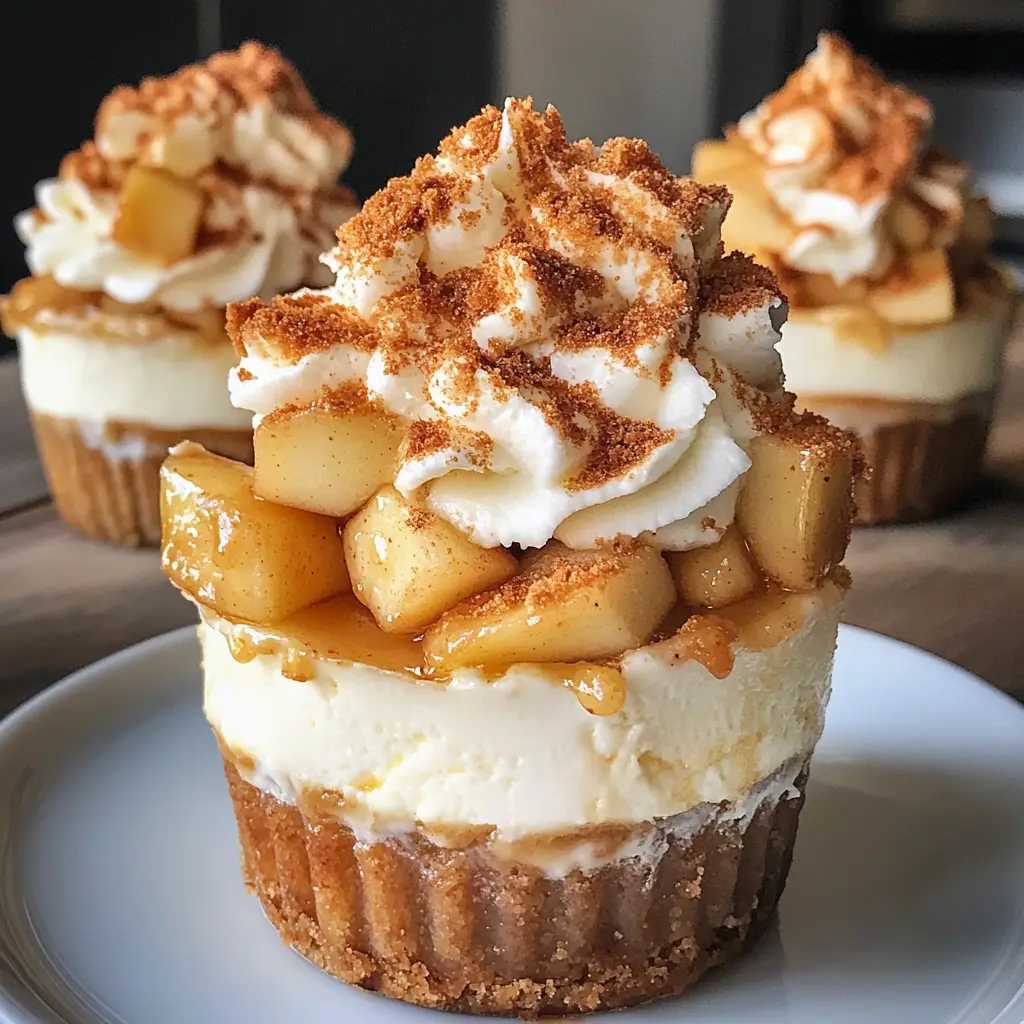
Introduction to Apple Pie Cheesecake Cups Recipe
As a passionate home cook, I find joy in creating desserts that not only taste amazing but also tell a story. One of my favorite recipes is the Apple Pie Cheesecake Cups. This delightful treat combines the warm, comforting flavors of classic apple pie with the creamy richness of cheesecake. It’s like a cozy hug in a cup!
Every time I make these cups, I’m reminded of my grandmother’s kitchen, where the sweet aroma of baked apples would fill the air. She had a way of making everything feel special, and I strive to capture that same magic in my own cooking. These Apple Pie Cheesecake Cups are perfect for gatherings, family dinners, or even a quiet night in. They’re easy to make and look so beautiful when served!
What I love most about this recipe is its versatility. You can customize it to suit your taste or the season. Whether you prefer a spicier filling with cinnamon and nutmeg or a more traditional approach, the choice is yours. Plus, they’re served in individual cups, making them a fun and elegant dessert option.
So, grab your apron and let’s dive into this delicious adventure together! I promise you’ll be amazed at how simple it is to create these delightful Apple Pie Cheesecake Cups. Your friends and family will be begging for seconds!
Ingredients for Apple Pie Cheesecake Cups Recipe
Before we embark on this delightful culinary journey, let’s gather our ingredients. Having everything prepped and ready makes the cooking process smoother and more enjoyable. Here’s what you’ll need to create these scrumptious Apple Pie Cheesecake Cups.
Main Ingredients
- 1 cup of graham cracker crumbs
- 1/4 cup of unsalted butter, melted
- 2 cups of peeled and diced apples (I love using Granny Smith for their tartness!)
- 1/2 cup of granulated sugar
- 1 teaspoon of ground cinnamon
- 1/4 teaspoon of nutmeg (optional, but it adds a lovely warmth)
- 1 tablespoon of lemon juice
- 8 ounces of cream cheese, softened
- 1/2 cup of powdered sugar
- 1 teaspoon of vanilla extract
- 1 cup of whipped cream (store-bought or homemade)
When selecting your ingredients, I recommend using fresh apples for the best flavor. Organic apples are a great choice if you can find them, as they tend to be sweeter and more flavorful. For the cream cheese, make sure it’s at room temperature; this will help create a smooth and creamy cheesecake mixture.
Optional Add-ons
- Chopped nuts (like pecans or walnuts) for added crunch
- Caramel sauce for drizzling on top
- Extra spices like allspice or ginger for a unique twist
- Chocolate chips for a decadent touch
Feel free to get creative with these optional add-ons! I often sprinkle some chopped nuts on top for a delightful crunch, or drizzle caramel sauce for that extra indulgence. The beauty of this recipe is that it can be tailored to your taste, making it a fun adventure in the kitchen!
How to Prepare Apple Pie Cheesecake Cups Recipe
Now that we have our ingredients ready, it’s time to roll up our sleeves and get cooking! Making Apple Pie Cheesecake Cups is a delightful process that fills your kitchen with wonderful aromas. I can almost smell the sweet apples and warm spices already! Let’s break it down step by step.
Step 1: Prepare the Crust
First things first, we need to create a delicious crust that will hold all the goodness together. In a mixing bowl, combine the graham cracker crumbs and melted butter. Stir until the crumbs are evenly coated and resemble wet sand.
Tips for Step 1
- For a richer flavor, try using crushed digestive biscuits instead of graham crackers.
- Press the mixture firmly into the bottom of your cups to create a sturdy base.
Step 2: Make the Apple Filling
Next, let’s whip up that scrumptious apple filling! In a saucepan over medium heat, combine the diced apples, granulated sugar, cinnamon, nutmeg, and lemon juice. Cook until the apples are tender and the mixture is bubbly, about 5-7 minutes.
Tips for Step 2
- Don’t skip the lemon juice; it brightens the flavor and keeps the apples from browning.
- Feel free to add a splash of vanilla extract for an extra layer of flavor!
Step 3: Prepare the Cheesecake Mixture
Now, let’s make the creamy cheesecake layer! In a mixing bowl, beat the softened cream cheese until smooth. Gradually add the powdered sugar and vanilla extract, mixing until well combined. Finally, fold in the whipped cream gently to keep it light and airy.
Tips for Step 3
- Make sure your cream cheese is at room temperature to avoid lumps.
- For a lighter texture, you can use whipped cream cheese instead of regular cream cheese.
Step 4: Assemble the Cups
It’s time to bring everything together! Start by spooning a layer of the crust into the bottom of each cup. Next, add a generous layer of the apple filling, followed by a layer of the cheesecake mixture. Repeat the layers until you reach the top of the cups, finishing with the cheesecake layer.
Tips for Step 4
- Use a piping bag for the cheesecake layer to create a beautiful swirl on top.
- Don’t worry about making it perfect; the rustic look adds to the charm!
Step 5: Chill and Serve
Once your cups are assembled, cover them with plastic wrap and place them in the refrigerator for at least 2 hours. This chilling time allows the flavors to meld beautifully. When you’re ready to serve, garnish with your favorite toppings!
Tips for Step 5
- For the best flavor, let them chill overnight if you can.
- Top with a sprinkle of cinnamon or a drizzle of caramel sauce just before serving for an extra treat!
Equipment Needed for Apple Pie Cheesecake Cups Recipe
Before we dive into the deliciousness of Apple Pie Cheesecake Cups, let’s make sure we have the right tools at our disposal. Having the right equipment can make the cooking process smoother and more enjoyable. Here’s what you’ll need:
- Mixing Bowls: A couple of medium-sized mixing bowls will help you combine your ingredients easily.
- Measuring Cups and Spoons: Accurate measurements are key to achieving the perfect flavor balance.
- Whisk or Electric Mixer: Use a whisk for a good workout or an electric mixer for a quick and easy cheesecake mixture.
- Saucepan: A medium saucepan is essential for cooking the apple filling to perfection.
- Cups or Glasses: Individual serving cups or glasses are perfect for showcasing your beautiful layers.
- Piping Bag (optional): If you want to create a fancy swirl with your cheesecake layer, a piping bag is a fun addition!
If you don’t have a piping bag, don’t worry! You can simply use a zip-top bag with a corner snipped off. It works just as well! With these tools in hand, you’re all set to create your delightful Apple Pie Cheesecake Cups. Let’s get cooking!
Variations of Apple Pie Cheesecake Cups Recipe
One of the things I adore about cooking is the endless possibilities for creativity. These Apple Pie Cheesecake Cups are no exception! Here are a few fun variations that can add a twist to this classic dessert:
- Berry Bliss: Swap out the apples for a mix of fresh berries like strawberries, blueberries, and raspberries. The tartness of the berries pairs beautifully with the creamy cheesecake.
- Pumpkin Spice: For a fall-inspired treat, replace the apple filling with a pumpkin puree mixture. Add pumpkin spice and a touch of maple syrup for a cozy flavor.
- Chocolate Delight: Mix in some melted chocolate into the cheesecake layer for a rich, chocolatey version. You can even add chocolate chips to the apple filling for an extra surprise!
- Nutty Crunch: Incorporate crushed nuts into the crust or sprinkle them between layers for added texture. Pecans or almonds work wonderfully here.
- Caramel Apple: Drizzle caramel sauce over the apple filling before adding the cheesecake layer. It adds a sweet, gooey element that’s simply irresistible!
These variations not only keep things exciting but also allow you to cater to different tastes and occasions. I love experimenting with these ideas, and I encourage you to do the same! Each twist brings a new flavor adventure, making your Apple Pie Cheesecake Cups even more delightful.
Cooking Notes for Apple Pie Cheesecake Cups Recipe
As I dive into the world of Apple Pie Cheesecake Cups, I’ve gathered a few cooking notes that can help elevate your dessert game. These little tips can make a big difference in your final result!
- Chill Time: Don’t rush the chilling process! Allowing the cups to chill for at least 2 hours helps the flavors meld beautifully. If you can wait overnight, even better!
- Ingredient Temperature: Ensure your cream cheese is at room temperature before mixing. This simple step prevents lumps and creates a smooth, creamy texture.
- Apple Selection: Choose firm apples like Granny Smith or Honeycrisp. They hold their shape well during cooking and provide a delightful contrast to the creamy cheesecake.
- Layering: When assembling, be generous with your layers! A good balance of crust, apple filling, and cheesecake will create a delightful bite every time.
- Storage: These cups can be stored in the refrigerator for up to 3 days. Just make sure to cover them well to keep them fresh!
With these cooking notes in mind, you’re well on your way to creating the most delicious Apple Pie Cheesecake Cups. Happy cooking!
Serving Suggestions for Apple Pie Cheesecake Cups Recipe
When it comes to serving my Apple Pie Cheesecake Cups, I love to make the presentation as delightful as the dessert itself! Here are some fun serving suggestions that can elevate your dessert experience:
- Garnish with Whipped Cream: A dollop of freshly whipped cream on top adds a light and airy touch. You can even pipe it for a fancy look!
- Sprinkle with Cinnamon: A light dusting of cinnamon or nutmeg on top not only enhances the flavor but also adds a beautiful visual appeal.
- Drizzle with Caramel Sauce: For an extra indulgent treat, drizzle some caramel sauce over the top. It adds a sweet, gooey finish that everyone will love!
- Serve with Ice Cream: Pairing these cups with a scoop of vanilla ice cream creates a delightful contrast of temperatures and textures.
- Use Fun Cups: Consider serving them in mason jars or decorative dessert cups. It adds a rustic charm that’s perfect for gatherings!
These serving suggestions not only enhance the flavor but also make your Apple Pie Cheesecake Cups a feast for the eyes. I always find that a little extra effort in presentation makes the dessert feel even more special. Enjoy sharing these delightful treats with your loved ones!
Tips for Perfecting Apple Pie Cheesecake Cups Recipe
As I’ve experimented with my Apple Pie Cheesecake Cups, I’ve gathered a few golden tips that can help you achieve dessert perfection. These little nuggets of wisdom can make all the difference in your final creation!
- Use Fresh Ingredients: Fresh apples and high-quality cream cheese elevate the flavors. I always opt for seasonal apples for the best taste!
- Don’t Overmix: When combining the cheesecake mixture, mix just until smooth. Overmixing can lead to a dense texture, and we want it light and fluffy!
- Experiment with Spices: Feel free to adjust the spices to your liking. A pinch of cardamom or a dash of ginger can add a delightful twist!
- Layer Wisely: Pay attention to your layering. A good balance of crust, apple filling, and cheesecake ensures every bite is a harmonious blend of flavors.
- Chill Thoroughly: Patience is key! Allowing the cups to chill for a longer time enhances the flavors and makes them easier to serve.
With these tips in your back pocket, you’re all set to create the most delightful Apple Pie Cheesecake Cups. Happy baking!
Breakdown of Time for Apple Pie Cheesecake Cups Recipe
As a home cook, I know that time management is key in the kitchen. When making my Apple Pie Cheesecake Cups, it’s helpful to have a clear idea of how long each step will take. Here’s a quick breakdown of the time you’ll need:
- Prep Time: Approximately 30 minutes. This includes gathering your ingredients, preparing the crust, making the apple filling, and whipping up the cheesecake mixture.
- Cooking Time: About 10 minutes. This is the time it takes to cook the apple filling on the stovetop until it’s tender and bubbly.
- Chilling Time: At least 2 hours. This step is crucial for allowing the flavors to meld and the cheesecake to set properly. If you can, chilling them overnight is even better!
- Total Time: Approximately 2 hours and 40 minutes (including chilling time). This gives you a delicious dessert that’s well worth the wait!
By keeping track of these times, you can plan your cooking session more effectively. I often find that preparing the cups in advance allows me to enjoy the moment when it’s time to serve them. Plus, the anticipation makes the first bite even sweeter!
Nutritional Information for Apple Pie Cheesecake Cups Recipe
As a passionate home cook, I believe that enjoying dessert doesn’t have to come with guilt. Understanding the nutritional information can help you savor each bite of these delightful Apple Pie Cheesecake Cups while keeping your health in mind. Here’s a general breakdown of the nutritional content per serving (based on a standard recipe yielding about 6 cups):
- Calories: Approximately 250-300 calories
- Protein: 3-4 grams
- Carbohydrates: 30-35 grams
- Fat: 15-20 grams
- Sugar: 12-15 grams
- Fiber: 1-2 grams
Keep in mind that these values can vary based on the specific ingredients you choose and any optional add-ons you include. For instance, using low-fat cream cheese or reducing the sugar can help lower the calorie count. I often find that making small adjustments allows me to enjoy my favorite treats without compromising on flavor!
So, whether you’re indulging in these cups for a special occasion or just because, knowing the nutritional information can help you make informed choices. Enjoy every delicious spoonful!
Frequently Asked Questions about Apple Pie Cheesecake Cups Recipe
As I’ve shared my love for Apple Pie Cheesecake Cups, I often get questions from fellow home cooks eager to try this delightful dessert. Here are some of the most frequently asked questions, along with my answers to help you on your culinary journey!
Can I make Apple Pie Cheesecake Cups ahead of time?
Absolutely! In fact, I recommend making them a day in advance. The chilling time allows the flavors to meld beautifully, making them even more delicious. Just cover them well and store them in the refrigerator until you’re ready to serve.
What type of apples are best for this recipe?
I love using Granny Smith apples for their tartness, which balances the sweetness of the cheesecake. However, Honeycrisp or Fuji apples also work wonderfully! Choose firm apples that hold their shape when cooked.
Can I use a different type of crust?
Yes! While graham cracker crust is a classic choice, you can experiment with other options. Try using crushed digestive biscuits, Oreo cookies, or even a nut-based crust for a gluten-free version. The possibilities are endless!
How long do these cups last in the fridge?
These Apple Pie Cheesecake Cups can be stored in the refrigerator for up to 3 days. Just make sure to cover them well to keep them fresh. I find they taste best within the first couple of days!
Can I freeze Apple Pie Cheesecake Cups?
While I recommend enjoying them fresh, you can freeze the cheesecake cups for up to a month. Just be sure to wrap them tightly in plastic wrap and then in foil. Thaw them in the refrigerator overnight before serving.
What can I use instead of cream cheese?
If you’re looking for a lighter option, you can use Greek yogurt or mascarpone cheese as a substitute. They provide a creamy texture, but keep in mind that the flavor will be slightly different. Experimenting is part of the fun!
These FAQs should help clarify any questions you might have as you embark on your Apple Pie Cheesecake Cups adventure. Remember, cooking is all about exploration and creativity, so don’t hesitate to make this recipe your own!
Conclusion on Apple Pie Cheesecake Cups Recipe
In conclusion, Apple Pie Cheesecake Cups are a delightful fusion of flavors that bring together the best of both worlds: the comforting essence of apple pie and the creamy indulgence of cheesecake. As a passionate home cook, I can confidently say that this recipe is not only easy to make but also incredibly rewarding. Each cup is a little masterpiece, perfect for sharing with family and friends or enjoying during a cozy night in.
What makes these cups truly special is their versatility. You can customize them to suit any occasion or personal taste, whether you prefer a classic apple filling or a creative twist. Plus, the individual servings add a touch of elegance to any gathering, making them a hit at parties or holiday celebrations.
So, whether you’re a seasoned baker or just starting your culinary journey, I encourage you to give these Apple Pie Cheesecake Cups a try. They’re sure to become a beloved favorite in your home, just as they have in mine. Happy cooking, and enjoy every delicious bite!


